Einleitung

Der Ohrhörer-Lautsprecher des iPhone 8 Plus dient auch als normaler Lautsprecher und sorgt für Stereoklang. Wenn dein Ohrhörer-Lautsprecher aufgibt, kannst du ihn mit Hilfe dieser Anleitung austauschen.

  1. OqdAPX1NfcxJgNbg
    • Bevor du anfängst, entlade den Akku deines iPhones auf unter 25%. Ein geladener Lithium-Ionen Akku kann Feuer fangen und/oder explodieren, wenn er versehentlich beschädigt wird.

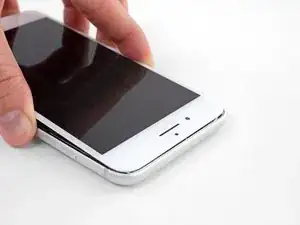
    • Schalte dein iPhone aus, bevor du daran arbeitest.

    • Wenn du ein iPhone öffnest, werden die Dichtungen des iPhones beschädigt. Halte eine Ersatzdichtung bereit, bevor du mit diesem Schritt fortfährst, oder achte darauf, dass keine Flüssigkeit eindringt, wenn du dein iPhone ohne Dichtung zusammen baust.

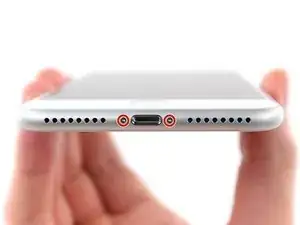
    • Drehe die beiden 3,5 mm Pentalobe Schrauben an der unteren Kante heraus.

    what do I do about super stripped screws?

    Ean Palacios -

    I’m sorry, your comment slipped past my radar earlier. For future fixers that might see this and ask the same question, you can check out our stripped screw guide for some detailed advice.

    Adam O'Camb -

    Do you need a toolkit like the essential toolkit

    Adam Palmer -

    Hi Adam. Having a tool kit with all of the listed parts above is best. The screw heads are very small and each set of screws needs a very specific type of driver to remove them without stripping any of them.

    Kyle Luksa -

  2. 6UPwoloGBO4tmVoS
    6UPwoloGBO4tmVoS
    BmSYPJmOy6dbHipF
    3EOdQPAGOmiuhoKU
    • Wenn du ein Plektrum zu tief einschiebst, kann das Gerät beschädigt werden. Dieser Schritt zeigt, wie du eine Marke am Plektrum anbringen kannst, damit das nicht passiert.

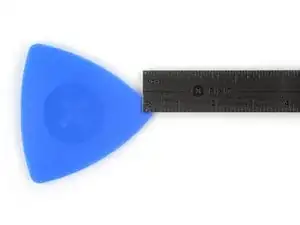
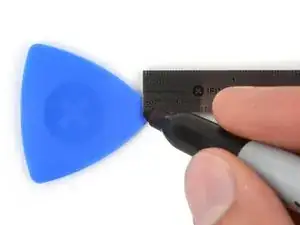
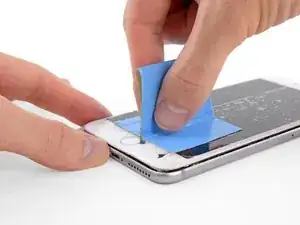
    • Zeichne mit einem Permanentmarker 3 mm von der Spitze des Plektrums entfernt einen Strich.

    • Du kannst die anderen Ecken ebenfalls mit Strichen in verschiedenen Abständen markieren.

    • Du kannst auch eine Münze so mit einem Klebeband auf das Plektrum kleben, dass sie einen Abstand von 3 mm zur Spitze hat.

    Got to step 2 and realized the fix kit doesn't include an opening pick! Looks like a guitar pick, and I have those lying around. Is that expected? Looks like the pick is used in many steps below. There's a little blue crowbar that isn't mentioned in the instructions. Perhaps that replaces the opening pick?

    Sloan Looney -

    Hi! I can't see which guide you were using when writing this comment. Can you reply here with which guide and fix kit you used?

    Clay Eickemeyer -

    I see you posted this in Meta. I hope it's resolved soon! In the meantime, a guitar pick may work well enough for your repair.

    Clay Eickemeyer -

    what fix kit?

    Meow Purr -

    My fix kit didn't include an opening pick either

    WILLIAM HARRIS -

    Make sure you check inside the black boxes after emptying them. My pick was stuck inside one of the boxes.

    AndyF -

    My AliExpress refurbished screen came with a pick that has a coin-like circle that pops out, so no modification was necessary

    Gijs Leegwater -

    the picture shows 3 cm but the description says 3 mm's. Which one is it?

    John Pena -

    That is a misunderstanding. It is a ruler with a scale for cm, it shows 0.3 cm, i.e. 3 mm.

    VauWeh -

    Oh, come ON!

    Big Ed -

    It will ALWAYS be millimeters on a phone, but this step is ridiculous, skip it!

    Leif DeWolf -

    @leifdewolf I wouldn't skip it for a first repair.

    Gabriel-Science -

    It's not an Ifixit KIT if it doesn't include everything. You'll need to order the opening pic separately. Or head to Walmart like myself and look for guitar pics. Hopefully, this will work just as well.

    Jaleeljb97@icloud.com -

    No pick in mine as well. It’s really not clear that you have to order this separately when ordering an IPhone SE 202/2022 screen repair kit. Is this the case?

    Jackson Castiglione -

    Frustrated, I ordered a compact package where everything was encapsulated. Useless suction tools could not separate the screen. If it is unable to decouple the screen, then why sucking suction tools you have provided.

    Shourob Datta -

    For my kit the triangle pick was stuck inside the box with the screen not with the other tools maybe it's also there for you

    Henry Scheibehenne -

    Y’all are getting far, FAR too detailed with some of this stuff…. Measuring and marking the pick that you won’t actually use to open the device?!? lol that’s kinda funny. Just heat it up, grab a spudger, and the back just pops right off! The iFixit tech need to stick to the KISS method more often, you know KEEP IT SIMPLE STUPID!!! Like l, for reals, I’ve been doing this stuff for YEARS and using iFixit guides regularly and this is just ridiculous at this point!

    Leif DeWolf -

    Will the phone still work if the sensor assembly on the back of the screen is damaged?

    Mutshidzi Rambau -

    I don't have a pick, but how much better are these picks than an old credit card for opening an iPhone 13 mini?

    mike eng -

    The pick in my iFixIt kit was packed with the battery, not with the rest of the toolkit.

    Tony Houlihan -

  3. TYwCcrqNBd4ohROm
    TYwCcrqNBd4ohROm
    Ui5vOPjtLUbtNCGB
    cvSW1VHhPiNmImkf
    • Wenn das Display deines iPhones gesprungen ist, solltest du das Glas mit Klebeband abkleben, um weitere Brüche zu vermeiden und Verletzungen während der Reparatur zu verhindern.

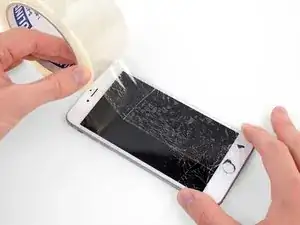
    • Lege überlappende Streifen durchsichtigen Packbands über das Display des iPhones, bis die gesamte Oberfläche bedeckt ist.

    • Trage eine Schutzbrille, um deine Augen vor Glassplittern zu schützen, die sich während der Reparatur lösen.

    • Wenn du den Saugheber in den nächsten Schritten nicht befestigen kannst, falte ein starkes Stück Klebeband (z.B. Paketband) zu einem Griff und hebe das Display stattdessen damit an.

    • Wenn alles fehlschlägt, kannst du den Saugheber auch mit Sekundenkleber am Display befestigen.

  4. YFbVJy32AORrrT13
    YFbVJy32AORrrT13
    5OoBJRhLaZ2HItnM
    A4T1DxOZSJ16rhJn
    • Wir haben die Anti-Clamp entwickelt, um das Öffnen von Geräten zu erleichtern. Die nächsten drei Schritte zeigen, wie sie verwendet wird. Wenn du sie nicht benutzen willst, überspringe die nächsten drei Schritte und folge einer anderen Methode.

    • Genaue Anweisungen für die Anti-Clamp findest du hier.

    • Ziehe den blauen Griff nach hinten, um die Arme der Anti-Clamp zu entriegeln.

    • Schiebe die Arme entweder über die rechte oder die linke Kante deines iPhones.

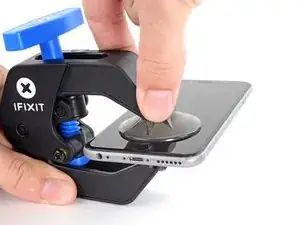
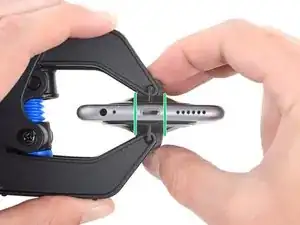
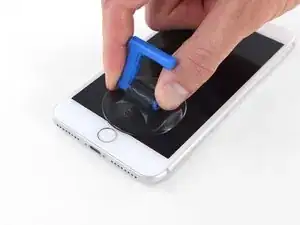
    • Bringe die Saugheber nahe an der Unterkante des iPhones an, einen auf der Vorderseite, den anderen auf der Rückseite.

    • Drücke die Saugheber auf den Oberflächen fest.

    • Wenn die Oberfläche deines iPhones zu rutschig für die Anti-Clamp ist und diese nicht gut hält, kannst du Klebeband benutzen, um eine griffigere Oberfläche zu schaffen.

  5. jTOgVMBLsXEoHW6M
    jTOgVMBLsXEoHW6M
    GHUOCycRqrdGPloU
    XhWEEIvdRoCv4ayy
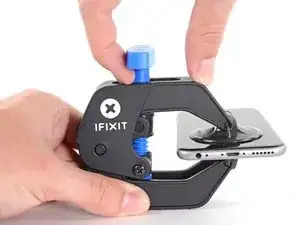
    • Ziehe den blauen Griff nach vorne, um die Arme zu arretieren.

    • Drehe den Griff 360° im Uhrzeigersinn, oder soweit, bis du merkst, dass sich die Saugheber dehnen.

    • Achte darauf, dass sich die Saugheber weiterhin gegenüber stehen. Wenn sie sich nicht mehr gegenüber stehen, dann löse die Saugheber ein wenig ab und schiebe sie in die richtige Position.

    Bien, y a-t-il des boutiques spécialisées elle-même se charger de l’opération de changement de l’écran de l’iPhone 8 plus je suis un littéraire. Je renonce à le faire moi-même mais j’assume les frais le prix de l’écran. Merci de répondre dans un commentaire suivant Cordialement

    Acquaviva -

  6. KbWJQqLcoArLKmUO
    KbWJQqLcoArLKmUO
    RnlwghmEIU5hKxhF
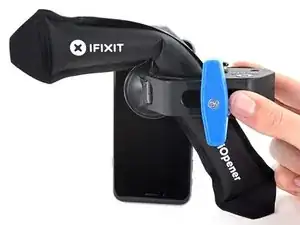
    • Erhitze eine iOpener und führe ihn durch die Arme der Anti-Clamp hindurch.

    • Du kannst auch einen Fön, eine Heißluftpistole oder eine Heizplatte verwenden, aber achte darauf, dass du dein Gerät nicht überhitzt – Display und Akku sind ziemlich empfindlich.

    • Falte den iOpener so, dass er auf der Unterkante des iPhones liegt.

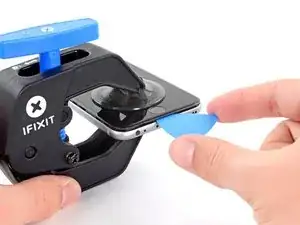
    • Warte eine Minute, damit sich der Kleber lösen kann und ein Spalt entsteht.

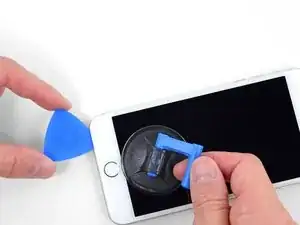
    • Setze ein Plektrum unter das Display ein, sobald die Anti-Clamp einen ausreichend großen Spalt geschaffen hat.

    • Wenn die Anti-Clamp keine ausreichend große Lücke bildet, erhitze den Bereich noch mehr und drehe den Griff um eine Vierteldrehung.

    • Drehe den Griff nicht mehr als eine Vierteldrehung auf einmal und warte eine Minute zwischen den einzelnen Umdrehungen. Lass die Anti-Clamp und die Zeit die Arbeit für dich machen.

    • Überspringe die nächsten drei Schritte .

  7. EXTwOVVOnkGXlAiy
    • In den nächsten drei Schritten wird gezeigt, wie du einen Saugheber zum Öffnen des Displays benutzen kannst.

    • Es ist leichter das iPhone zu öffnen, wenn du das untere Ende erwärmst. Du weichst so die Verklebungen auf.

    • Du kannst das untere Ende des iPhones mit einem Haartrockner oder einem iOpener erwärmen. Wende die Wärme 90 Sekunden lang an, um den Kleber aufzuweichen.

    6/14/23 I did this repair but used a heat gun on low for 60 seconds. This allowed me to open the case as the instructions say, but in the end the Home button failed. I probably over heated it. I used this "go around" for a virtual Home button. I don't care about touch ID:

    https://www.youtube.com/watch?v=LbTlUm4p...

    laryball -

  8. 1SUHNLjLanp2x1y2
    1SUHNLjLanp2x1y2
    G2AloSCafqypVhRk
    • Setze einen Saugnapf auf die untere Hälfte der Vorderseite , direkt über dem Home Button.

    • Passe dabei auf, dass der Saugnapf nicht den Home Button bedeckt. Er kann sonst nicht dicht abschließen.

    Warning ! If you pull too hard (reheat the underside of the display again), you create an gap of air between the glass and the lcd display !

    When you replace the display assembly you end up with gray stains on the display.

    Result: you have to buy a new display (assembly).

    Arnoud -

    Using just the single suction cup that is included in the battery replacement kit probably wouldn’t open the device. An iOpener and an iSlack should be the recommended method. However, you can get it open with just the single suction cup and iOpener, but does take a lot of time.

    Get an iOpener and iSlack with the battery replacement kit.

    Chris -

    I used a flat x-acto (#18) blade knife tool to gently pry back the screen enough to allow me to insert the pick near the bottom corner. I then worked the pick under the screen as mentioned in steps 5 & 6 below then. This worked really well for me.

    Kyle Luksa -

    I used the suction cup without heating the phone - the adhesive came away quite easily without applying any heat. Maybe due to age of phone (nearly 4 years old). Worth trying.

    Ben Vinnerd -

    I can’t get the single suction cup to work. Hate being stuck on the simplest step!

    Donny -

    My screen was very shattered, and was quite hard to get suction, as my tape was very low quality. However, after pulling it up a little bit, I was able to insert a regular razor blade into the very small gap and used that as a lever.

    Michael Scroop -

    Oh my goodness! Don't do that again. You can definitely damage something in the phone if you use a sharp metal razor blade..

    cytur -

  9. mrEFNcgfVQWurjTW
    mrEFNcgfVQWurjTW
    rErHmkOhfvSITnGD
    TohvbXinCCnyfcK6
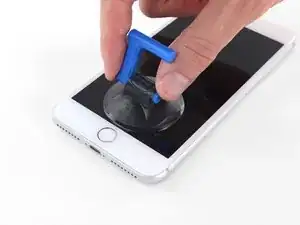
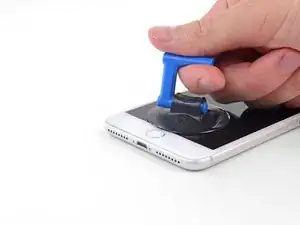
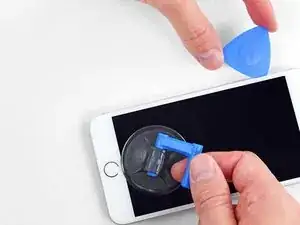
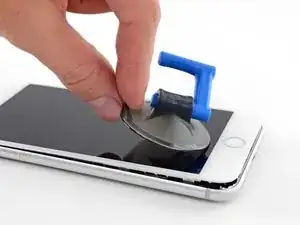
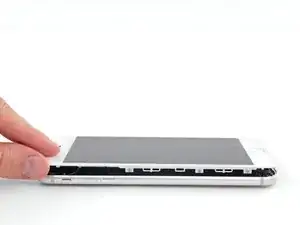
    • Ziehe gleichmäßig und fest am Saugnapf. Es sollte sich ein kleiner Spalt zwischen Front Panel und Rückgehäuse bilden.

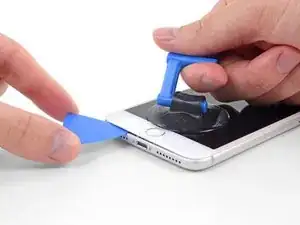
    • Setze ein Plektrum oder ein dünnes Hebelwerkzeug ein paar Millimeter in den Spalt ein.

    • Die wasserdichte Verklebung am Display ist sehr stark. Um den Spalt zu öffnen, musst du recht viel Kraft aufbringen. Wenn du Schwierigkeiten hast den Spalt zu erzeugen, solltest du nochmals Wärme anwenden, dann die Scheibe hoch und runter ruckeln, um so die Klebeverbindung zu schwächen.

    After multiple tries and using a very hot iOpener, it will not open.

    Kenneth Ewald, Sr. -

    In sheer frustration, I pulled out my trusty pocket knife and managed to lift the bottom of the screen slightly, but in the process, cracked the glass from the bottom to the home button. The case is open now.

    Kenneth Ewald, Sr. -

    this was by far the most difficult part. be diligent and follow the “firm and constant pressure” guide... the “gap” will be extremely “slight”. you will be able to slide a corner of the pry tool even if you cannot see the gap.

    Colleen V -

    This needs a TON of strength and most likely a partner. Your strong partner will pull up the screen with the suction cup and you will put the pick into the small gap that appears.

    cytur -

  10. AOHSGnMOFMrHBNmQ
    AOHSGnMOFMrHBNmQ
    pBblekYxOTaMfuJJ
    GvMBDIHTcivkDvXO
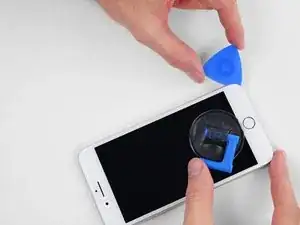
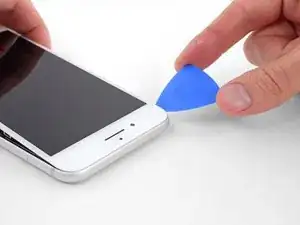
    • Schiebe das Plektrum um die Ecke und entlang der linken Kante nach oben in Richtung der Tasten für die Lautstärkeregelung und des Stummschalters. Trenne so die Klebeverbindung des Displays auf.

    • Halte vor der oberen linken Ecke an.

    Do not go over the top otherwise you can crack the screen. Sadly happened to me :(

    The instruction should be:

    “Stop near BUT BEFORE REACHING the top left corner of the display”

    Leonardo Piga -

  11. vNlPrysxSGXqqFA4
    • An der rechten Kante deines iPhones verläuft ein empfindliches Kabel. Setze dein Plektrum hier nicht ein, da sonst das Kabel beschädigt werden könnte.

  12. iiGOsaDUPLVF3bpu
    iiGOsaDUPLVF3bpu
    xIUoq1psydvfJCrU
    WRDGbKd2rpx3JRwL
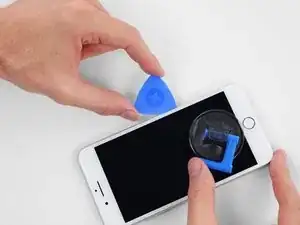
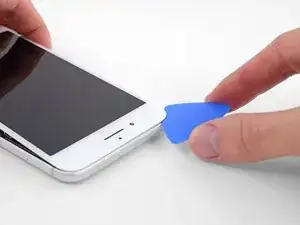
    • Setze das Plektrum an der rechten unteren Ecke ein. Schiebe es um die Ecke herum, dann entlang der rechten Kante nach oben. Trenne dadurch die Verklebung.

    • Setze dein Plektrum nicht tiefer als 3 mm ein, da du sonst Schäden an den Displaykabeln riskierst.

    I had really good luck using a hairdryer on some of the more stubborn portions of adhesive.

    Jessica Kirsh -

  13. dlBIvSNLXKCnX4B6
    • Hebe vorsichtig den Saugnapf an und mit ihm den unteren Teil des Displays.

    • Hebe das Display maximal 15° an. Du könntest sonst die Flachbandkabel des Displays überdehnen und beschädigen.

  14. STTnPPfiiKNEokvD
    • Ziehe an der kleinen Lasche am Saugnapf, um ihn vom Front Panel zu lösen.

  15. FWPXimHpMQKpmZZu
    FWPXimHpMQKpmZZu
    MGZUVhY6gplY6qCc
    voQbuSeunKejF3ic
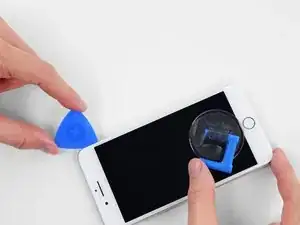
    • Schiebe das Plektrum unter das Display und die Oberkante entlang, um die letzte Klebeverbindung zu trennen.

    Be very careful at this step. The glass at the top will break very easy when the display is lifted too much.

    Gerdschi D -

  16. Y3wG53ZtiZEQdGYY
    Y3wG53ZtiZEQdGYY
    FNyyLxBTwBhIDlrI
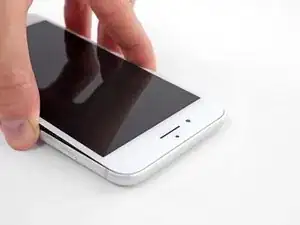
    • Schiebe die Displayeinheit leicht nach unten, weg von der Oberkante, um die Rasten, mit denen sie am Rückgehäuse gehalten wird, zu lösen.

  17. 4NykCXCCyRd5enLv
    4NykCXCCyRd5enLv
    mFZBjHhOBBSSbDKG
    yGLgglmNotb5obSH
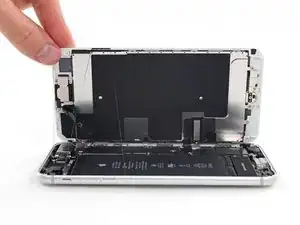
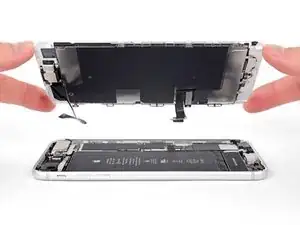
    • Öffne das iPhone, indem du das Display von der linken Seite her aufklappst, so wie man die Seite eines Buches umschlägt

    • Versuche noch nicht, das Display ganz zu trennen. Verschiedene empfindliche Flachbandkabel verbinden es noch mit dem Logic Board.

    • Lehne das Display an einen geeigneten Gegenstand, um es gut zu stützen, während du weiter am iPhone arbeitest.

    Das “links” ist auf dem Foto rechts.

    Matze Diamond -

    Das ist falsch. Wenn man auf das iPhone sieht, ist der Home Button unten. Auf dem Photo ist deutlich sichtbar, dass die linke Seite angehoben wird.

    Hans -

  18. gdf4RAku2FO4NKSD
    gdf4RAku2FO4NKSD
    RrJOlSmc4jTe2Wsm
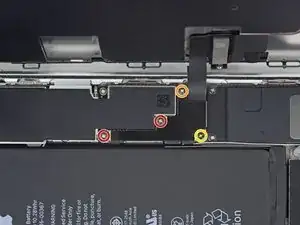
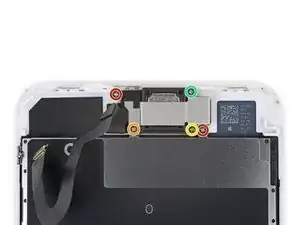
    • Entferne die vier Kreuzschlitzschrauben (JIS) mit denen die untere Display Kabel Halterung auf auf der Platine angeschlossen ist:

    • Zwei 1,3 mm Schrauben

    • Eine 1,4 mm Schraube

    • Eine 2,7 mm Schraube

    • Behalte in dieser Anleitung deine Schrauben sorgfältig im Auge, so dass jede Schraube beim Zusammenbau wieder dorthin zurückkehrt, wo sie hergekommen ist. Die Installation einer Schraube an der falschen Stelle kann dauerhafte Schäden verursachen.

    The Phillips screwdriver bit is the PH000. The measurement refers to the screw length.

    Jack Harry -

  19. FVmDfbaakEqqPyM5
    • Entferne die Halterung am unteren Displaykabel.

  20. xCtNERRx2CKlovLn
    xCtNERRx2CKlovLn
    6OqRktbAd2XLTrpP
    • Hebele den Akkuanschluss mit der Spudgerspitze aus seinem Sockel auf dem Logic Board.

    • Biege das Akku Anschlusskabel etwas weg vom Logic Board, um zu verhindern, dass es sich versehentlich wieder mit dem Akku verbindet und das iPhone während der Reparatur unter Spannung setzt.

    When I reassembled the iPhone 8 Plus, I had to plug it into a Lightning cable to wake it up (just pushing power button wasn’t sufficient).

    browniestarmite -

  21. hSevVTlWDAgGghXZ
    hSevVTlWDAgGghXZ
    xRZuRojAQGBGB3jM
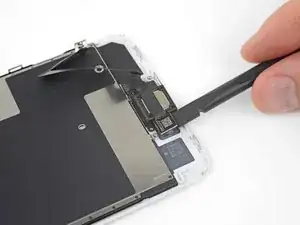
    • Hebele den breiten unteren Displayverbinder mit der Spudgerspitze oder mit dem Fingernagel gerade aus seinem Sockel.

    • Um Druckverbinder wie diesen wieder anzuschließen, musst du erst auf einer Seite herunterdrücken, dann auf der anderen. Drücke nicht in der Mitte. Wenn der Verbinder auch nur ein bisschen daneben sitzt, kann er sich verbiegen und irreparabel beschädigt werden.

    I got hold of a iPhone 8 Plus with cracked screen that I am planning to fix.

    Here is my problem:

    When I tried to take out the screen from my phone, (step 15-18) I was curious about the new screen, so I tried to connect it. It was completely dead! Then I tried the old cracked one, and suddenly that was dead to! This is a phone that some fool has been inside earlier and changed battery, but I suspect he has done some more really stupid things. The Taptic Engine is living its own life and vibrating every time I slightly touch the home button. (I have a new Taptic Engine) The phone is also full of dust and small particles that does not belong there. One tri-point Y000 screw (step 18) is even missing! Now the biggest problem is that both screens are black! I know the phone is on, because I hear voice command speak when I turn on the power. The screen worked before I tried to change it? And one last thing: My new LCD screen came with new flex cables. Is it possible to switch over, so I can use the old ones?

    smikalsen -

    Hi,

    Is your problem solved?

    Daniel Leprince -

    Be careful of damaging MOSFETs by the LH side of the large lower display cable. After replacing the battery and turning the device on, the phone showed low charge and didn't have a charging symbol even after plugging into multiple cables and chargers. Turns out I had damaged the logic board attempting to disconnect the connector.

    Chris Cerrudo -

  22. aWkRBoqdn5JLDxut
    aWkRBoqdn5JLDxut
    NNsd3K6mmfCyvmLZ
    • Löse den Verbinder am zweiten unteren Displaykabel mit der Spudgerspitze. Er ist direkt hinter dem eben gelösten.

    I used the other end of the spudger on this connector and it seemed to work a little better for me. I came in from underneath the top-right edge instead of the bottom right.

    Jessica Kirsh -

  23. oJa4BeNCiLydYrFd
    oJa4BeNCiLydYrFd
    GA64GXyHWNMhEGK5
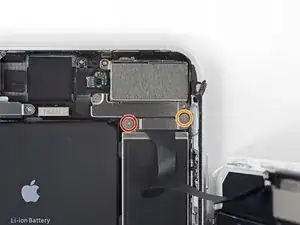
    • Entferne die beiden TriPoint Y000 Schrauben, welche die Halterung über dem Verbinder der Sensoreinheit am Front Panel befestigen:

    • Eine 1,0 mm Schraube

    • Eine 1,2 mm Schraube

    una vite da 1mm e due viti da 1.2 mm???

    Matteo Carachino -

    Ciao Matteo! Grazie per l’osservazione. Ho appena modificato il testo :) La traduzione è aperta a tutti. Hai quindi la possibilità di fare le tue suggestione direttamente nel testo e sei il benvenuto se vuoi usare di questa possibilità nel futuro. Grazie ancora per la vigilanza! Saluti, Claire

    Claire Miesch -

    The tool kit does include a 1.0 or1.2mm screwdriver! How am I supposed to remove those screws?

    peter frommer -

    Bought the screwdriver that supposedly fits these screws and it still doesn’t work.

    hypercarduser -

    My bracket looks different. Can’t get these screws out.

    Ray Rushing -

    kit came with wrong bit. i received 2x P02 (penta tips) and no tri point y000.

    Christopher Shane Gripp -

    There is no such thing as a trigger point y000 screwdriver. Why couldn't they use Philips like the rest of the screws.Nobody knows what these trips point y000 even look like. this is a scam to force you to buy a new phone.

    Al tb -

    y000 tri-point screw driver comes with the iFixit repair kit at minimal cost

    godo -

  24. hBRGDcEYEQNRA2A1
    • Entferne die Halterung, welche den Verbinder der Front Panel Sensoreinheit bedeckt.

  25. GacqUhpZexRIIL1r
    GacqUhpZexRIIL1r
    gTmxBknJLSOFdNJx
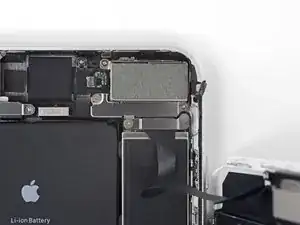
    • Löse den Verbinder der Front Panel Sensoreinheit mit der Spudgerspitze oder dem Fingernagel von seinem Sockel.

    What happens is this strip is torn and how does one fix it

    Mijinyawa Dauda -

  26. AVYiAe5OJSrbfHdg

    Should there be a step somewhere in here to point out when to remove the blue plastic from the new iFixit screen?

    Paul Santora -

  27. 6BZsE4NglAuSLpqB
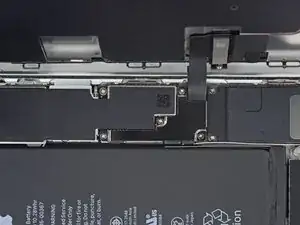
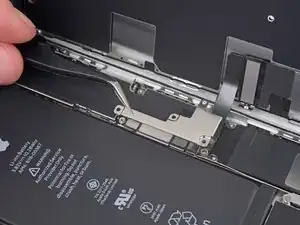
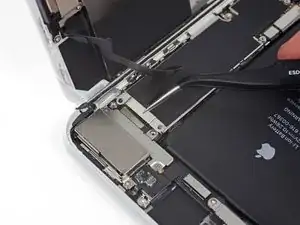
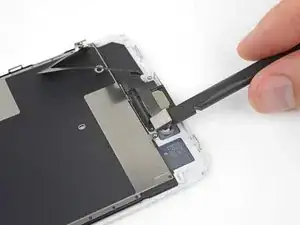
    • Entferne folgende fünf Kreuzschlitzschrauben, welche die Halterung des Ohrhörer-Lautsprechers befestigen:

    • Zwei 1,8 mm Schrauben

    • Eine 2,3 mm Schraube

    • Eine 2,4 mm Schraube

    • Eine 2,8 mm Schraube

  28. pMAIN3Kd6BGQEFKF
    • Entferne die Halterung des Ohrhörer-Lautsprechers.

  29. DFC2RHWQG3PAdcXt
    DFC2RHWQG3PAdcXt
    ywLvOiKKZmdYTL3K
    4S3Rv6tMW6ALVOZU
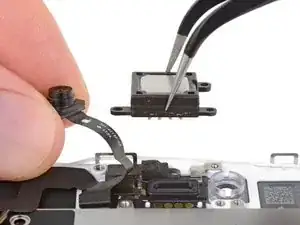
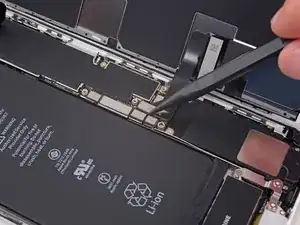
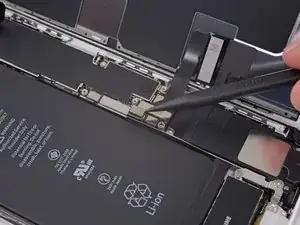
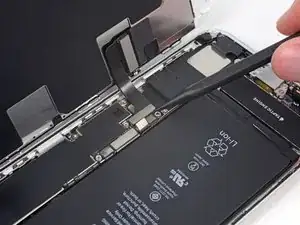
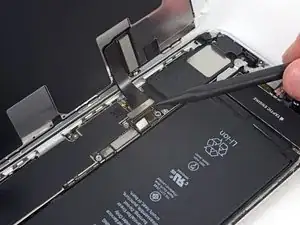
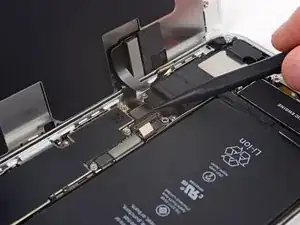
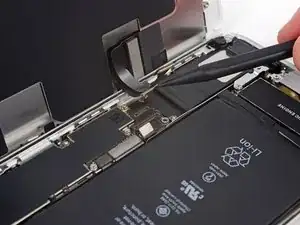
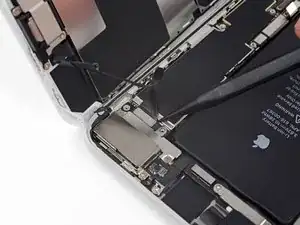
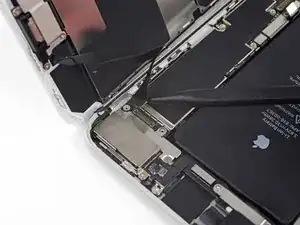
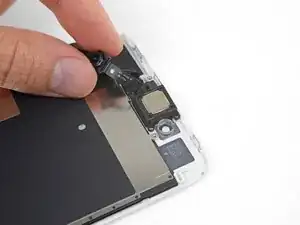
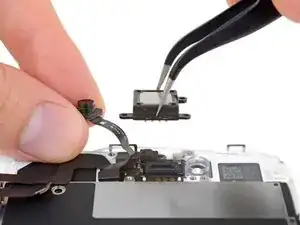
    • Hebe die Frontkamera mit dem flachen Ende des Spudgers aus ihrem Sitz.

    • Biege das Flachbandkabel der Kamera vorsichtig zur Seite, damit der Weg für den Ohrhörer-Lautsprecher darunter frei wird.

  30. KsZtuTIJhGrAQaUV
    • Entferne den Ohrhörer-Lautsprecher.

    Could it be possible to make the phone waterproof again after an earpiece replacement?

    Stefan -

Abschluss

Vergleiche dein neues Ersatzteil mit dem originalen Teil, du musst eventuell einige Komponenten übertragen oder Schutzfolien vom neuen Teil abziehen, bevor du mit dem Einbau beginnen kannst.

Um dein Gerät wieder zusammenzubauen, folge den Schritten in umgekehrter Reihenfolge.

Entsorge deinen Elektromüll sachgerecht.

Hat die Reparatur nicht ganz geklappt? In unserem Forum findest du Hilfe bei der Fehlersuche.

Jeff Suovanen

Mitglied seit: 06/08/13

442488 Reputation

3 Kommentare

To replace the earpiece speaker, is the 6plus kit you sell compatible?

marigranadillo -

I couldn’t find this part to buy, do you not sell it?

swyatt22 -

I'm sure if you kept looking at the cell phone repair shops, or cell phone repair parts you'll find the earpiece part. The iPhone 8 is very popular. I found mine for like $4-$5 in Saudi Arabia. otherwise you can look at amazon or eBay. good luck.

iAziz -