Einleitung

Diese Anleitung zeigt, wie die Logic Board Einheit im Nano getauscht wird.

  1. lqKlCtMsQpYnmwqN
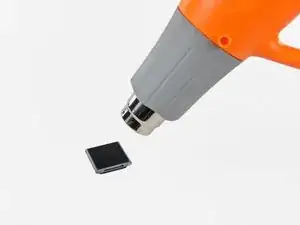
    • Nimm einen Haartrockner oder ein Heißluftgebläse und erwärme damit den den Kleber, mit dem der Rand der Frontpanel-Baugruppe am äußeren Gehäuse befestigt ist.

    • Überhitze die der Frontpanel-Baugruppe nicht, du könntest sonst das LCD beschädigen.

    Do I need new adhesive to reassemble?

    David Wallin -

    Make sure to not break this cable even if your backlight is out, there can be internal corrosion that prevents the backlight from working. It may still work with the old display.

    Matthew Borgholthaus -

  2. QwRPFKaTUfY5wvVe
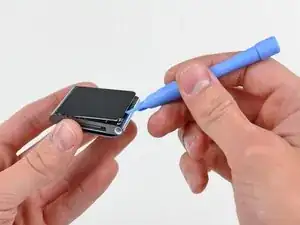
    • Heble die Frontpanel-Baugruppe - solange sie noch warm ist - mit der Kante eines Öffnungswerkzeugs von der Seite mit dem Kopfhöreranschluss vom Nano ab.

    • Setze das Öffnungswerkzeug nicht an der linken Displayseite ein und versuche auch nicht die Frontpanel-Baugruppe von dort aus hochzuheben, da sich dort das Displaykabel befindet, welches dabei leicht beschädigt werden könnte.

    • Fahre fort, die Frontpanel-Baugruppe am Rand vom äußeren Gehäuse abzuheben. Achte darauf, dass das Displaykabel an der linken Seitenkante nicht beschädigt wird.

    • Wenn es sehr schwer geht, die Frontpanel-Baugruppe abzulösen, dann erwärme sie nochmals und versuche es erneut.

    I strongly recommend using a Small Suction Cup (IF145-019-1) instead of a plastic opening tool.

    After half an hour of various heating times, trying to use a plastic opening tool, I overheated the LCD, which caused it to discolour. Now I need to buy a new screen. I wish I'd thought to use a suction cup earlier; it seems so obvious in retrospect.

    Peter Burkimsher -

    I used a hot water bottle with towelling cover, resting on it for about 5 minutes. glue softened at 45 degrees. enough to easily lift panel.. Ipod’s working temperate is 55 deg C max according to apple. I used IR heat gun for temperature check.

    Hay rack -

    We have a temperature controlled testing oven at work. I set the oven for 50 degrees C, let it absorb heat for half an hour, then took it out. I had zero luck with either the plastic pry tool or the suction cup, so I carefully pried up the indicated side with the sharp pointed tip of a dental pick until I could get the plastic tool into the crack opening.

    Klieb -

  3. igxGIWdBGjufPoAM
    igxGIWdBGjufPoAM
    Sq3MKLVxjFZfTLsb
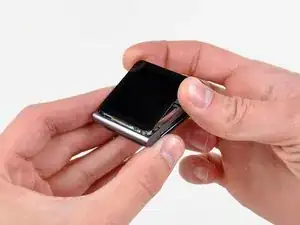
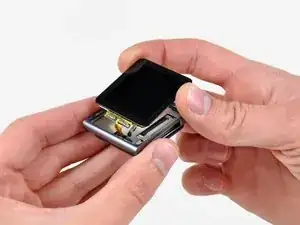
    • Hebe die Frontpanel-Baugruppe an der Seite mit dem Kopfhöreranschluss hoch.

    • Ziehe die Frontpanel-Baugruppe leicht von der linken Seite weg, um das Displaykabel freizugeben.

    • Die Frontpanel-Baugruppe ist immer noch mit zwei Kabeln am Nano angeschlossen.

  4. DlZM3DGDlh2Wflu1
    • Lege die Frontpanel-Baugruppe neben den Nano.

    • Entferne folgende zwei Schrauben:

    • Eine 2,3 mm lange Kreuzschlitzschraube

    • Eine 2,6 mm lange Kreuzschlitz-Schulterschraube

  5. dSU3vipUBQDOB2YU
    dSU3vipUBQDOB2YU
    Z462On2RXtRxUblK
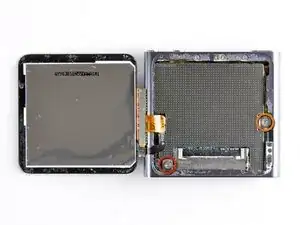
    • Heble die Metallabschirmung mit einem Öffnungswerkzeug von der oberen rechten Ecke her aus dem Nano heraus.

    • Entferne die Metallabschirmung vom Nano.

    Why does the steel shielding look like a DS cart (this isn't a real question)

    Susposter779 -

  6. GT1KwHmNxpJRZpBE
    GT1KwHmNxpJRZpBE
    C6QZWqLdQth2rQhD
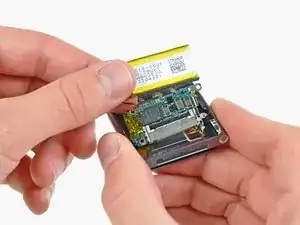
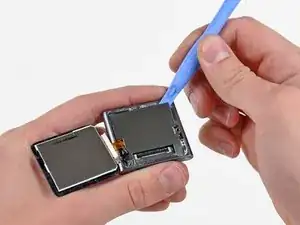
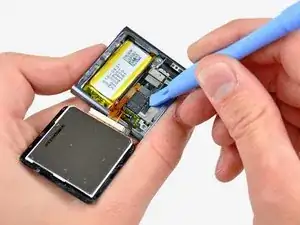
    • Heble die Stecker am Displaydatenkabel und am Touchscreenkabel mit einem Öffnungswerkzeug aus ihren Anschlüssen auf dem Logic Board hoch und trenne sie ab.

  7. KKVtRDIuPGSClKGX
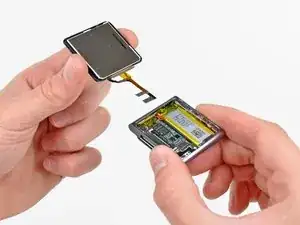
    • Entferne die Frontpanel-Baugruppe, achte dabei darauf, dass sich die beiden Kabel nicht verfangen.

    • Zum Zusammenbau kannst du dieses doppelseitige Klebeband verwenden.

    How come you did not put back the metal plate that goes between the iPod and the display?

    Adam Meyerson -

    You do put the steel shield back in to place and screw it down, but only after you connect the digitizer and display data cable connectors to their sockets on the logic board.

    Lance J -

    Does anyone have a current link to the screen adhesive tape product? The ebay link in the article is dead.

    sysfu -

  8. BhynMUrYy1VXGF1X
    • Nimm ein iPod-Öffnungswerkzeug und hebe den Stecker der Kopfhörerbuchse aus seinem Anschluss auf dem Logic Board hoch und trenne ihn ab.

    Hello.. I lost my jack connector and it still stay on logic board.. So what will i do? I cant remove it from logic board.. Please help me.. :(

    Emonk -

  9. KRJiY5aAPhHkvdBg
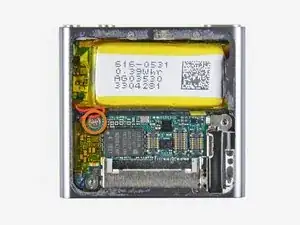
    • Entferne die einzelne 1,9 mm Kreuzschlitzschraube, mit der das Logic Board am äußeren Gehäuse befestigt ist.

  10. YTYhmvXR1aaPj5KC
    YTYhmvXR1aaPj5KC
    chQhgWJgrILDFaG2
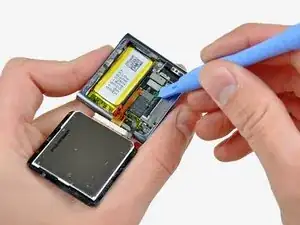
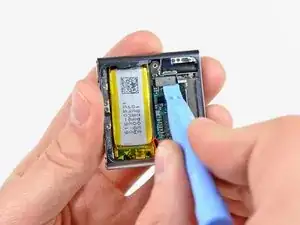
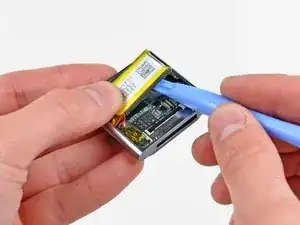
    • Heble den Akku mit dem iPod-Öffnungswerkzeug behutsam aus der Klebeverbindung zum äußeren Gehäuse heraus.

    • Der Kleber ist sehr stark. Arbeite sorgfältig und langsam. Achte darauf, dass du nicht abrutschst und umliegende Bauteile beschädigst.

    • Ziehe den Akku mit dem Daumen zur linken Seite des Nano hin und heble gleichzeitig die andere Akkukante aus dem äußeren Gehäuse heraus.

  11. xI3WTWbTteNxdZhc
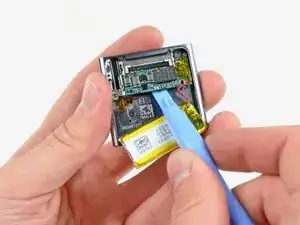
    • Nimm das iPod-Öffnungswerkzeug und heble behutsam das Logic Board aus der Klebeverbindung zum äußeren Gehäuse.

    • Heble das Logic Board nicht zu stark nach oben.

    You need to be careful here, I used an opening pick because I felt like I needed something wider to pry the logic board up, and I sliced the headphone jack assembly connector... (the one disconnected in step 8) :(

    chrismeunier -

  12. MNPURT3mXXQAI14r
    MNPURT3mXXQAI14r
    SDgd26UUwP5dy2sX
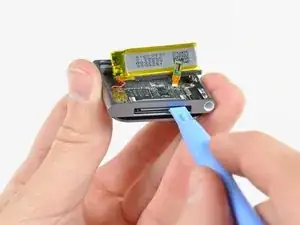
    • Schiebe den Dock-Anschluss vorsichtig mit dem iPod-Öffnungswerkzeug zur Mitte des Nano hin.

    • Entferne die Logic Board Einheit vom Nano. Achte sorgfältig darauf, dass das Kabel zur Kopfhörerbuchse nicht beschädigt wird.

    very good directions. You lead only half way to the push button area. I have to try the rest of the way!

    Good work!

    kcryeung -

Abschluss

Um dein Gerät wieder zusammenzubauen, folge den Schritten in umgekehrter Reihenfolge.

Andrew Bookholt

593241 Reputation

9 Kommentare

Hi, i wonder if you could help me... I changed my cracked screen (my ipod worked even though the screen was broken) but then when I assembled the ipod ( I did everything you did) it doesn't work, nor does my computer recognize it anymore. Would you happen to know what might be the problem? Have I unintentionally somehow damaged it?

d1k4 -

Thanks for the guide Andrew! I've just replaced my cracked screen and everything works flawlessly.

Cristian Dragos -

Is there any where to send them in and have a professional repair them. I’ve tired some of the things on the site but I think I may have damaged them further? Please advise.

Valerie -

Hi..just to tell u about my ipod. It was accidentaly washed in my washing machine. I want to know..is the ipod still in function if i replace the battery only not the board. Im still hoping that my ipod still can be use. I love my ipod 6th generation. It has sentimental value to me..huhu

madeq 78 -

I did the very same thing, washed my 6th gen in the washer. when i realized what i had done, i immediately put the ipod in a tub of rice. now it works, but only when it’s plugged in. I’m pretty sure it’s the battery that needs replacing. I’ve not replaced the battery as all of the things i need from ifixit are out of stock. If everything on the ipod works except that it won’t hold a charge and stay on unless plugged in, then it’s most likely the battery and replacing it will probably fix the problem.

thefactory01 -

I didn’t see any guide or instruction for replacing the battery. I only see the red and black wires so I’m assuming the battery need to be de-soldered and a new one soldered back on. Does this sound about right?

Civan -

hello i have also a Ipod Nano 6 e generation found in recyclebox ! ,i have put in Iphone charge kabel to see if he work,s no reaction it all, i opent the Enclosure carefully and discover what,s in how compact is it ,what fragile component,s are inside ,i found a kabel from mainboard wich is broken ,i search on Google Ipod Nano 6 e generation kabel and replace the new one and connect it with the little mainboard also the little screen and put it on Iphone charge kabel again ,i press the on button to see if it will start up but no ,it could be the processor is crashed and the Ipod is Crashed ,it is a very compact nice design media player MP 3

Ronald liersen -

I found that my locksmith pinning tweezers are perfect for disconnecting the the various connectors.

Don Jenkins -

any suggestions on how to fix an on/off button on the IPOD Nano Gen 6

Jimmy Selph -