Einleitung

Diese Anleitung zeigt, wie die Frontpanel-Einheit im iPod Touch (1. Generation) ausgetauscht wird.

  1. TIvismtwH6jPRiw6
    • Das Öffnen des Gehäuses ist schwer und möglicherweise gefährlich. Eine Menge Kraft ist erforderlich, um das Öffnungswerkzeug aus Kunststoff zwischen die Nähte des Gehäuses zu hebeln. Das Gehäuse kann beschädigt werden, wenn dieser Schritt nicht korrekt ausgeführt wird. Achte beim Öffnen des iPod darauf, dich nicht zu verletzen.

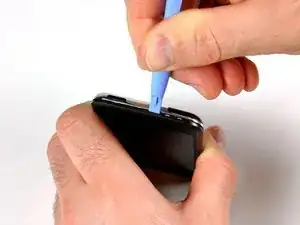
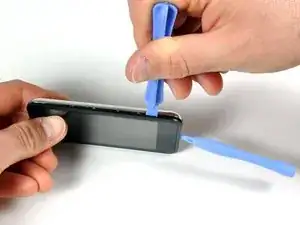
    • Stecke das kleine Kunststofföffnungswerkzeug in die Naht zwischen der Kunststoffanzeigetafel und der Metallrückwand. Die abgewinkelte Kante sollte zur Metallrückwand zeigen.

    • Halte das Werkzeug an Ort und Stelle, sobald es innen verkeilt ist und die beiden Paneele getrennt sind.

    I found the little plastic tools to be useless. I finally got the case apart using jeweler's screwdrivers, guitar picks, and believe it or not, a wood chisel to split the sides of the case open. And believe it or not, I got back together again - not quite as good as new, but good enough.

    I'd REALLY love to know how Apple technicians get this little beast apart without damaging or nicking the case.

    phinegan -

    Zitat von phinegan:

    I'd REALLY love to know how Apple technicians get this little beast apart without damaging or nicking the case.

    Who's betting the actually replace the back with a brand-spanker - if they repair them at all!

    marc draco -

    They do replace it with a new back, thats why they said that if you have words on the back (engraved) by someone other then apple, your going to lose those but if there done by apple then they'll do it again (when replaceing the battery they say that)

    Zitat von marc draco:

    Who's betting the actually replace the back with a brand-spanker - if they repair them at all!

    shadowfox00101 -

    I replaced my battery in my 1st gen iPod and it still doesn't hold a charge for more then 5 min. Any ideas?

    ae86keidori -

    Zitat von ae86keidori:

    I replaced my battery in my 1st gen iPod and it still doesn't hold a charge for more then 5 min. Any ideas?

    mine has the same problem. My 1st gen iPod touch dropped in water. after that It still works but can't hold a charge for more than 5 mins. I changed the battery and still the same.

    One of my friend give me some advices, I simply clean the whole logic board with some non water alcohol, and it works. It works perfect now. You can have a try.

    Liku -

    I found a method that worked for me in opening the case. I started at the top, and used a sewing needle. I'm sure a straight pin world work also. Using some padding between the back of the needle and my hand, I worked the point of the needle between the casing and the metal back. Don't push straight into the gap, push on the edge of the gap down toward the back of the iPod. Once you feel the needle slip in, use it as a guide to get your prying tool in there.

    Paul Jones -

    Hey, I made it, it's open! My opener tool was useless. A swiss army knife and lots of brute force is your friend. My tool broke apart not resisting such force that is necessary.

    http -

    lol i dropped my iPod this fixedit because it had no back

    elais -

    Count get past step 1 :( began seperating the back but the metal back sooner bent than the clips letting loose. I heard something chip then the ipod started getting very hot so I think I punctured the battery :( its going to live outside for a while before I throw it out.

    Mike -

  2. Qp5VYIcMl4AIj4ee
    Qp5VYIcMl4AIj4ee
    XIxl3RtSE1DfJWrp
    nHQANHqJHMZu5xXC
    • Auf jeder Seite des iPod befinden sich sieben ineinandergreifende Halteklammern. Das große Kunststofföffnungswerkzeug wird verwendet, um die Frontplatte von der Metallrückseite des iPod zu trennen.

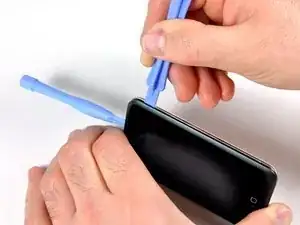
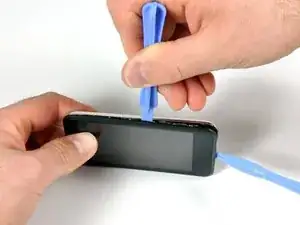
    • Stecke das große Öffnungswerkzeug in die rechte Seite des iPod, wobei der Rand des Werkzeugs auf die Metallrückseite zeigt.

    • Vergrößere vorsichtig den vorhandenen Spalt, indem du das große Öffnungswerkzeug wackeln und nach rechts bewegst.

    • Fahre damit fort, bis die rechte Seite des iPod locker ist.

  3. DJdxYAsO3DZrD6Cs
    DJdxYAsO3DZrD6Cs
    k4hHgpMOBucGConj
    ypad6vV3vAU12CBo
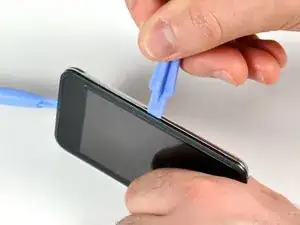
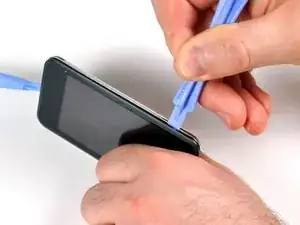
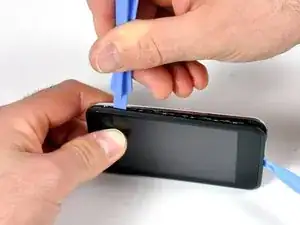
    • Wechsele zur anderen Seite des iPod.

    • Befolge das gleiche Verfahren wie im vorherigen Schritt, um die sieben Clips loszulassen, die die Bedienfelder an Ort und Stelle halten.

    • Sobald die Panels auf dieser Seite getrennt sind, kann die Rückseite vom Rest des iPod getrennt werden.

  4. gKaxFyNPSMVElhG3
    gKaxFyNPSMVElhG3
    i1ukjsGYEIeSTBgn
    cO4edEK4D5OEwmST
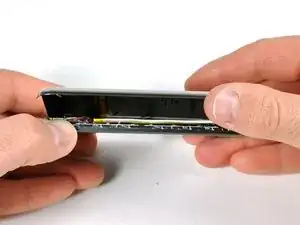
    • Hebe die Rückwand vorsichtig mit den Fingern an.

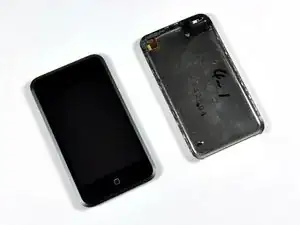
    • Die Vorder- und Rückseite des iPod sollten nun vollständig getrennt sein.

    • Die goldene Antenne (drittes Bild) kann leicht aus ihrem Gehäuse herausfallen. Stelle sicher, dass die Antenne fest sitzt, bevor du den iPod schließt.

  5. ySJwIVXgX3U5WIsG
    • Der Akku ist am Display des iPods festgeklebt, aber nicht mit Schrauben befestigt.

    • Drehe den iPod um 180°, so dass er wie im Bild gezeigt liegt.

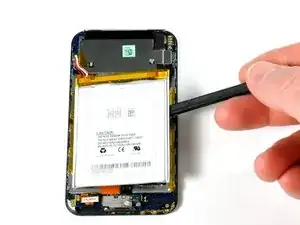
    • Setze den Spudger sorgfältig zwischen Akku und Display ein. Unter dem Akku verlaufen Kabel, du musst deshalb langsam hebeln.

    Could I possibly just cut the battery cables in this step and solder them to the wires on the new battery??

    DUSTmurph -

    On reassembly before putting the two screws back in, make sure to slide the top part of the board opposite the screws under the small black plastic notch.

    barlowdo -

    In step five I was very careful with the spudger at getting the battery loose from the LCD screen but now after reassembly I have white bleed through all around three sides of the LCD screen. It shows up easily on light colored screen backgrounds like the Set up screen. It looks like the spudger some how damaged the back side of the LCD screen during disassembly. Is this glue heat sensitive or is there an alternative to using the spudger that a user can suggest?

    barlowdo -

    Zitat von DUSTmurph:

    Could I possibly just cut the battery cables in this step and solder them to the wires on the new battery??

    I am thinking about trying this myself - It seems a lot less labor intensive than desoldering in that very tight location. I guess the big concern is if there is room for insulation on the spliced wires when the unit gets closed up.

    barlowdo -

    Zitat von barlowdo:

    I am thinking about trying this myself - It seems a lot less labor intensive than desoldering in that very tight location. I guess the big concern is if there is room for insulation on the spliced wires when the unit gets closed up.

    I will add that there is really not a lot of wire length to do a splice on and it may be as difficult to do as soldering to the circuit board.

    barlowdo -

    Yes, even without de-soldering/soldering, one can simply cut the two wires then put a jumper wire on re-installation.

    I agree with DUSTmurph's, comment.

    profeduards -

    Is there any jumper little enough to fit in it?

    Giovanni Borney -

    You could cut the cables and solder the new batt's to these, but I'd make sure the total length of the splice is the same to the original. Also use the smallest-diameter heat-shrink tube to insulate so as not to make a bump that prevents the trinket to close properly.

    Aristarco Palacios -

  6. GfrRCnar26CxFAUF
    GfrRCnar26CxFAUF
    KdqYRH5H6oo6jAMp
    6lr4OXqEfMvtaUDp
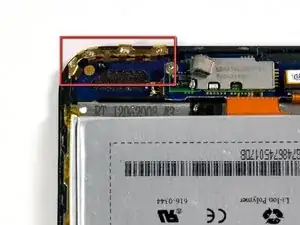
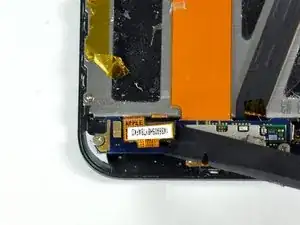
    • Entferne die goldfarbene Antenne mit einem Spudger (oder deinen Fingernägeln). Die Antenne verbiegt sich leicht, drücke deswegen nicht so fest. Setze die Antenne beim Zusammenbau zuerst ein, bevor du die Antennenplatinen einbaust.

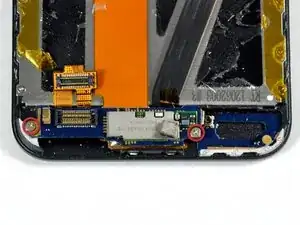
    • Entferne den Stecker auf der linken Seite mit einem Spudger.

    • Entferne die beiden Kreuzschlitzschrauben.

    These two screws are short.

    NoH2O -

    There is a gold spring coil on the side of the board near the left side. BE VERY CAREFUL! It extremely brittle metal and if smashed down, won't connect with the power switch. Once smashed down, attempting to stretch it back out will break it. I found out the hard way and the only way to fix it is to replace the logic board.

    LukeInDC -

    Are these really Phillips 00 screws? My supposedly 00 screwdriver is way too big. Maybe they are really Phillips 000. The screws in my device were set with blue locktight (grr). I was able to unscrew three of the six with very small straight edge screwdriver but had to sand off the heads of three more with a Dremel tool. This is dangerous. During the process I barely nicked a component near where the antenna cable connects to the logic board. Now I have a new battery and no WiFi.

    anonymous 6952 -

  7. SZKKaWLNFWvbUSWv
    SZKKaWLNFWvbUSWv
    vFXo1sQAeOLndhT1
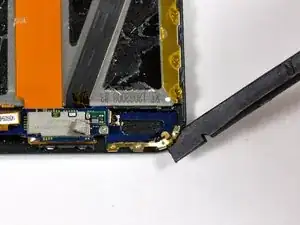
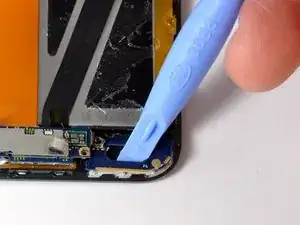
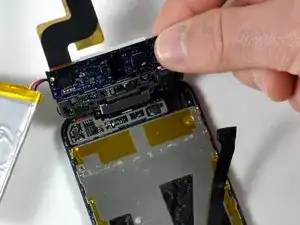
    • Die Antennenschleife muss hochgehebelt werden(sie ist festgeklebt). Verschiebe vorsichtig die Platine mit der Antennenschleife mit einem Öffnungswerkzeug oder einem Spudger. Die Platine ist mit einem dünnen Flachbandkabel an der Antennenelektronik angeschlossen. Diese Konstruktion aus zwei Platinen ist ziemlich fragil.

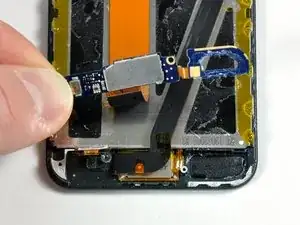
    • Hebe die beiden Platinen der Antenne zusammen hoch und löse das orangene Kabel vom Display ab.

  8. 1ge1vhPcRY3kYdBo
    1ge1vhPcRY3kYdBo
    5rxlLLHOYGSdNDKa
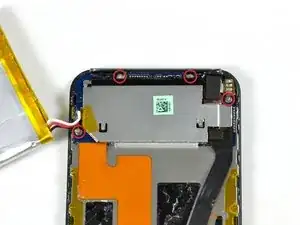
    • Entferne das schwarze Klebeband mit einem Spudger. Darunter werden die zwei im Bild gezeigten Schrauben sichtbar.

    • Drehe die vier Kreuzschlitzschrauben heraus.

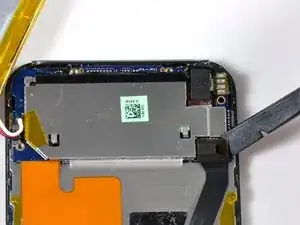
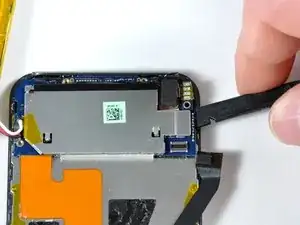
    • Trenne den schwarzen Stecker mit einem Spudger ab.

    Left screw is very short. Right screw is long. Top screws same as bottom ones.

    NoH2O -

    Also, right top one appears bronze/gold colored while left top one is silver, like the bottom ones. Don't know if this is important. (Also, couldn't figure out how to add to previous comment!)

    NoH2O -

    Actually you can skip all this taking apart sequence - just remove older battery, clean the soldering holes and solder wires back from top. just put some thin plastic film under logic board where the soldering points are while soldering wires in. I replaced god knows how many batteries like this and they all are fine. that way you can replace battery in 5minutes!

    DigiHead -

    Right, this is what I did. Although it took me more than 5 minutes just to get the case open.

    Madelaine Gogol -

    i reinstalled the lcd and digitizer. only the top works. the bottom of the screen will not respond to touch. help please !!!

    Nemowuner -

  9. LGx15QyW51qMMl6P
    LGx15QyW51qMMl6P
    WjLOtAFu4PQNJtRQ
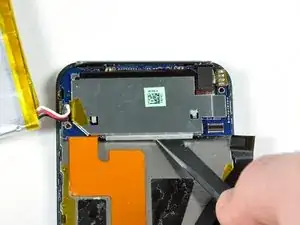
    • Löse das Logic Board an verschiedenen Seiten mit dem Spudger ab. Das Logic Board ist zusätzlich zu den im vorigen Schritt entfernten vier Schrauben festgeklebt.

    Be very careful under the right hand side of the board with any tool...there are some small resistors near the headphone-jack that can easily be knocked off.

    Paul G -

  10. SJTifRx6sKwGLkMo
    SJTifRx6sKwGLkMo
    wxSIB6NxLdZNsfLH
    3bLcFNUbI6kKCGbl
    • Klappe das Logic Board vorsichtig hoch. Am Logic Board sind die Kopfhörerbuchse und der Docking-Anschluss angebracht.

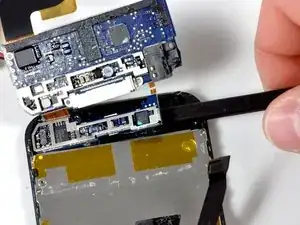
    • Hebe das Logic Board (mit angeschlossenen Bauteilen) nach oben.

    • Der kleine Abschnitt des Logic Boards, der darunter liegt, verbiegt sich leicht und ist empfindlich. Hebe den Spudger nicht hoch, wenn du die kleine Platine ablöst. Bewege den Spudger nur zur Seite hin.

    • Schiebe den Spudger unter den kleinen Abschnitt des Logic Boards. Das Board sollte sich ablösen, wenn der Spudger an der anderen Seite angelangt ist.

    When removing the smaller board, while sliding the spudger, I dislodged a white circular plastic disc stuck to the board which is some kind of buffer to the front side button and the board. It's a little sticky, hopefully I'll be able to put it back the right way.

    NoH2O -

    I've managed to strip a screw. Be careful of that!

    brittanica101 -

    I believe the white adhesive disc is the contact for power button, so try replacing the same way it came off. The dotted lines on the white should wrap around the edges of circuit board slightly and the board should hold it in place.

    swips -

    You don't actually need to remove the smaller portion of the logic board to remove the display. Just lift the larger portion up and out of the way, as illustrated.

    Mo Oishi -

    When I did this, the headphone jack cable sheared completely. The headphone jack was still down and the board flipped up. There was almost no resistance to indicate something was tearing. Luckily, installing a new headphone jack is pretty easy if you have a fine tip soldering iron. But it was a big delay as I had to order the part.

    jonathan -

    Zitat von jonathan:

    When I did this, the headphone jack cable sheared completely. The headphone jack was still down and the board flipped up. There was almost no resistance to indicate something was tearing. Luckily, installing a new headphone jack is pretty easy if you have a fine tip soldering iron. But it was a big delay as I had to order the part.

    Ryan Lacy -

    Zitat von Ryan:

    Do you have any specific info or guide on how to replace the headphone jack? I agreed to help a friend with their iPod and it turns out a new headphone jack is in order. I have never done a repair on an iPod requiring soldering. I think myself and many others would be grateful for a tutorial.

    Ryan Lacy -

    Zitat von Ryan Lacy:

    Do you have any specific info or guide on how to replace the headphone jack? I agreed to help a friend with their iPod and it turns out a new headphone jack is in order. I have never done a repair on an iPod requiring soldering. I think myself and many others would be grateful for a tutorial.

    Well what worked for me was keeping the old connector on the soldered part. The new ribbon has two holes on each solder connecting point. If the ribbon isn't already ripped, go ahead and rip/cut it. Then simply place the new ribbon on top of the existing end with the solder blobs on it. Press down with the heated tip from on top of the solder pads and the heat should be enough to melt the solder beneath. It should flow right up through the holes with the pressure and voila.

    jonathan -

    Jonathan did you post any photos or a video of your soldering the new headphone jack to the logic board? I did as you did and broke the small ribbon or cable connecting the headphone jack to the logic board. This is my first attempt at repairing an electronic device, and it ended very badly.

    Lucy -

    I do it without removing the smaller card : it is more safety !!

    Christophe BRETON -

  11. CCIHgfGXa5snEwhO
    • Das Logic Board und der Akku können nun vom restlichen iPod getrennt werden.

  12. xdsZIZMTOF5iSOKx
    xdsZIZMTOF5iSOKx
    PQjnkmgIUNV3n5YF
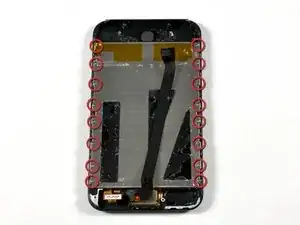
    • Ziehe das orangene Klebeband von der Rückseite des Displays ab, um die sechzehn Kreuzschlitzschrauben freizulegen.

    • Entferne die sechszehn Kreuzschlitzschrauben #00.

  13. gVjkJYIFqUAYmAFW
    gVjkJYIFqUAYmAFW
    iRx6EnsafJKeMkql
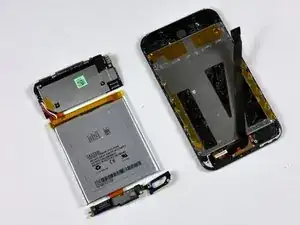
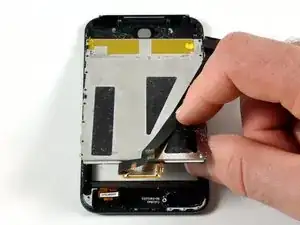
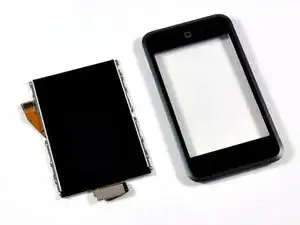
    • Hebe das Display vorsichtig hoch und löse es vom Frontpanel ab.

    • Das Display und das Frontpanel sind nun komplett voneinander getrennt.

    hi,

    after you take the display unit out. You have to separate the display from the al. backing plate. it is held on with glue so gentle prying with the spudger tools will do it for you. i started from one of the loose corners and used the opening tool to enable the spudger to get in.

    fantastic teardown,keep up the good work

    jigs

    jigalinb -

    Once you have re-assembled the iPod, the screen will not work unless you restart it by holding down the power button and the Home button down for a few seconds until you see the Apple logo.

    soulSnax -

    Some questions on re-assembly. I took mine apart because it got wet, so stopped after Step 13--I don't see a reason to take the front panel off--altho I may hit it w/the hair dryer just to ensure everything is dry. I'm also gently scrubbing the connectors and boards to remove built-up dust and crap. Any other suggestions?

    My Q's: do you re-use the various pieces of tape that were removed during dis-assembly? what about the glue--just stick things back on whatever glue is left or should I apply some anew? If so, what kind of glue do I use?

    I'm optimistic I'll be able to put it back together, thanks to this great site! Hopefully it will work as good as new.

    NoH2O -

  14. 3jH5T32UpDEmWWtA
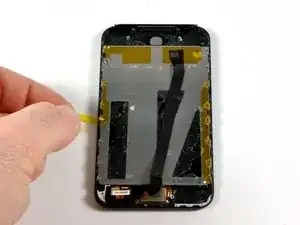
    • Du musst den metallen Abstandshalter auf das neue Frontpanel übertragen. Dadurch kommt der Home Button in Kontakt mit dem Logic Board.

    • Dieser Abstandshalter ist am Frontpanel festgeklebt. Setze den Spudger sorgfältig darunter und heble ihn heraus.

    What part of the board registers the “click”? I replaced the digitizer and I see the gold contact point however when home button is pressed there is no click sound and no click is registered. I don’t see any other area that would contribute to a click.

    Steve Sobs -

Abschluss

Um dein Gerät wieder zusammenzubauen, folge den Schritten in umgekehrter Reihenfolge.

Will Budney

Mitglied seit: 28/04/10

2350 Reputation

0 Kommentare