Einleitung

Diese Anleitung soll den all denen helfen bei denen das reMarkable nicht mehr vom Hersteller unterstützt wird, bitte fange also erst mit der Reparatur an, wenn du alle anderen Möglichkeiten vom Original-Hersteller ausprobiert hast!

Weil die Aluminium-Rückplatte des Geräts am Kunststoffrahmen festgeklebt ist, ist es sehr schwierig, sie zu entfernen und wieder anzubringen. Ich würde empfehlen, die Reparatur nicht ohne geeignete Werkzeuge und etwas Erfahrung im Reparieren zu beginnen.

"Ich werde keine Verantwortung für jeglichen Schaden, der durch folgen dieser Anleitung entstanden ist, übernehmen. " Und wie oben schon erwähnt, setze dich wenn möglich als erstes mit dem reMarkable Support in Kontakt.

  1. PhB66CFIoPaVWxMW
    PhB66CFIoPaVWxMW
    nEuIh12LgfrIjdqN
    • Stelle als Erstes sicher, dass du dein reMarkable ausgeschaltet hast, bevor du mit dem Reparatur-Prozess anfängst.

    • WARNUNG: Das Display darf nicht mit Alkohol oder sonstigen Lösungsmitteln in Berührung kommen, da dies das Gerät beschädigen könnte.

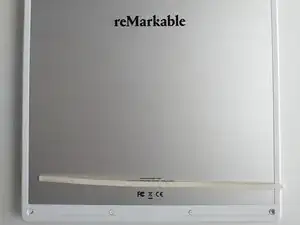
    • Entferne sowohl die unteren als auch die oberen Gummistreifen. Dadurch werden 6 kleine Kreuzschlitzschrauben sichtbar.

    • Entferne alle 6 Schrauben.

  2. aolKHPPBgQbSsIZB
    • Die Aluminium-Rückplatte ist an das Gerät geklebt und du wirst ein gutes Hebelwerkzeug benötigen, um die Rückseite von der Kunststoffhalterung zu trennen.

    • Der Kleber hält alle 4 Seiten zusammen, der Kleber verläuft auch vertikal und in der Mitte nach unten.

    • Der schwierigste Teil ist, dort anzufangen, wo der Spalt zwischen der Rückplatte und dem Gerät am größten ist, um ein Hebelwerkzeug anzusetzen, ohne die Aluminium-Rückplatte zu verbiegen.

    • Fange bei einer der oberen Ecken an. Entferne langsam und vorsichtig die Aluminium-Rückplatte mit einem stabilen Hebelwerkzeug, das zwischen die Rückplatte und das Gerät passt.

    The gap between the aluminium plate and the plastic is quite snug. What sort of spudger did you use?

    Erm -

    I have used the tools that are on the picture. To start, I have probably used the black handle pointy tool and then with the metal flat headed to go around... At least that is how I would do today ;-). Those tools were the time available for me, so I am not sure if you have any similar looking and similar strength of tools in iFixit store. They do improve their tools set time-to-time, so I kinda think they must have something...

    Visegradi Istvan -

    What's the point of removing the aluminum backplate? Can we not skip to removing the plastic frame and keep the aluminum backplate attached to the plastic frame with no reduction in access to the internals?

    I only see 6 screws in the picture which aligns with the six holes that aren't covered by the aluminum backplate. So if none of the other holes that are beneath the aluminum backplate have screws, it might seem like a good opportunity to leave it attached.

    But I may be missing something. Please let me know, thanks.

    Trent Wilson -

    If you do not remove the aluminium backplate then you have no access to any internals at all.

    You see that I started with the 6 screws but than I get nowhere. Nothing was lose or removable. Only option was left to continue with the backplate. (Which in a sense makes step1 and step2 to be possibly done in any order you wish)

    In step 3 you can also see that there are 15 more screws to be able to separate the plastic frame from the magnesium base.

    If you do not belive then just try it yourself :-)

    Visegradi Istvan -

    I understand now. Thank you for clarifying this for me Visegradi.

    Trent Wilson -

    i got through this step by drilling a tiny hole in the corner of the aluminium plate. not the most beautiful approach, and you have to be super careful only to drill through the aluminium and not the plastic below. but it worked.

    damian -

    I cut away part of the frame that connects to the metal back plate by gouging gently with a sharp knife until an edge of the frame was visible and the knife could go between. I then extended the blade and ran it under the plate all the way around several times. I suggest gouging on the bottom left corner, as it'll be noticeable.

    When replacing-I recommend bending the plate slightly concave (so the edges touch the frame first), then the glued centre part of the frame will hold the edges down rather than them peeling up slightly.

    Sam Wane -

  3. fUdnCB2hkcsEyvfZ
    fUdnCB2hkcsEyvfZ
    WhBgwIAXKsvAPhPZ
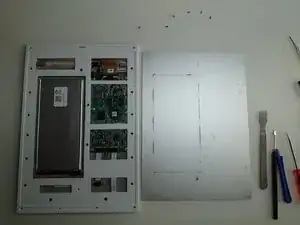
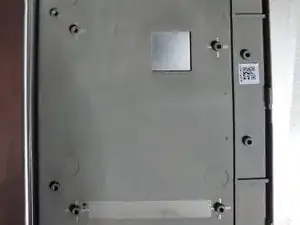
    • Es gibt 6 Schrauben auf beiden Seiten und 3 Schrauben im mittleren oberen Bereich. Entferne alle (6+6+3) 15 Schrauben. (Die 2 Schrauben auf der Unterseite müssen nicht zwingend entfernt werden).

    • Nachdem die Schrauben entfernt wurden, kann der Kunnststoffrahmen von der Hauptplatinenhalterung gelöst werden. ZWISCHEN DEN BEIDEN TEILEN BEFINDET SICH AUCH ETWAS KLEBER/FÜLLER! Sei vorsichtig beim Trennen der beiden Stücke.

    I found this part equally difficult. Turning the tablet so the screen is facing me, I ran my thumbnail around the thin joining line just on the inside of the frame. This loosened the filler and enabled the outer frame to leave the screen.

    Sam Wane -

  4. 3InWS4S56LH1vALw
    • Ziehe/heble den Akkustecker nach oben, um ihn vom Mainboard abzulösen.

    Note, pull up the connector like it says. I tried to pull it out (like normal connectors) but this hinges up and away from the tablet. I pulled by the cable and mashed the connector-but with an old battery it didn't matter

    Sam Wane -

  5. 2xtyJUYQOebthdH4
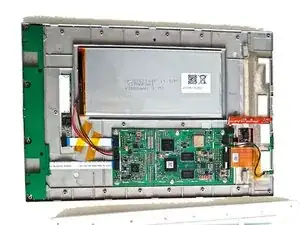
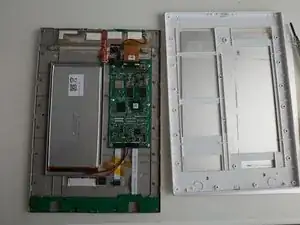
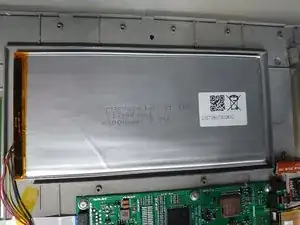
    • Nutze einen ähnlichen Akku, um den Original-Akku zu ersetzen.

    • Der Akku ist mit etwas Kleber befestigt. Verwende ein robustes Werkzeug, um den Akku von seiner Position zu entfernen.

    No need to go further if replacing the battery, just put it back together now

    Sam Wane -

  6. CrtuWIUFGhaHHCud
    CrtuWIUFGhaHHCud
    hDkkBybBZNjo224U
    NRZNMe1OMYlkif26
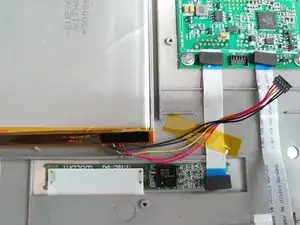
    • Um das Mainboard ersetzen, entferne alle Stecker. Alle Stecker funktionieren ähnlich - hebe den schwarzen/hinteren Teil an und ziehe alle Kabel heraus. Die zwei Ausnahmen sind der Stecker zum Akku, den du einfach nach oben ziehen oder abhebeln kannst, und der WiFi-Koaxialanschluss, der ebenso behandelt werden sollte.

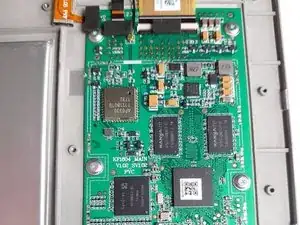
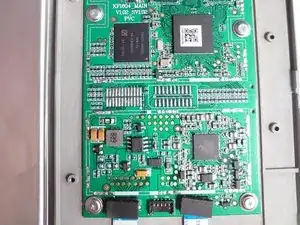
    • Es gibt 6 Schrauben mit speziellen Unterlegscheiben, die das Mainboard am Rahmen befestigen.

  7. MV1ARnFU5egJsvB1
    MV1ARnFU5egJsvB1
    v2gKjWfCxyltpdgl
    R1FtG6eAkNrMAugN
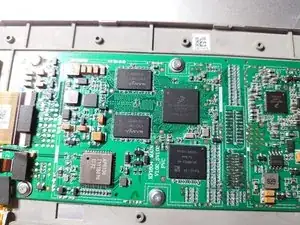
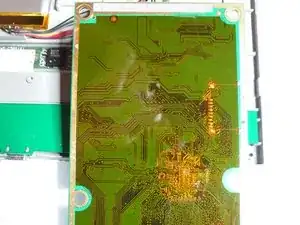
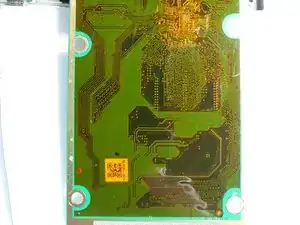
    • Interessanterweise enthält selbst die andere Seite des Mainboards einige Elemente nahe der CPU, die ein halbkreisförmiges Loch im Rahmen benötigen... eine interessante Designentscheidung.

  8. BXM4RUsTb1TjRjsG
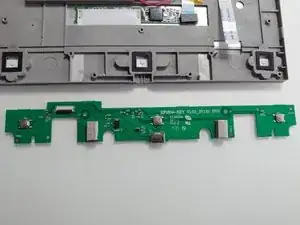
    • Entferne die 2 Schrauben, die das Tasten-/USB-Panel zusammenhalten.

    • Trenne das Flachbandkabel vom Panel, indem du den schwarzen/hinteren Teil des Steckers nach oben drehst/ziehst (siehe Bild).

  9. EfN3x2WTwbgOyXac
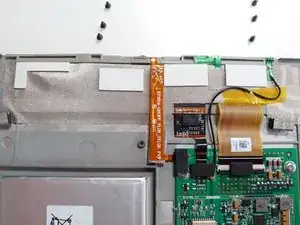
    • Illustration, wie der Ein-/Aus-Schalter und das WiFi-Kabel mit dem oberen Teil vom Mainboard verbunden sind.

Abschluss

Um dein Gerät wieder zusammenzubauen, folge diesen Anweisungen in umgekehrter Reihenfolge.

Visegradi Istvan

Mitglied seit: 22/12/18

319 Reputation

11 Kommentare

The one thing I’m having difficulty with is simply identifying the proper battery. Suggestions/source would be greatly appreciated. Unfortunately “similar to” doesn’t give much guidance.

Crawford Long -

@crawfordlong, Unfortunately, it looks like Remarkable isn’t too keen on the end user replacing their own battery so they don’t provide the specific battery you would need. I did find this on their website. You could probably contact them directly and ask about battery specs? They’ll probably warn you about it voiding your warranty, but it’s worth a shot.

Kris Rodriguez -

They have been awful. Completely ghosting any request for technical information after I rebuffed their attempt to turn a tech support request into an upsell opportunity (for a new tablet). I’m unlikely to support them in the future at this point, given the way they’ve handled this. I would have been fine with almost any answer, up to and including “I’m sorry, we do not recommend and do not assist with out of warranty self-repairs.” But losing all interest in communicating after I declined to spend several hundred dollars to replace a device that might simply need a battery? Horrendous.

Crawford Long -

I had a broken tablet, so I got it from there… but as far as I see from these old pictures a 3.7V 3000mAh battery with size 2867144 what was installed here. If you unable to find exact same size then I would go with any fitting size which is closely matching.

Obviously, if you do not know what you are doing then please DO NOT play with the battery! It can cause fire or other type of damages!!!

R,

PS: quick search gave me this (I have not tried to install it or buy it - this is only a search result)

https://m.nl.aliexpress.com/item/3275988...

Visegradi Istvan -

The issue I’m running into is the connector + number and nature of wires (everything I’m finding has a single +/- wire pair, not 2 pair + yellow). Frustrating. (And your warning is both appreciated and received, but I’m comfortable with the attempt.)

Crawford Long -

Hello and thank you so much for you guide

I find a battery online on a “BIG BAY “

But according to this vendor the dimensions are essential

But 3,7volts are standard exactly like apple 🍏 battery inside … are all the same different dimensions….

Are extremely cheap considering giving new juice to your device 👍🏻 And new life !

Thank again cheers

analfabetagoloso -

I was able to purchase this battery.

https://www.aliexpress.us

It fits perfectly in the thin design of the remarkable 1 tablet and works; however, once the battery was drained, I could not get it to charge. I checked the ports with a multimeter the voltage reads 3.5 V when the battery is disconnected and the tablet is connected to a charger. When I connect the battery, it reads 3.7 V. The old battery I had it was also reading at 3.7 V.

Please if you have any suggestions to make this work, let me know.

I am not an expert, but I know my way around this kind of stuff.

Sinan Aqrawi -

I also tried this battery and had the same issue. The plug on this battery didn't fit the port on the back of the tablet, so I cut the plug off of this battery, cut the plug off of the old battery, and one-by-one reconnected the wires (red to red, red to red, white to yellow, black to black, black to black).

The tablet started up fine and worked until it needed to charge. It won't charge.

I found a unrelated battery-mod post elsewhere, involving a Wii U gamepad. Instead of swapping at the wire level, that user disconnected the old battery at the PCB, and swapped the lithium cells themselves, stating it was necessary step "In order for the new battery to work properly and not run into issues like not being able to power up the console..."

https://old.reddit.com/r/WiiUHacks/comme...

Screenshot of text:
https://cdn.discordapp.com/attachments/9...

I threw out my old battery so I'm out of luck.

Risky C. Moe -

Hi, do you have any idea where to buy a similar battery? What I find on aliexpress and ebay is only has three or two wires and the original has five.

https://www.aliexpress.com/i/10050038156...

https://www.ebay.com/itm/New-3-7V-3000mA...

Gergő Szembratovics -

Simply use a heat gun to soften the glue holding the back panel in place (250 C is enough)

FinStP -

Hello, i dismounted mine and it finally worked after taking out the battery and placing it back again, but there is an issue with charging it. There seems to be overheating the component called: AG 9K126. Do you now if we can replace it or how can we charge the battery without the usb connector?

Thanks!

Cristina Guisado -