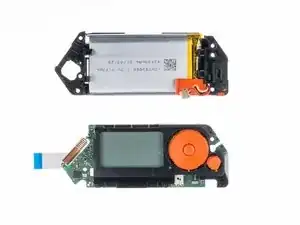
Einleitung

Der Flipper Zero ist ein tragbares Multi-Tool für Pentester und Geeks in einem spielzeugähnlichen Gehäuse. Er liebt es, digitale Dinge zu hacken, wie Funkprotokolle, Zugangskontrollsysteme, Hardware und mehr. Er ist vollständig quelloffen und anpassbar, sodass du ihn nach Belieben erweitern kannst.

  1. PQJuABmOeCvrSpQX
    • Verwende keinen Alkohol oder alkoholhaltige Reinigungsmittel, Tücher, Tupfer oder Desinfektionsmittel auf dem Bildschirmschutzglas! Dies kann das Displayschutzglas beschädigen.

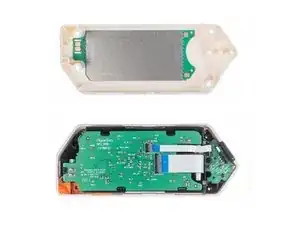
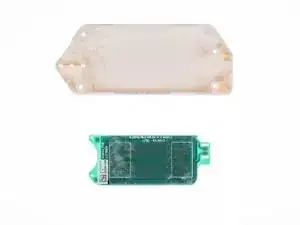
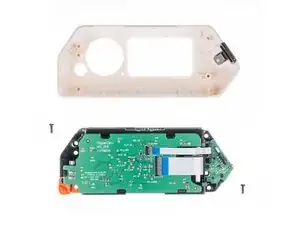
    • Die IR-Abdeckung und das Displayschutzglas sind mit der oberen Abdeckung verbunden und können nicht getauscht werden.

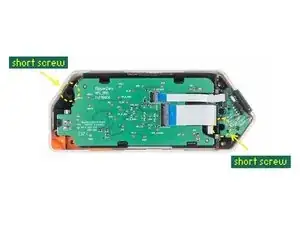
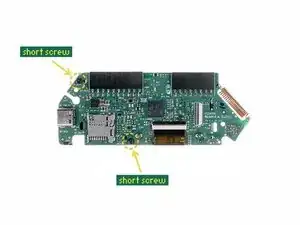
    • Im Flipper Zero kommen nur zwei Schraubentypen vor:

    • Lange Schraubengröße: 1,8 x 8mm

    • Kurze Schraubengröße: 1,8 x 4,5mm

  2. Xkx3MjRElM1NP1Ip
    • Entferne die microSD-Karte (falls vorhanden), indem du sie mit deinem Fingernagel reindrückst.

  3. rVf3Pb6kNjgG3DyQ
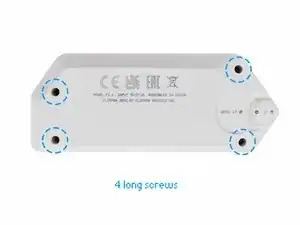
    • Benutze einen PH0-Schraubendreher, um die 4 langen Schrauben zu lösen, mit denen das hintere Gehäuse befestigt ist.

  4. ekhPVJGevZylMfAg
    ekhPVJGevZylMfAg
    FbDvsPu1EmmDo5IG
    xpgkVebRsxN4kwsS
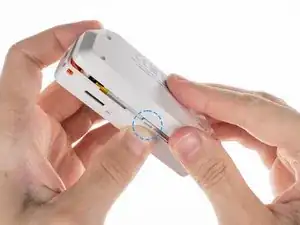
    • Drücke nacheinander mittig auf die Seiten der oberen Abdeckung, um die Laschen zu lösen, die die hintere Abdeckung festhalten.

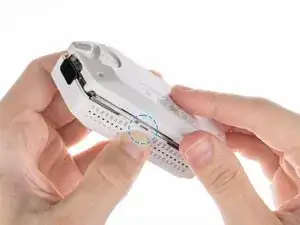
    • Sobald die Laschen frei sind, kannst du die hintere Abdeckung abnehmen.

    You need to press a little stronger between the GPIO ports than next to the SD-card slot.

    EpicErik HD -

  5. pIxCjQ6Bu2OaiuxJ
    • Die Platine mit der NFC-Antenne ist mit Klebeband an der hinteren Abdeckung festgeklebt.

    • Um die Platine zu entfernen, hebe vorsichtig eine der Kanten der Platine mit einem Plektrum an, um das Klebeband abzulösen.

    This is not just the NFC antenna, it also includes the 125khz antenna for RFID reading/emulation.

    Jeroen van der Heiden -

  6. 21MoGCCmXZNfKEKm
    21MoGCCmXZNfKEKm
    eLQthvxfV1ErYTIS
    • Ziehe vorsichtig den Rest der Platine heraus.

  7. QfjWFTPXF41DhSWU
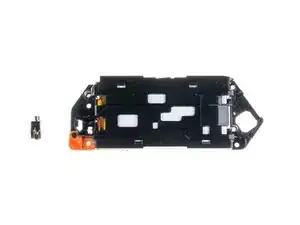
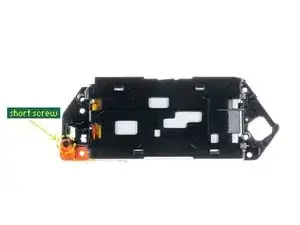
    • Benutze einen PH0 Schraubendreher, um die beiden kurzen Schrauben zu lösen, die den Rahmen mit der oberen Abdeckung verbinden.

    When I did this I had a long screw and a short screw. The long screw was top left. Thanks for the excellent guide!

    Patrick Coyle -

    I also had 1 long and 1 short screw

    Žiga Deisinger -

  8. GHpVTYwHKSB1UHRZ
    • Nimm den Rahmen aus dem Gehäuse heraus.

    take the chassis out of the case... well alright... please explain how because it's very much stuck at the side of the USB port :/
    2023 version is different than the 2022?

    remco katz -

    My case is unable to disconnect from the chassis

    Dillon Henault -

    I found out... on some models there are another set of screw on the board with the screen. So you need to carefully remove the first board. Moving the orange plastic stuff helps. Also the boards will still be connected by the battery cable. So you will need to rotate one board over the other gently to access the 2 last screws... epic!

    sebastien.barbieri -

  9. ORDmGDgWJAkGDRlI
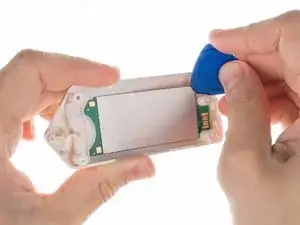
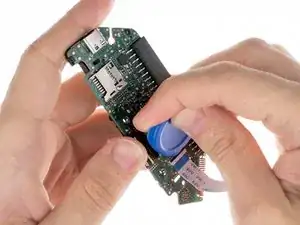
    • Klemme den Akku ab, indem du den Stecker mit einem Kunststoffwerkzeug vorsichtig aufhebelst und herausziehst.

    • Benutze dazu keinen Metallschraubendreher oder ähnliches Werkzeug aus Metall. Dies kann zu einem Kurzschluss des Akkus führen und ihn beschädigen.

  10. cRXnQCQGs6XCZCUG
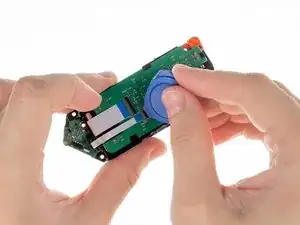
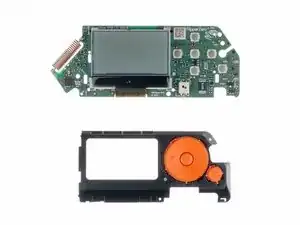
    • Trenne das große Flachbandkabel von der Platine ab. Benutze ein Plektrum aus. Kunststoff, um die Lasche anzuheben und die Verriegelung zu öffnen.

  11. ZpqvrILl4Kp6eEvQ
    • Sobald die Stecker gelöst sind, kannst du die Flachbandkabel vorsichtig herausziehen.

  12. TVHkBFeHNgwSLtOE
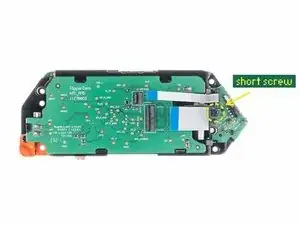
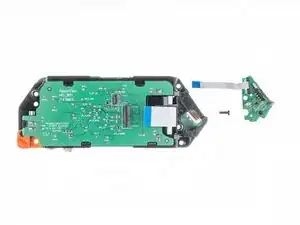
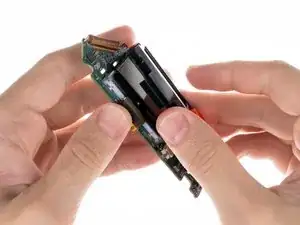
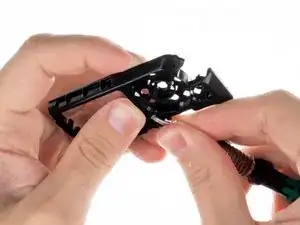
    • Entferne mit einem PH0 Schraubendreher die kleine Schraube, mit der die iButton Platine befestigt ist.

  13. g3NS62xDYnRICPXI
    • Wenn die Schraube entfernt ist, kannst du die iButton Platine herausnehmen.

  14. hGPuCrbgYMDLYRCB
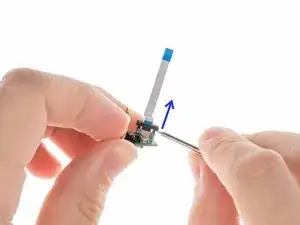
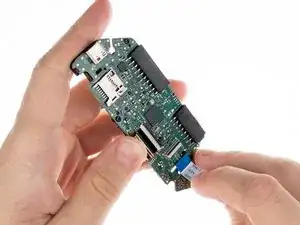
    • Benutze einen Schlitzschraubendreher, um die Verriegelungslasche des Flachbandkabels nach oben zu heben. Ziehe dann vorsichtig das Flachbandkabel heraus.

  15. OAJAXQB3lHjXeWFo
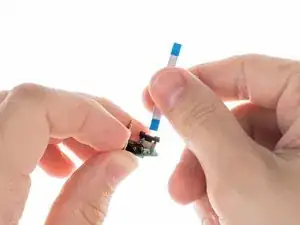
    • Sobald der Stecker entriegelt ist, kannst du das Kabel vorsichtig aus dem Anschluss ziehen.

  16. F6odPQBvB2TQEfZ5
    F6odPQBvB2TQEfZ5
    ySMEnLQKq3Yqgylr
    • Um die Akkuhalterung zu entfernen, bewege sie vorsichtig vor und zurück, während du die beiden Teile auseinanderziehst.

    I'd say it's just a little more than a "gentle rock". There are two tabs. One is visible to the left of the display, through the PCB. The other is hidden under the buttons. I gently released the visible one by flexing it away from the display, and then the other came loose more easily with some gentle encouragement.

    whereami -

  17. dOwRmQTFFpov2rIK
    • Um die NFC RFID Platine zu lösen, löse die Laschen in der gezeigten Reihenfolge.

  18. KEqBCnnFC4MbLMKt
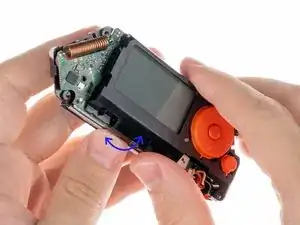
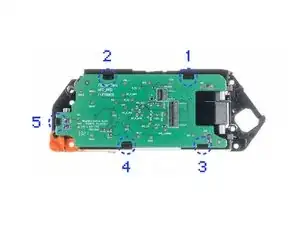
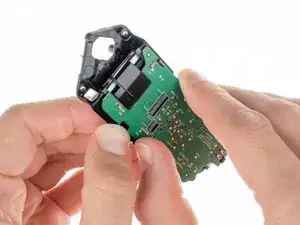
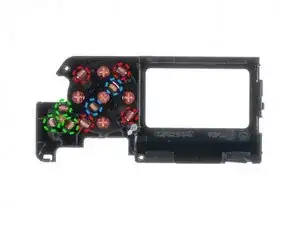
    • Löse die Platine von den Laschen, indem du an der Kante des Gehäuse nahe der Lasche in der gezeigten Reihenfolge drückst.

  19. CeVKc2Q3UWKdUvvk
    CeVKc2Q3UWKdUvvk
    tPbKrl3xngZR3GhY
    • Nimm den Vibrationsmotor aus dem Gehäuse heraus.

    Do we have a part number for the motor?

    James Randolph -

  20. RuQuLNPDrG1fkTu1
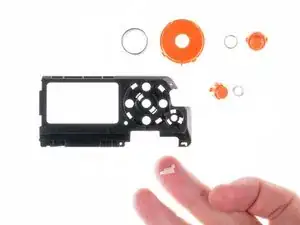
    • Um die Halterung für die Trageschlaufe zu entfernen, löse die kurze Schraube, mit der sie befestigt ist, mit einem PH0 Schraubendreher.

  21. HZ1yT6jDXHIUUHM2
    • Entferne die Halterung für die Trageschlaufe vom Rahmen.

  22. scLYMMBAHiTmF3NV
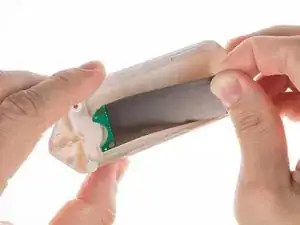
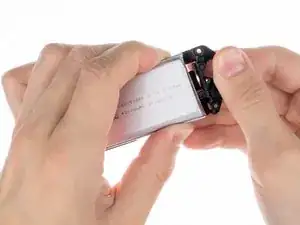
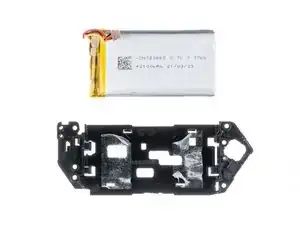
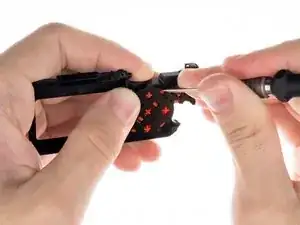
    • Der Akku ist mit doppelseitigen Klebeband am Gehäuse befestigt. Benutze ein Plektrum aus Kunststoff, um den Akku vorsichtig vom Gehäuse abzulösen.

    • Vorsicht: Stich den Akku nicht mit scharfen Werkzeugen an. Aus einem angestochenen Akku können gefährliche Chemikalien austreten oder er kann sich entzünden.

  23. Lpwh1ffJNTlwDsXe
    Lpwh1ffJNTlwDsXe
    3IYYl35RMNDVLl4Z
    • Entferne den Akku aus dem Gehäuse.

    where is the replacement battery? what are the dimensions of the battery?

    Arni Nym -

    This kind of battery is standard, as this device is not a known brand, you will not find a Flipper Zero branded spare part batteries, indeed, it's a standard no-name Li-Po battery that is being used in this device.

    From the picture, we can guess this battery is a standard 3.7V Li-Po battery having a power capacity of 7.77W, so the capacity is indeed 2,1Ah -> so 2100 mAh of capacity.

    Note : we can observe there is a circuit protection (BMS) on this battery, I don't know how this device reports voltage, temp and other battery-related stats but these features may not work properly if BMS of the new battery is not compatible with the device firmware.

    After more research, I found the data sheet of this battery for you as the manufacturer of this device made public a lot of hardware related docs : https://cdn.flipperzero.one/FLIPPER_ZERO...

    I found dimensions are specified in it with other useful information. So I don't know which dimensions you are searching for, there are mentions on page 4 of this doc

    Brendan -

    There is also additional dimensions specified page 5 and also pictures starting page 22.

    This document has been made by the chinese laboratory in charge of thesting the safety of the battery used in the flipper zero device.

    Brendan -

  24. JjxCkxSm3PF2bJwD
  25. TPWsBjLSTSAVkupG
    • Ziehe das Flachbandkabel heraus.

  26. ubAIKFULQyuFUTaj
    • Löse die beiden kurzen Schrauben, mit denen das Tastengehäuse befestigt ist, mit einem PH0 Schraubendreher.

  27. 3JG1etLlCLFZRRYi
    • Drücke auf die abgebildete Lasche, um das Tastengehäuse von der Platine zu lösen.

  28. NMTgFPJjmUUAcTQ4
    NMTgFPJjmUUAcTQ4
    RWiXkgRStjfKPZxd
    • Entferne das Tastengehäuse.

  29. mFyr2EoaDLGX2hNl
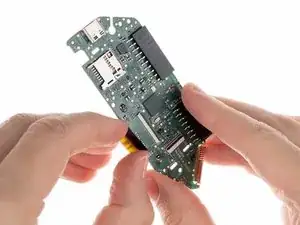
    • Trenne das Display-Flachbandkabel von der Platine ab.Hebe mit einem Plektrum aus Kunststoff die Lasche hoch, um die Sperre zu entriegeln.

  30. IXuPa6IoBoIs5D2P
    • Ziehe das Flachbandkabel aus dem Anschluss auf der Platine heraus.

  31. EeaJBfSbI3PZoqjp
    • Um das Display zu lösen, musst du zwei Kontakte entlöten.

    • Achte bei diesem Schritt darauf, dass du nicht versehentlich andere Bauteile in der Nähe schmilzt oder entlötest.

  32. fexNkgRkTMdnR1dS
    • Um die Tasten zu entfernen, musst du die Laschen lösen.

    • D-Pad

    • OK-Taste

    • Zurück-Taste

    • Die mittlere Taste (OK) wird erst nach dem D-Pad entfernt.

  33. FGWEpntlD2uhEKZ3
  34. 3VW5itLpHwy6louN
  35. qEphZjBe2p3UX4aU
    qEphZjBe2p3UX4aU
    AyQXrAMkMBhvxuUS
    • Ziehe den Lichtleiter aus dem Inneren des Gehäuse heraus.

  36. weZSuIQ2yQRlri43
    • Hier kannst du alle Teile zusammen sehen.

Flipper Devices

Mitglied seit: 29/06/22

685 Reputation

14 Kommentare

I'd say, that long screws requires PH1 screwdriver.

Evge Key -

Agree with Evge, when I read "PH0" I picked mine but they wouldn't quite fit. I had to use a PH1 (1.2 to be exact, according to toolset casing) to be able to unscrew the chasis and get to the battery (I had to only remove and plug back the battery cable to fix my problem)

João Ciocca -

Careful with those screws. They are not great quality and strip easily.

andy cooper -

Yeah, I have run into the same issue. The screw securing my IR/iButton board sheered in half! I cant remove the bottom part since its flush with the socket, but the board seems to be alright without it and is still in place since the chassis supports it. I still need to find a way to get it out :)

SkidFace -

Do you know what kind of these screws are?

Gugo -

Second that about the screws being low quality. Also, if your FZ battery decides it doesn't like you anymore (it shows some 50%ish max), open it (steps 1-4), disconnect it (steps 7-9), and reconnect the battery. And it seems to be something that's gonna be routine, because it happened back in October and again now in December.
When disassembling this time I checked the screws better, and it seems a 2.0 phillips is the best fit for the long screws.

João Ciocca -

Second the question for what kind of screws are being used? Size/thread?

Enygma -

Am I the only one that ended up with 5 long screws?

geronimo larralde -

My small iFixit toolkit doesn't have the right bits for step 3. PH0 strips the slot on the screw, and PH1 does not fit into the hole. If you have the same tools as me, don't force it, you'll do damage to the screws. Try other screwdrivers.

Tamás Hegedűs -

The IR cover does come out, just pull

Carters lil channel -

there are three golden pins that fall out when you open the clamshell. this doesnt show them or where they go. fml.

Bob L. Phishmann -

Those pins are supposed to be attached to the IR board, you have accidentally broken them off in the disassembly, they can only be soldered back on with a soldering iron/hot air station. You can also just leave them in their respective holes and the press of using the pins, will make them make contact with the board, they will just be loose. Or leave them out entirely, iButton isnt too common in most countries.

Francis -

what do i buy to replace gpio pins 1-8?

Michael S.bush -

What about the wifi module? Is it possible to fix it? I have this kit https://www.sdrstore.eu/software-defined... and the wifi board stopped working after 2 months. Is there any way I can fix it?

Engelbert Jacobs -