Einleitung
Werkzeuge
-
-
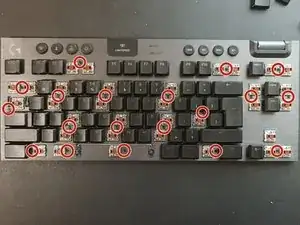
Entferne alle Tastenkappen, um die Schrauben darunter freizulegen, indem du einen „keycap puller“ oder deine Finger benutzt. Benutze einen Kreuzschlitzschraubendreher #00, um die Schrauben zu entfernen.
-
-
-
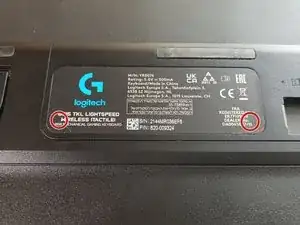
Drehe die Tastatur auf den Kopf. Du wirst nun einen schwarzen Aufkleber mit einem Logitech Logo sehen. Darunter befinden sich zwei Schrauben, die den Akku befestigen. Benutze einen Schraubendreher, um die Schrauben zu entfernen. Entferne das Plastikgehäuse.
-
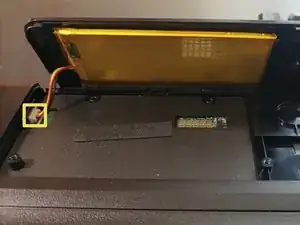
Ziehe vorsichtig den Akkustecker heraus, indem du an dem kleinen Plastikstecker ziehst.
-
-
-
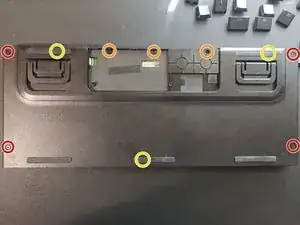
Entferne zuerst alle Rot und Orange markierten Schrauben, da diese am einfachsten zu lösen sind.
-
Drei Schrauben sind unter den Gummifüßen. Diese sind in Gelb markiert. Um die Gummifüße zu entfernen, benutze etwas Scharfes, um sie vorsichtig hochzuheben. Die Füße sollten noch mehrere Male klebrig bleiben, nachdem du das gemacht hast.
-
-
-
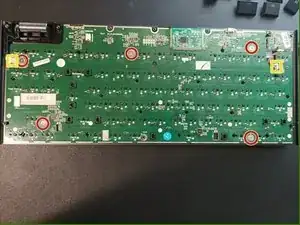
Wenn du die Platine entfernen möchtest, musst du alle Tastenkappen entfernen und alles abschrauben und trennen.
-

7 Kommentare
on this last step, when the 5 screws were removed, I was not able to remove the circuit board. Not sure what was still holding it in place
1. The PCB is not removable without de-soldering every switch. There is a slight overlap.
2. For replacement switches/keycaps, Kailh low-profiles should work because there are just slightly custom Kailh (the switch's clear casing has "Kailh" imprinted on it)... as long as you are willing to make slight modifications with a dremel.
3. If you want to reduce weight, the bottom casing has a glued, steel plate with no purpose except to increase the weight. A heat gun can be usefull to loosen the adhesive if you're afraid of breaking the plastic case.
4. I used water and a toothbrush to clean under the caps, then let sit on a heat plate for 10 hours before plugging the battery back in.
Does anyone know how to take off the legs / kick stands? I have replacements but I don't know how to remove the old one which has broken
if i want to do maintenance that requires removing the top chassis only, can i do this step only? or are all steps required (i.e. removing battery and all screws from bottom).
I dont need to remove the PCB i am just trying to replace the rubber media keycaps.
Deltron Z -