Einleitung

Obwohl der Nintendo 3DS in den Vereinigten Staaten erst am 27. März erscheint, wurde er in Japan bereits am 26. Februar veröffentlicht. Wir haben einige Fäden gezogen, um dieses japanische Modell zu erwerben, und können es kaum erwarten, zu sehen, wie der 3DS tickt. Sei heute mit dabei, wenn wir Nintendos neuestes und bisher radikalstes Handheld-Gerät unter die Lupe nehmen.

  1. kIdasThA5Uc3dKEZ
    kIdasThA5Uc3dKEZ
    IT5fmQpIhs2TcEs1
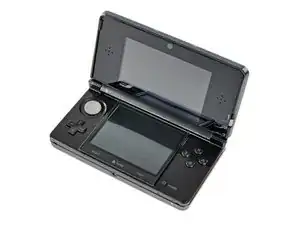
    • Frisch aus dem Land der aufgehenden Sonne kommt der lang erwartete Nintendo 3DS! Es ist ein großartiges kleines Gerät, und es fühlt sich hochwertig an, wenn man es in die Hand nimmt.

    • Das Äußere des neuesten Geräts der DS-Reihe weist einige Neuerungen auf:

    • 3D-Top-Display

    • Duale Kameras für 3D-Bilder und Spiele

    • "Circle Pad"-Joystick

    • IR-Schnittstelle

    • Metall-Stift

    • Überarbeitete Start-/Auswahltasten und eine neue Home-Taste

  2. RACIKUTqHLSDi6tn
    • Hier siehst du, wie er im Vergleich zum Nintendo DSi XL abschneidet. Man beachte, dass das Gehäuse etwas dicker ist, dafür aber eine kleinere Grundfläche hat.

    • Nintendo hat das Layout auf der Oberseite des 3DS im Vergleich zum DSi XL geändert.

    • Der Ladeanschluss wurde auf die rechte Seite verlegt, und es wurden Kontakte hinzugefügt, vermutlich für die Ladestation, das Stiftloch befindet sich jetzt neben dem Steckplatz für die Spielkassetten, ein IR-Sensor-Fenster wurde hinzugefügt, und die Löcher für einen Trageriemen wurden gestrichen.

  3. eFByWckqSmYdcnm3
    • Der 3D-Anpassungsregler. Mit diesem Schieberegler kannst du festlegen, wie tief du das 3D-Sichtfeld sehen möchtest.

    • Das obere Display des 3DS erzeugt Berichten zufolge 3D-Bilder durch die Verwendung von Parallaxe. Eine Schicht im oberen LCD-Display reagiert auf die Einstellungen des 3D-Schiebereglers und verändert das Bild leicht zwischen deinen beiden Augen. Wenn man es aus der empfohlenen Entfernung betrachtet, erscheint das Bild in 3D.

    • Nintendo ist kein Anfänger in Sachen 3D-Spiele, wenn man bedenkt, dass das Unternehmen in der Vergangenheit Erfahrungen mit dem lächerlich coolen und unterschätzten Virtual Boy gesammelt hat, der einen ähnlichen 3D-Effekt mit etwas anderen Mitteln erzielte.

    • Die 3D-Ansicht *sollte* für die meisten Leute funktionieren, aber ein iFixit-Mitarbeiter (von etwa 10, die es ausprobiert haben) hatte Probleme, sie zu sehen. Für ihn sah der Bildschirm anders aus, aber nicht "3D"-mäßig.

  4. IoKvdLAkHsuDMXxL
    IoKvdLAkHsuDMXxL
    pnGYr6PWWBKXhGYK
    hXJMBGsqPULThOul
    • Wir haben eine interessante kleine Besonderheit des 3DS entdeckt, als wir zufällig etwas Staub mit Druckluft wegbliesen.

    • Externe Mikrofone auf dem 3DS nehmen das charakteristische Geräusch des Windes auf, der am Gerät vorbeifliegt, und drehen die Live-Symbole im Hintergrund jedes Menüs, als ob sie sich in einem Tornado befänden.

    Any noise will trigger this, though. Even coughing.

    neonnero -

  5. RFH4US3X66fXYKCY
    RFH4US3X66fXYKCY
    OrjGYvYotn3wCULi
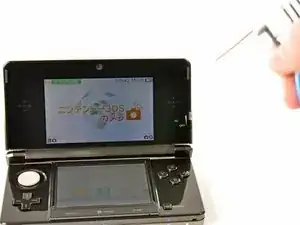
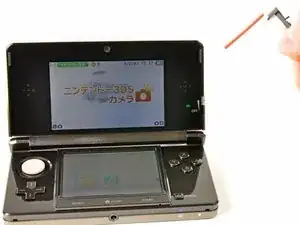
    • Es stellt sich heraus, dass 3D nicht sehr gut zu erkennen ist, wenn man versucht, ein Foto davon zu machen. Das berührungsempfindliche untere Display und der neu gestaltete Metallstift sind jedoch gut zu erkennen.

    • Da keiner von uns im Büro fließend Japanisch spricht, müssen wir bis Ende des Monats warten, um einen 3DS zu bekommen, den wir voll genießen können.

  6. l31DElbHEobKBQpD
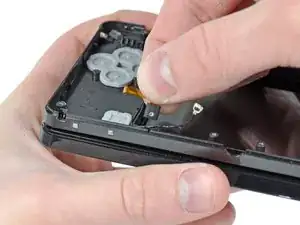
    • Ein paar Kreuzschlitzschrauben sind alles, was sich uns und dem Wertvollen in den Weg stellt.

    • Im Gegensatz zu früheren DS-Konsolen lässt sich die gesamte Rückwand des 3DS in einem Stück abnehmen, anstatt eine kleine Klappe für den Zugang zum Akku zu haben. Das sorgt für eine sauberere Optik, bedeutet aber auch, dass der Akkuwechsel etwas länger dauert.

  7. E2xSKjqUVqUOLaDY
    E2xSKjqUVqUOLaDY
    6MLkEKNK12PONaZr
    • Der 3,7V 1300mAh 5Wh Li-Ion-Akku bietet eine mickrige Laufzeit von 3-5 Stunden. Die tolle 3D-Action hat ihren Preis. Selbst beim Spielen von Original-DS-Spielen hält der 3DS mit einer einzigen Ladung nur 5-8 Stunden durch.

    • Die Akkulaufzeit wird höchstwahrscheinlich durch den angeblich schnelleren Prozessor, die beiden LCD-Elemente im oberen Display (zur Steuerung des Parallaxen-Effekts) und die hardwareintensiveren Programme beeinträchtigt.

    • Angesichts der kurzen Akkulaufzeit liefert Nintendo den 3DS mit einer Ladestation zum bequemen Aufladen aus. Laut Nintendo dauert eine volle Ladung 3,5 Stunden.

    What is up with Nintendo and the number 3.5?

    Joe Drew -

    I cannot find replacements for this backplate anywhere! Does anyone know?

    CORED3SIGN -

  8. EnGbwxdvbXWvwmdi
    EnGbwxdvbXWvwmdi
    E1PmuMLM2uYnku5P
    vyeXeG2SZJjZwpxC
    • Ein cooler Teleskop-Stift wird in einem Schlitz links neben dem Steckplatz für die Spielkassetten aufbewahrt.

    • Durch seine Metallkonstruktion fühlt er sich hochwertiger an als der einteilige Spritzguss-Stift, der bei früheren DS-Versionen verwendet wurde.

  9. SnDgIacVLJv5kkNE
    SnDgIacVLJv5kkNE
    IkjXAUHUgmdZch6A
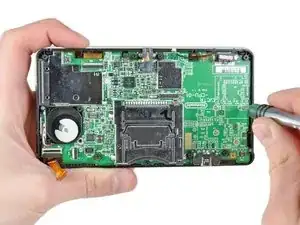
    • Ein paar Kreuzschlitzschrauben werden mit unserem bewährten 54-teiligen Bitsatz entfernt, und schon lässt sich das untere Gehäuse abnehmen.

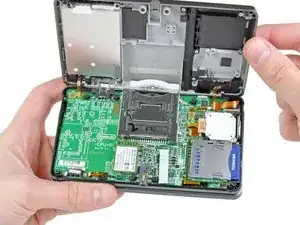
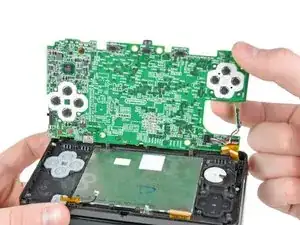
    • Wenn das untere Gehäuse abgenommen ist, erhalten wir einen guten Blick auf die Hauptplatine und die vielen angeschlossenen Komponenten. Da sich Elemente wie der Joystick und der SD-Kartenleser auf separaten Platinen befinden, ist ihr Austausch weniger kostspielig, falls sie in Zukunft kaputt gehen sollten.

    A PH00 is too big for these screws, and a PH000 seems to also be unable to snag it

    3dsuser -

    These screws strip INCREDIBLY easily. PH00 works, but you need to press down fairly hard and sorta jerk the screwdriver around a few degrees at a time. Even after working this out (by stripping the first one) I accidentally stripped the next-to-last screw I was removing, requiring me to cut the screw well.

    Tai -

    Another vote for using a PH000 bit for the smaller internal screws, it is a much better fit. Apply downward pressure to the bit as you turn.

    Matt Cooke -

    what are each ribbon cables on this bottom? the one behind the battery broke and i dont know if its worth replacing, ds works fine without

    sonic sega -

  10. 2lmCAgEK6rydGfPb
    2lmCAgEK6rydGfPb
    ErOT5MRuuBXISQRW
    WOssAmilZH1RKQcm
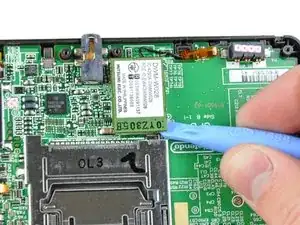
    • Die Wi-Fi-Platine kann mit einem Kunststoff-Öffnungswerkzeug leicht von der Hauptplatine entfernt werden.

    • Nachdem die einzelne Antenne abgezogen wurde, ist sie frei vom 3DS.

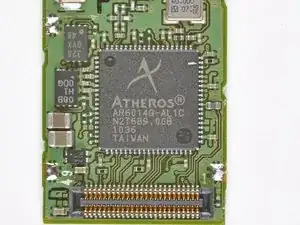
    • Auf der Rückseite des Boards befindet sich ein Aufkleber mit der Aufschrift Mitsumi DWM-W028, aber das Herzstück ist ein Atheros AR6014 IC für 802.11 b/g-Konnektivität.

  11. RRZgnVoDCrIujZKu
    RRZgnVoDCrIujZKu
    PvE1aYykjWsRBApn
    • Als Nächstes kann die winzige IR-Platine von der Platine abgezogen werden.

    • Noch weiß niemand genau, wozu der Infrarot-Port des 3DS dienen wird, aber wir vermuten, dass er für die Kommunikation zwischen 3DS und 3DS gedacht ist.

    • Der IR-Controller-IC wird von NXP hergestellt und trägt die Kennzeichnung:

    • S750 0803 TSD031C

    So far, atleast one thing uses the IR port.

    there is available a addon for the 3ds that gives you a extra pair of shoulder buttons and a second circlepad to the right.

    It uses the IR port.

    So supposedly the ir port allows for device to 3ds connection.

    mahonen -

    The guide skims over this part - though it's one of the most important.

    -

    The speaker ribbon cable (first picture, lower left, topmost cable/smallest of the 3 ribbons in this area) connects to the mobo goldteeth facing away from keyboard (damage/improper assembly will result in a non-bootable 3ds that has the power LED flash for less than a second before turning off). The white line shows where a fold should be.

    -

    The camera cable (directly underneath speaker cable, largest of the 3 ribbon cables) connects with goldteeth facing the mobo.

    The top LCD (non-touchscreen) cable (opposite side of mobo, medium in width) connects with goldteeth away from mobo. This should be the last cable removed in disassembly, and the first reattached.

    -

    If you plan on removing the top part of the 3ds, note of how the 3 cables are oriented (what direction goldteeth face) and layered (which cable is on top of which cable). Doing this incorrectly will likely result in cables not reaching where they need to go (see step 18).

    Tai -

    Removing the cables must come after step 13 (step 12 if you fudge things) - but the pictures in step 11 are better suited to showing cable order.

    Tai -

  12. lkGtpyCuwkMCeNS4
    lkGtpyCuwkMCeNS4
    U3yGUisxlAMDabDn
    kNC3kHgJAxOFXYXi
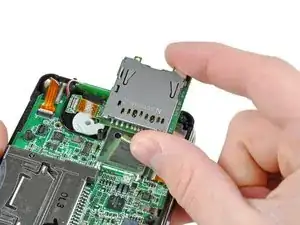
    • Die Unterseite des Circle Pads und der SD-Kartensteckplatz liegen nebeneinander und lassen sich mit geringem Aufwand herausnehmen.

    • Es ist das erste Mal, dass eine Nintendo-Handheld-Konsole über andere Richtungstasten als das D-Pad verfügt, während die Sony PSP seit ihrem Debüt Ende 2004 mit einem analogen Joystick ausgestattet ist.

    • Der 3DS wird standardmäßig mit einer 2-GB-SD-Karte ausgeliefert und kann problemlos auf eine SD- oder SDHC-Karte mit größerer Kapazität aufgerüstet werden - eine wichtige Option, wenn du vorhast, viele 3D-Fotos zu schießen und Spiele im Nintendo eShop zu kaufen.

    All the screws here mount the mobo to the case. And even though you can remove the mobo with the circle pad ribboned in, the cable may break as it flops around if you're not careful.

    Tai -

    on some models i think the sd slot is soldered on to the mother board so be careful

    DA REAL DUCK -

    Be careful removing the SD card reader Mine has some strong adhesive holding it to the plate which resulted in me breaking one of the connections and having to resolder. Use IPA 90% (min) to weaken it before prying the ready off to save yourself the extra work!

    Kittysoba -

  13. CMyvFq3H6EJWqGHZ
    CMyvFq3H6EJWqGHZ
    BUSghgRLYJyRNZab
    • Entfernen der verbleibenden Schrauben, mit denen das Motherboard am unteren Gehäuse befestigt ist.

    • Motherboard ist fast draußen... das kommt mir irgendwie bekannt vor...

    Once the motherboard is out, all the buttons and button membranes in the bottom part of the plastic shell are free to move. Turning or jostling the shell will result in a lot of plastic pieces everywhere.

    Tai -

  14. ZNLWCfUYPgGCdpbA
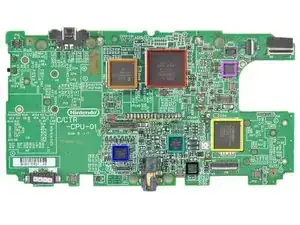
    • Chips, die wir im Inneren der 3DS-Hauptplatine gefunden haben (hier findest du eine hochauflösende Version

    • Nintendo 1048 0H ARM CPU

    • Fujitsu MB82M8080-07L 128MB FC-RAM

    • Toshiba THGBM2G3P1FBAI8 2 GB NAND Flash

    • Texas Instruments PAIC3010B 0AA37DW

    • UC CTR 041KM73 KG10

    • Invensense ITG-3270 MEMS Gyroskop

    • ST Micro 2048 33DH X1MAQ Beschleunigungsmesser Modell LIS331DH

    The card reader pad to the bottom right of the red chip. Can that be jumper wired to the trace line, if that pad was ripped off when removing the card reader??

    glowstick21 -

  15. n1CKAdbPrHyNPNuW
    • Die Rückseite des Motherboards ist etwas weniger aufregend:

    • TI 93045A4 OAAH86W

  16. NTAjH1fPWq5TUdgS
    NTAjH1fPWq5TUdgS
    gBvSNRjQtMBTRHAV
    gYOThjT6MNSqVsm6
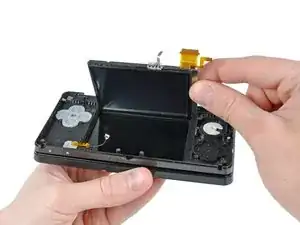
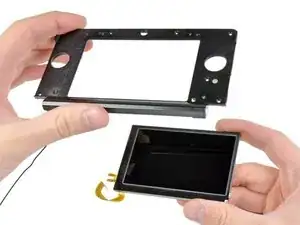
    • Die untere LCD-Baugruppe lässt sich problemlos herausnehmen.

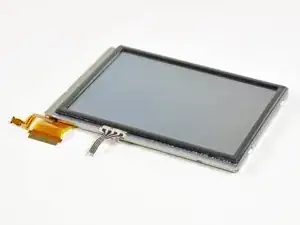
    • Das 2,42" x 1,81" große LCD mit einer Auflösung von 320 x 240 Pixeln kann 16,77 Millionen Farben darstellen.

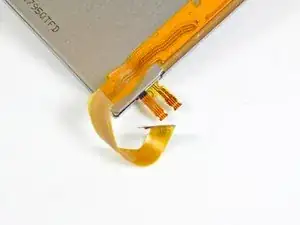
    • Der Touchscreen auf dem unteren Display ist viel dicker als bei den meisten Handys, was wahrscheinlich darauf zurückzuführen ist, dass das Touch-Display mit einem Stift und nicht mit der Fingerspitze bedient wird.

    • An dieser Stelle kann auch das untere Mikrofon aus dem Gehäuse gezogen werden.

  17. 4gfZYgGog2eHHBiX
    4gfZYgGog2eHHBiX
    ZYbHdeFTFmqqxIvQ
    • Während ältere DS-Versionen vier Gummischraubenabdeckungen auf dem vorderen Displayrahmen hatten, entschied sich Nintendo bei seinem neuen System für einen schlankeren Ansatz, indem es eine Frontplatte auf den Rahmen klebte, um die Schrauben zu verbergen.

    • Mit Hilfe einer Heißluftpistole und einem öffnungswerkzeug aus Kunststoff können wir das obere Display relativ leicht öffnen.

    While you can replace the same front panel if you're careful, it will likely be bent (and a small eyesore) from the force required to remove it.

    Tai -

    i looked all over ebay for the front panel replacement and cant seem to find it, do you know of any sources?

    BHayes82 -

    Be careful when heating the panel, if you overheat the panel you can ruin the screen underneath and have to replace it!

    Joe Drew -

  18. ONDBDBqwLJCmcJVR
    ONDBDBqwLJCmcJVR
    YhXnxXcwOlRSkQvt
    FuuSaBZmOypiFxwd
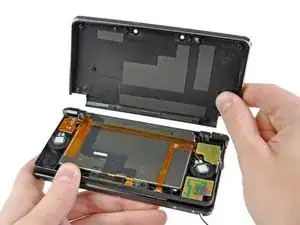
    • Nach dem Lösen von sechs Kreuzschlitzschrauben lässt sich der hintere Rahmen vom Display abnehmen, um die Lautsprecher, die Wi-Fi-Antenne und das obere LCD freizulegen.

    • Um mit der Demontage fortzufahren, müssen wir die Scharniere abtrennen und ein paar Flachbandkabel durch die hohlen Scharniere fädeln.

    • Das Einfädeln der oberen Display- und Kamerakabel durch das winzige Scharnierrohr ist etwas, das Nintendo zweifellos mit Hilfe von Robotern bewerkstelligt.

    This is not shown well - but to separate the top part of the 3DS from the bottom (sorta as shown in step 21 but not done in step 18) - refer to step 18's picture of the circuitry, LCD, and speakers. Be careful, damaging a cable here = potentially dead 3DS.

    -

    First, the 3 ribbon cables from step 11 must fed through a plastic slot in the bottom part (where the cutouts of the d-pad + buttons are), then GENTLY coiled sideways like an ice cream cone through small hollow silver cylinder (that's narrower than the cables are wide) and through a cylinder on the top part (where the non-touchscreen is), pictured in step 18 near where the brown/black ribbon cables intersect.

    -

    On the opposite side, left of the notification LED, there is a removable silver dowel (solid cylinder). With a T-pin (or a sturdy needle), pry the dowel to the left, "toward" the LCD. There is a little notch on the dowel that will help. Once the dowel is fully to the left, the two halves of the 3DS can be separated, and the dowel removed.

    Tai -

  19. tF3EFNBICBFqlwCo
    tF3EFNBICBFqlwCo
    L2UbS1othjQxVjGp
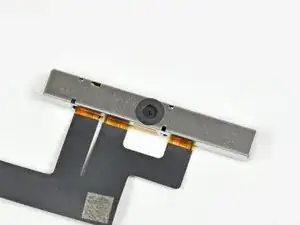
    • Alle drei Kameras sind über ein Flachbandkabel miteinander verbunden. Wir stellen fest, dass dies ein Trend bei den kleineren Geräten mit mehreren Kameras ist, und es macht Sinn - die Daten müssen zur Verarbeitung an denselben Ort gelangen.

    • Es ist offiziell: Dies ist das Gerät mit den meisten Kameras, das wir je auseinandergenommen haben.

  20. sNIU6xxDNPEn2SjQ
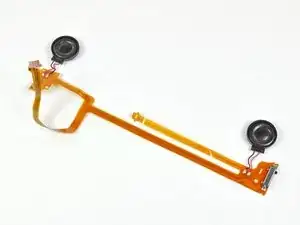
    • Die Stereolautsprecher liefern den angemessenen, blechernen Klang, den man von tragbaren Geräten gewohnt ist.

    • Diese Lautsprecher spielen mehr als nur Game-Sounds. Der Nintendo 3DS ist sowohl mit MP3- als auch mit AAC-Dateien kompatibel, aber wir bezweifeln, dass er in absehbarer Zeit den iPod ersetzen wird.

    • Das Flachbandkabel der Lautsprecherbaugruppe enthält auch den Schieberegler zur Einstellung des 3D-Sichtfelds und die Status-LED der Doppelkamera.

    Whaere can i get this my 3D slider is broken but I wol dbuy from here but ifixet dos not have it?

    AppleTopic -

  21. BRGA4BYUDoYnR3DV
    BRGA4BYUDoYnR3DV
    j25jUOI6Or4WG4gj
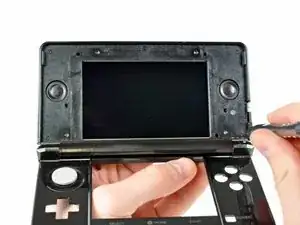
    • Nachdem du die Lautsprecher entfernt hast, kannst du das obere LCD-Modul herausnehmen.

    • Es gibt drei Kabelanschlüsse für dieses LCD - zur Anzeige des Bildes sowie für die Parallax-Barriere, die den "3D"-Effekt in den 3DS-Spielen erzeugt.

    • Unsere Freunde von Nikkei Electronics' Tech-On haben das LCD-Panel ein wenig weiter zerlegt als wir und sechs einzelne optische Elemente gefunden.

  22. v1Ie3BkpBYkCOeaP
    v1Ie3BkpBYkCOeaP
    YCgFsmN1OX5ATYYw
    • Nintendo 3DS Reparierbarkeit Score: 5 von 10 (10 ist am einfachsten zu reparieren)

    • Der Akku lässt sich durch Abnehmen der hinteren Abdeckung leicht auswechseln.

    • Es wurden keine proprietären Tri-Wing-Schrauben verwendet, sondern nur Kreuzschlitzschrauben #00.

    • Die Kabel des oberen Displays sind so verlegt, dass es ziemlich frustrierend ist, sie zu entfernen, ohne sie abzureißen, und ebenso schwierig, sie beim Zusammenbau des Geräts wieder richtig zu befestigen.

    • Im Inneren des 3DS befinden sich viele kleine Komponenten, die möglicherweise Probleme verursachen können, wenn du bei einer Reparatur eine Komponente verlierst.

    • Die meisten Anschlüsse sind ZIF-Anschlüsse, und es ist schwierig, sicherzustellen, dass jeder einzelne richtig angeschlossen ist, ohne das Ganze wieder zusammenzubauen und das Gerät in Betrieb zu nehmen.

    • Die Kopfhörerbuchse und der Ladeanschluss sind mit der Hauptplatine verlötet, was bedeutet, dass du deinen Lötkolben herausholen musst, wenn du sie versehentlich beschädigst.

Walter Galan

702835 Reputation

19 Kommentare

Lack of details : "Removing the remaining pesky screws securing the motherboard to the lower case." (where and how many?)

jpfroud -

********Note: If your top or bottom screen was working before disassembly and doesn't work after reassembly, then it's likely that the connector is loose or dirty or damaged or not clipped or PLACED UPSIDE-DOWN. I had this issue with my Super3DS XL(2015 New3DS XL) and it turns out that the reason why my top screen wasn't working after put together, was because I had the top LCD connector upside-down. After I correctly put the connector in, It worked again! :) ********

justjustintuber -

Thanks for great guide - I could'nt find the access to the screws on the top screen until I read your guide.

Only problem I had was that I rounded out 2 of the screws in Step 9 and had to carefully drill the heads off and remove the shanks later. So I strongly recommend using the correct and good quality screwdriver as these are very tight

PaulM -

********Note: If your top or bottom screen was working before disassembly and doesn't work after reassembly, then it's likely that the connector is loose or dirty or damaged or not clipped or PLACED UPSIDE-DOWN. I had this issue with my Super3DS XL(2015 New3DS XL) and it turns out that the reason why my top screen wasn't working after put together, was because I had the top LCD connector upside-down. After I correctly put the connector in, It worked again! :) *********

justjustintuber -

Where does that black plastic piece directly above the blue SD card go? I can't seem to find a picture of it in place

SAJnabeshin -

This is a great tutorial. Do you have one for removing and replacing the cartridge reader?

Jay -

Hey there! This is a teardown, not a real repair guide, you should check out the 3DS repair manual! We don't have a guide for replacing the reader itself, as that requires some very specialized soldering, but you can follow the motherboard replacement guide, and if you are a microsolderer, you can replace the reader itself! Best of luck!

Sam Goldheart -

Is there a similar guide for the 3DS XL? I am replacing the middle part of the case after the hinge broke, and it seems that I have to pull the whole thing to pieces just to replace it...

Wii Console -

Hey there! This is a teardown, not a real repair guide. I'm not sure which middle piece you're looking to replace, but we have lots of 3DS XL repair manuals on its device page!

Sam Goldheart -

@sam I've tried several of these manuals, and as helpful as they are, none of them separate the hinge from the 3DS XL, what I need to do to replace the top-part of the lower half of the case, where it has split from the notification (StreetPass/SpotPass) light to the Wifi connection light, and every time the 3DS XL is closed, the crack gets bigger.

Wii Console -

Hi, I'm going to have to take out the cable from the battery placement that leads to the board to remove static buildup. Is there any way I can do that, like is there any cables that connect to it? I haven't taken the 3DS apart yet.

hinkley.boy.robert.l -

UPDATE: there was no static, had it looked at by a repair guy. I’ve been looking at the board components, and I’m starting to wonder if the power cable connector is loose or out, if not, the board or other components. While I am at it, figuring out (this may be for a year or so, don’t have a job yet :( ) why my Nintendo is not turning on (replaced the battery, nothing happens), I’m almost considering upgrading the speakers to a higher-quality speaker, if not, at least louder and more efficient. Anyone toyed around upgrading components, and have any advice how to and how not to do it? I would greatly appreciate it, as Nintendo no longer performs repairs on my model (original CTR type)

hinkley.boy.robert.l -

The stupid screw right below where the battery goes is totally jammed in there and none of my screwdrivers fit it. What do I do I'm so lost

musicalwhovian25 -

Does anyone know the manufacture and type of the zif connector that is used for the bottom lcd.

NOT the digitiser and power.

Dennis Peters -

For the old 3ds(first)

Dennis Peters -

Is it possible to do a simple teardown to get just the casing that is showing externally? I'm looking to do a custom paint job on my n3ds(not xl) from the chromatic red I got it as into a dark chromatic purple and would like to tear down just enough to get only the outer shell off.

Sledvick -

so my volume slider is broken and the actual slider inside works its just the plastic pice you slide that is in the outside, where can i buy one. now if i need to adjust the volume i have to open it and slide the volume with twisers.

AppleTopic -

I give up on my 3ds, when trying to repair it more components got broken than before.

The power adapter didnt worked, so when exchanging it the replacement broke into half when I put the cover on it. Then when lifting up the cover the conection from curcuit board to sholder button ripped. And then when exchaning the next power adapter and shoulder button. Well both got destroyed, the adapter broke into two parts, and the wire of the button ripped.

ZockerCo -

Tengo un nintendo 3ds old

Y se queda modo espera

Desde hace 2 años y no han encontrado soluciones

Rosse Garhu -