Einleitung

Der Akku versorgt das Headset mit elektrischer Energie. Diese Anleitung zeigt, wie der Akku entfernt wird.

  1. RbNuXeDABlsAdISL
    RbNuXeDABlsAdISL
    IyU4QwqntHQGD4I1
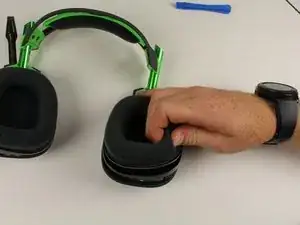
    • Die Ohrpolster werden von Magneten festgehalten. Ziehe sie vorsichtig vom Kopfhörer ab und entferne sie.

  2. Z5OKJlSUPGrKWcQk
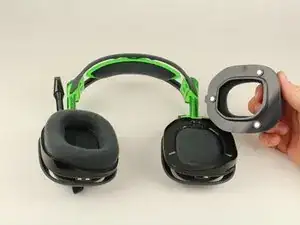
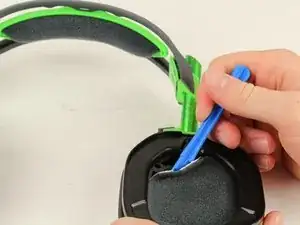
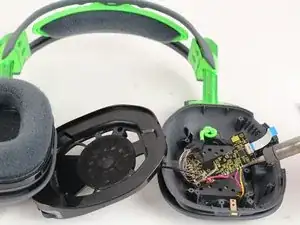
    • Drücke das Öffnungswerkzeug vorsichtig zwischen den schwarzen Kunststoff und das Schaumstoffpolster auf der entgegengesetzten Seite zum Mikrofon. Heble dann nach oben und entferne die Abdeckungen aus Filz, mit denen der Lautsprecher bedeckt ist.

  3. 2oXyLOMMI1TMZpaR
    • Entferne die vier 6 mm Kreuzschlitzschrauben #1.

  4. ymOPamwCSfOoibgU
    • Hebe das Lautsprechermodul nach oben aus dem Gerät.

  5. HeQkCOycDaZeIXZC
    HeQkCOycDaZeIXZC
    Zol1oN6LARIT4WbQ
    • Entferne die fünf 6 mm langen Kreuzschlitzschrauben #1.

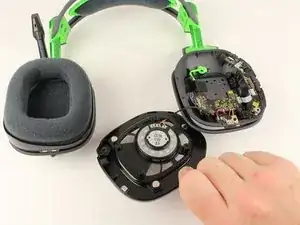
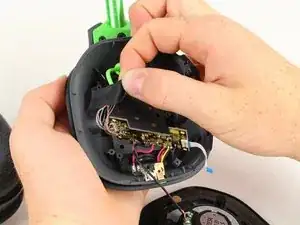
    • Ziehe die Tastenplatine vom weißen Flachbandkabel weg und entferne sie.

    I don't think these are PH1 screws.

    Felix -

  6. nWf2rjfRICaNk2vF
    nWf2rjfRICaNk2vF
    sQliNLC2DnlZVQtk
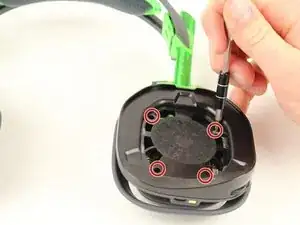
    • Entferne die vier 6 mm PH1 Schrauben.

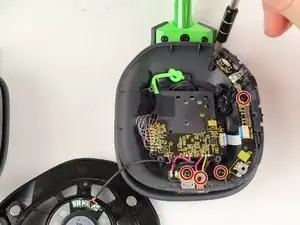
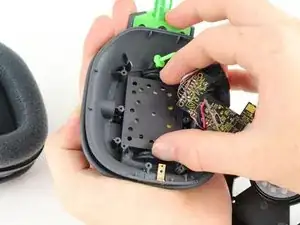
    • Entferne das Klebeband, welches die Kabel an der Platine hält.

  7. TokjHbZioYgTauEL
    • Drücke die beiden Laschen zusammen und schiebe die Platte heraus. Entferne sie dann.

  8. Sw2NMnPLbv5pf5dU
  9. HQIjqBfbnON643g4
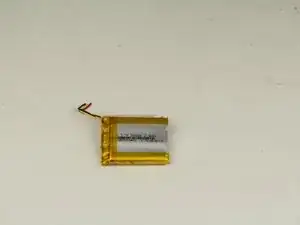
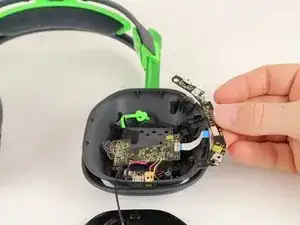
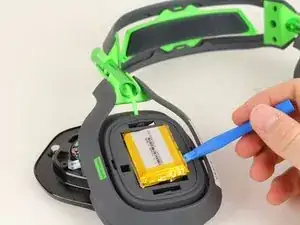
    • Heble den Akku mit einem Öffnungswerkzeug aus Kunststoff vom Kopfhörer weg und entferne ihn.

    How to take off the cover cap, where he takes the battery out?

    Wie entfernt man die Kappe, wo er die Batterie rausnimmt?

    Tim Uninteressant -

    Thats step 7 the picture is a little confusing but once you see it you will understand.

    Joe Steenblock -

    Question? Is there 1 package of batteries or 2 sets of packaged batteries for both sides or just the 1 side only?

    Dar rin -

    Thank you, Your explanations helped me to change the USB connector.

    Roger, Rimouski, Québec, Canada

    roger -

    I think there is a missing step (8.5?). im trying to check how I can remove the plate cover where the battery is. is this just a snap on? (too scared to try)

    Bryan P -

    Thanks for the guide! I've just fixed mine by following it. Btw, there's no need to remove any internal screws, with a small tweezer you can move the battery cables freely, and solder the new ones.

    Mike M -

Abschluss

Um das Gerät wieder zusammenzubauen, folge der Anleitung in umgekehrter Reihenfolge-

Andrew Monson

Mitglied seit: 02/10/17

505 Reputation

12 Kommentare

Is this for the Gen III Astro a50?

vic.bianco -

Yes it’s for the Gen 3 A50

Crisdavid -

Where do I buy a battery though….

Brandon Phillips -

how can I connect the new battery ?

Ahmed f -

you connect the new battery by soldering it to the same spot you de-soldered the old battery from

Ryan Green -

I can see why you have to unscrew the mainboard but I screwed it back after taking the game/voice control cover off as it was hard to desolder/solder back on the battery with it moving around. To anyone new to desoldering/soldering; make sure you have room and something to rest your hands while doing either (my hands shaked cause I had nothing to rest), make sure your soldering iron is hot enough to heat the solder but not too hot (obviously), use some non sharp pliers to hold the wires when you solder the new battery and to help pull the wires away when you desolder the old battery. This was my first time doing either and it took some time to get the wires soldered to the board but just take your time getting comfortable. I normally wouldn’t be comfortable doing something like this but I wasn’t going to drop another ~$250 for a new headset and if it went bad I could just put it back together and just plug in a micro usb cable to keep it powered till I found someone with some experience to solder the battery.

Crisdavid -

Question? Is there 1 package of batteries or 2 sets of packaged batteries for both sides or just the 1 side only?

Dar rin -

on my headset, the step 5 middle screw in the bottom is a ph 00

bbs282 -

If you're new to soldering, look up "how to tin wires soldering" on a search engine and do that before you try to solder the wires on.
Also put some flux on the 3 contacts and on your new battery wire ends. It will make a really clean connection when you solder them, minimizing the possibility of crossing battery wires. Don't add any extra solder, what's left on there after removing the old wires, is enough when you tin the new battery wires.
Hope that helps someone! I just did mine and I have a working headset again!!

wood.micah -

Can I just cut the wires from the old battery and then splice them together with the new battery wires?

Frog Pizza -

Ayo from 2025 thanks

Frog Pizza -