Einleitung

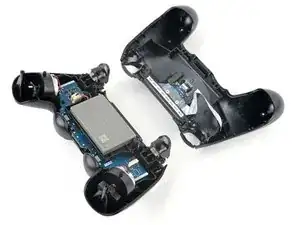
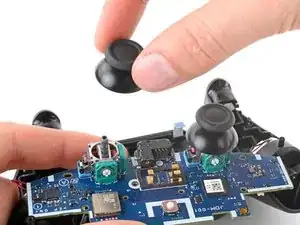
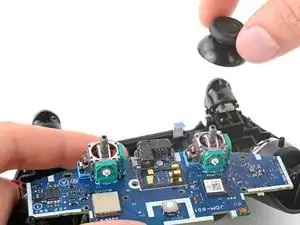
Diese Anleitung zeigt dir, wie du die Joystickabdeckungen im DualShock 4 Modell CUH-ZCT1U reinigen oder austauschen kannst.

Hinweis: diese Abdeckungen sind nicht die Ursache für den Joystick-Drift. Wenn sie nicht wie gewohnt funktionieren, dann musst du sie reinigen oder das Joystick-Modul austauschen.

  1. X5wSfxicAxSko1Zg
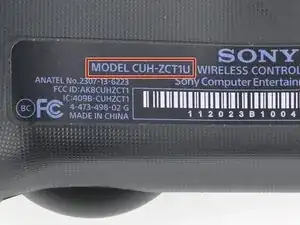
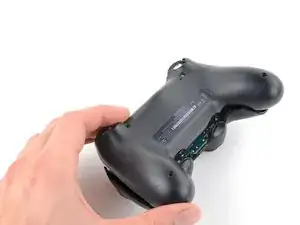
    • Überprüfe die Modellnummer auf der Rückseite des Controllers. Die Anleitung wurde mit einem CUH-ZCT1U Modell geschrieben. Wenn du ein anderes Modell hast, können sich die Verfahren und die Teile leicht unterscheiden.

    • Wenn du ein Modell der zweiten Generation eines DualShock 4 hast, mit der Modellnummer CUH-ZCT2U, benutze diese Anleitungen.

    model:cuh-zct2e

    كيف يمكن ان افكها

    Mhmod -

  2. w1u5HLFRbQIP2d2F
    w1u5HLFRbQIP2d2F
    pJuWDOWVmAmLyI6V
    • Um den Kontroller während der Reparatur sicher zu lagern, kannst du eine weiche Unterlage, z.B. ein Mikrofasertuch verwenden.

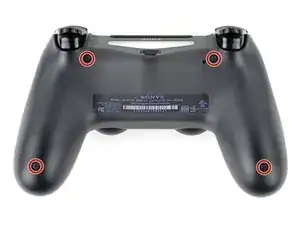
    • Entferne die vier 6,4 mm langen Kreuzschlitzschrauben, mit denen die Rückabdeckung befestigt ist.

    to re-torque these PH00 screw... i found 19Ncm to be about the max. (since 27Ncm was too much)

    Dreamcat 4 -

  3. NgnhjUOrfuwMJyov
    NgnhjUOrfuwMJyov
    cwbJVa63FyosD31P
    HvrmieUp6UwVcySs
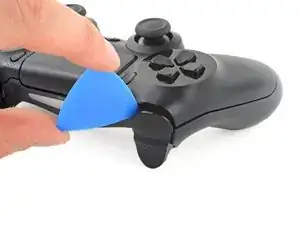
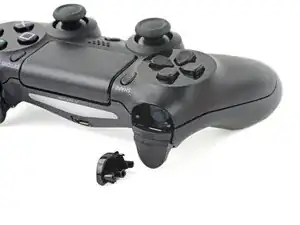
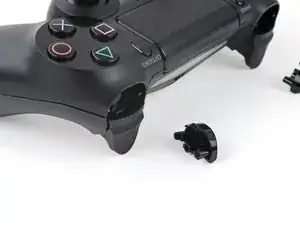
    • Heble mit einem Plektrum an jeder Ecke der L1-Taste, bis sie sich vom Gehäuse löst.

    • Decke die Taste ab, damit sie nicht davonfliegen kann.

    • Entferne die Taste.

    I found this step difficult. I've done it in the past but for some reason, this time I am having a very difficult time getting L1/R1 to come out. In the image, the shell is already apart, but for me at this stage it's still clamped shut after I removed the screws.

    Jimmy -

  4. AJugiOXGbAhQ1BMq
    • Entferne in gleicher Weise die R1-Taste.

    I didn't have to remove the buttons just to replace the battery ...

    Justin Vander Ziel -

  5. B1xF1WqHbfBoBJtF
    B1xF1WqHbfBoBJtF
    EHOhhIPKfA2DZQfI
    McHyyAQtKhIUOHJO
    • Das Rückgehäuse ist mit sechs Rasten am vorderen Gehäuseteil befestigt. In den nächsten vier Schritten wird gezeigt, wie die Rasten gelöst werden, bevor das Gehäuse geöffnet werden kann.

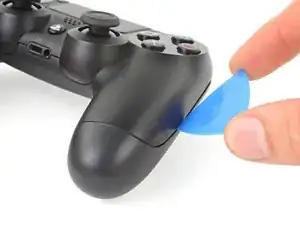
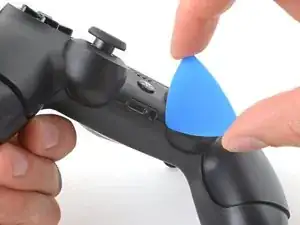
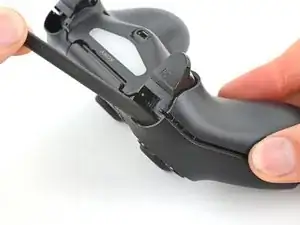
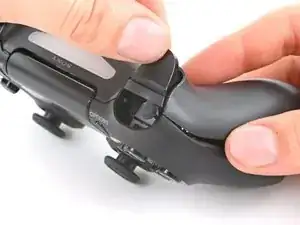
    • Setze das Plektrum nach unten geneigt in der Mitte zwischen Griff und Aktionstasten zwischen Vorder- und Rückseite ein.

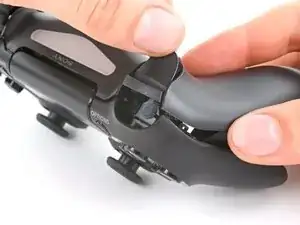
    • Schiebe das Plektrum zum Griff hin und heble gleichzeitig, bis sich die erste Raste löst.

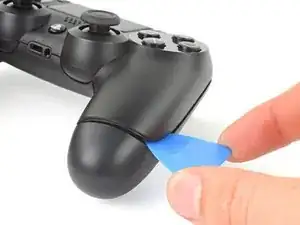
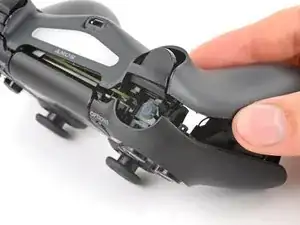
    • Wiederhole das Ganze auf der anderen Seite des Controllers, um die zweite Raste zu lösen.

  6. j1WZgSo6o3TaODlg
    j1WZgSo6o3TaODlg
    eRF1MNwAMFijHfw4
    ocNfVkqvnbtCNBcd
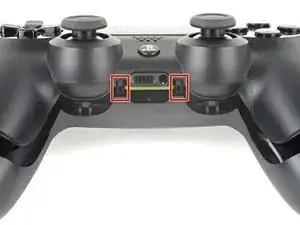
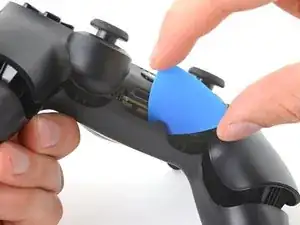
    • Zwei weitere Rasten halten die Gehäuseteile beim Erweiterungsabschluss und der Kopfhörerbuchse zusammen.

    • Setze das Plektrum links und rechts von den Anschlüssen zwischen dem vorderen und rückseitigem Gehäuseteilen ein.

    • Verdrehe das Plektrum, bis sich die Gehäuseteile voneinander lösen.

    • Wenn sich die Teile nicht leicht lösen, dann setze das Plektrum in verschiedenen Winkeln ein.

    • Öffne den Controller noch nicht, er wird immer noch mit zwei sehr empfindlichen Rasten in der Nähe der Trigger-Tasten zusammengehalten.

  7. jf5SveEdOwRIGhJq
    • Die letzten beiden Rasten sind sehr empfindlich und müssen von innen aus dem Gehäuse geöffnet werden. Wenn sie dabei brechen, ist es nicht so schlimm, die Reparatur und die Funktion wird dadurch nicht beeinträchtigt.

    • Du findest die Rasten, wenn du durch den Spalt über den R2- und L2-Tasten schaust.

    Ah, well perhaps I may have broken a tab by not removing the buttons but if be more worried about breaking the buttons

    Justin Vander Ziel -

  8. qQcyUfycauX1EUE6
    qQcyUfycauX1EUE6
    YFUPEeSZZqPY4U1E
    OHcMVCNj4VJZWyNC
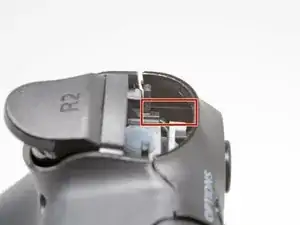
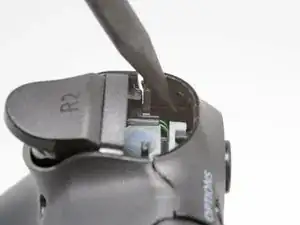
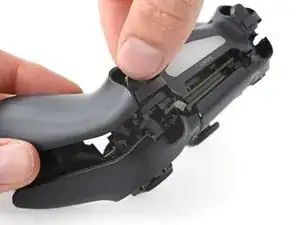
    • Schiebe die Spitze eines Spudgers durch den Spalt über der R2-Taste und drücke die Raste nach außen.

    • Während du die Raste nach außen drückst, ziehe gleichzeitig das Rückgehäuse langsam vom vorderen Gehäuseteil ab, bis sie sich voneinander lösen.

    • Öffne den Controller erst, wenn beide Rasten bei R2 und L2 gelöst sind.

    • Wiederhole das Verfahren für die Raste bei der L2-Taste.

  9. PKcRjl2CIQogpTKp
    PKcRjl2CIQogpTKp
    fip3U51QOcVGEXVJ
    u6ZnJrwXE1clORUW
    • Drücke die R2-Taste und schiebe die Gehäuserückseite darüber.

  10. KP2vxXGWlaTfsUDK
    • Drücke die L2-Taste und schiebe die Gehäuserückseite darüber.

  11. 3hhTNdLYVWIBGeVA
    3hhTNdLYVWIBGeVA
    hfTvkNdF3uokn4Pa
    GXsRCZqUChYpLy1d
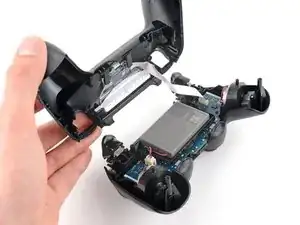
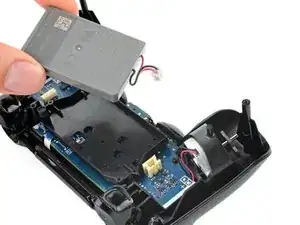
    • Klappe die Gehäuserückseite oben über den Controller und lege sie ab, achte dabei darauf, dass das Verbindungskabel nicht zu stark angespannt wird.

  12. nCng6Fw1GK6utOG1
    nCng6Fw1GK6utOG1
    SZUVqTnFbaQPaXbq
    5sWqh1SoSQhBsOFd
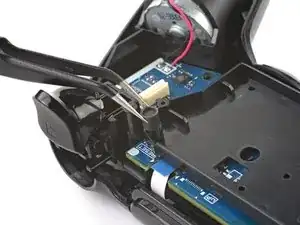
    • Ziehe das Verbindungskabel mit einer Pinzette oder deinen Fingern an der blauen Zuglasche aus seinem Anschluss heraus.

    • Achte beim Zusammenbau darauf, dass die Zuglasche beim Verbinden des Steckers zur Außenseite hin zeigt.

    On the model CUH-ZCT2E the circuit board is mirrored so that the connection is on the left side. When reassembling the blue tab should be facing inwards.

    Konrad Skeri Ekblad -

    I just left the interconnect cable attached and held things out of the way when I put in the new battery

    Justin Vander Ziel -

    I melted the connector with my soldering iron while removing the analog, is there a way to replace it? I don't know how many pins it has or the model to buy.

    Arlindo Tsuyoshi Hayashi -

  13. bTlYAQTvGVBKbfRV
    bTlYAQTvGVBKbfRV
    4QAyFxp5cWR2HTHW
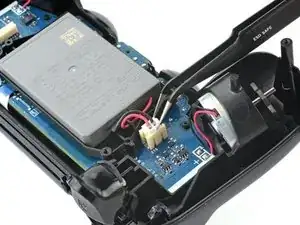
    • Fasse den Stecker des Akkukabels mit einer Pinzette oder deinen Fingern und trenne ihn von der Hauptplatine ab.

    • Ziehe nur am Stecker, nicht am Kabel.

  14. gp4YHL5LMwLLvcoE
    • Entferne den Akku.

  15. 6M2oWXxExT4ElTXk
    6M2oWXxExT4ElTXk
    FwVprSgDuD6bHjCd
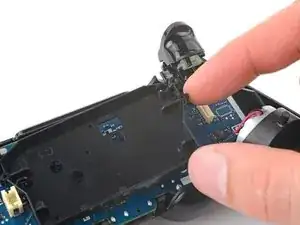
    • Fasse die Verlängerung für die Reset-Taste und hebe sie aus ihrer Vertiefung im Akkufach heraus.

    On the model CUH-ZCT2E this is part of the battery bracket and not removable. Just skip this step.

    Konrad Skeri Ekblad -

  16. OdOvSwnMxMWM4r1W
    OdOvSwnMxMWM4r1W
    mGrvIhfZTUenHG4w
    R1xtscUk6ivQwlFS
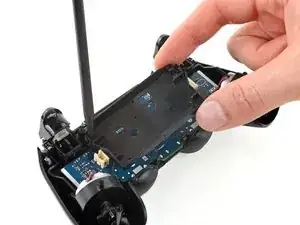
    • An den markierten Stellen befinden sich zwei Rasten, mit denen der Akkuhalter an der Hauptplatine befestigt ist.

    • Setze einen Spudger mit der Spitze in die Öffnung hinter der rechten Raste am Akkuhalter.

    • Drücke auf die Raste, bis sie sich von der Hauptplatine löst.

    • Hebe die rechte Seitenkante des Akkuhalters hoch.

    On the model CUH-ZCT2E the battery bracket is not secured by clips but by a PH #00 screw mid height on the right half of the battery bracket. Just remove the screw and for the next step lift the battery bracket straight up.

    Konrad Skeri Ekblad -

  17. MpRnnXNR6AkVJPdE
    MpRnnXNR6AkVJPdE
    JknRtEahfZLV1Rus
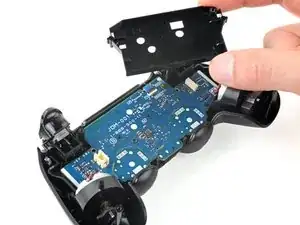
    • Setze einen Spudger mit der Spitze in die Öffnung hinter der linken Raste am Akkuhalter.

    • Drücke auf die Raste, bis sie sich von der Hauptplatine löst.

    • Entferne den Akkuhalter.

  18. NtpB2BKLXfOs3ibt
    NtpB2BKLXfOs3ibt
    ocmExNqCRtHeRbfY
    L2nX3BGEGvqBGKhL
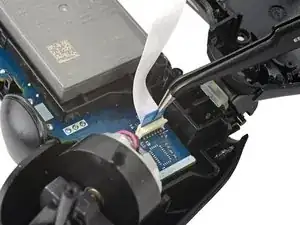
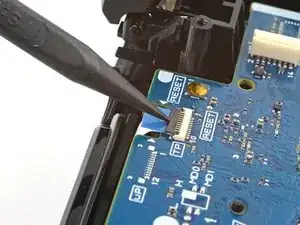
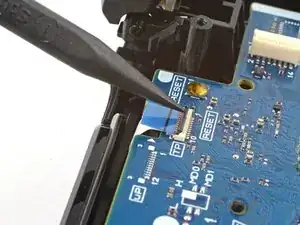
    • Klappe den Sicherungsbügel am ZIF-Anschluss des Kabels zum Touchpad hoch.

    • Ziehe das Kabel mit einer Pinzette oder deinen Fingern an der blauen Zuglasche aus dem Anschluss heraus.

  19. 1aIuIlkWcAAVXAKD
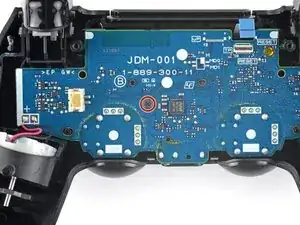
    • Nimm einen Kreuzschlitzschraubendreher und entferne die 6,4 mm lange Schraube, mit der die Hauptplatine befestigt ist.

  20. ouIZjDmNVCOuSSKT
    ouIZjDmNVCOuSSKT
    bx3YdyxTxUCJetoE
    VohkAs4xxPTNHEhL
    • Sei vorsichtig und spanne die Kabel zum Vibrationsmotor nicht zu stark an. Falls sie von der Hauptplatine abreißen sollten, löte sie mit Hilfe dieser Anleitung wieder an.

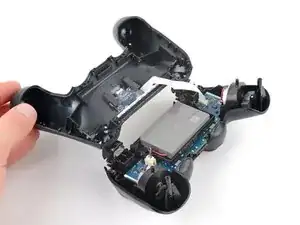
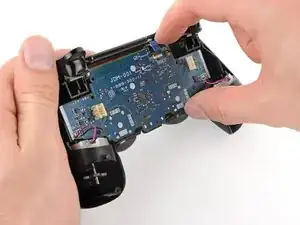
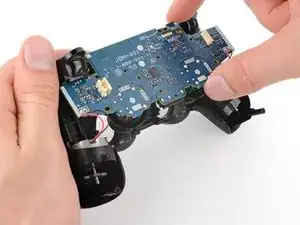
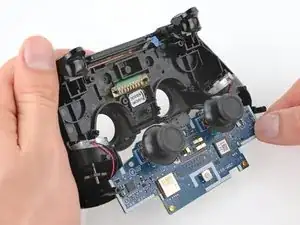
    • Hebe die Hauptplatine vom Mittelrahmen ab.

    • Schiebe die Abdeckungen der Joysticks durch die Ausschnitte im Gehäusevorderteil.

    • Klappe die Hauptplatine über die Unterkante des Controllers, die Kabel zum Vibrationsmotor können dran bleiben.

  21. tSDVRtrEGs6FpOxB
    tSDVRtrEGs6FpOxB
    AU2LAvhKW4MPRpPc
    kLvOCVQ3Rq4haaf5
    • Ziehe die Abdeckungen der Joysticks von ihren Modulen nach oben ab.

    • Beim Zusammenbau musst du die Abdeckungen drehen und herunterdrücken, bis sie die Module erreichen.

Abschluss

Um dein Gerät wieder zusammenzubauen, folge den Schritten in umgekehrter Reihenfolge.

Entsorge deinen Elektromüll sachgerecht.

Hat die Reparatur nicht ganz geklappt? Versuche es mit ein paar grundständigen Lösungen, ansonsten findest du in unserem Forum Hilfe bei der Fehlersuche.

Clay Eickemeyer

Mitglied seit: 19/09/22

85355 Reputation

14 Kommentare

So I followed all the steps, got the sticks in. But when I put the controller back together it Wouldent turn on. Do you guys have any clue as to what it could be?

blscott2270 -

Same exact thing happened to me, just wouldn't turn back on

Andrew Purcell -

Me too and all the reconnected cables are connected correctly, but it just won’t work.

Andy Hui -

Hope you guys still keep the parts, since the problem can be resolved by following the post below successfully. :)

https://www.google.com.hk/amp/s/amp.redd...

Andy Hui -

i think you didn't put a wire in

Gabrys Holcman -

Does this fix the issue with worn out sticks? Mine currently at idle will get stuck slightly pressing to the left, (in game, I'll be cruising left at a snail's pace) and pressing up/forward or sometimes pressing to the right doesn't fully work (in game this causes me to either not move at all, or move at about 2/3rds speed).

I've had them for about two years now, and they have seen some rigorous use, I tell you what. It is beginning to affect gameplay pretty badly, though.

doomjockey5000 -

The options and share button are loose when I try to put it back together any suggestions?

bdj1293 -

Thank you for the guide - it helped me fix a beaten up DS4 controller I found on the flea market. However, it would be nice to explain a bit more in detail how to crack the case pieces open. Some detailed pictures with the different inside clips and hinges would be nice. Also, there is no explanation as to how to assemble the L2/R2 triggers back together. Last, but not least, there is no explanation as to how to remove the battery tray, in order to connect the touchpad to the motherboard.

Vlad Mocanu Alexandru -

It actually opens quite easily. I'm female with shaky fingers and didn't have a plastic pry tool. Broke the last one opening iPhones. I took a very small flat too screw driver from my electronic tool set, stuck it in at the same spot he showed and just gently pried all around. It opened fairly easily with nothing breaking. When it was almost all the way open I did go to the opposite side and gently loosened up thevither end, just so it would open straight. It's easy as long as you are gentle with it

Dagmar Kugler -

If parts to the controller should be replaced how would you know? Is there a circuit test proceedure for the mother board? How would you know to replace other items when you are disassembling the controller? Thank you for the assistance with my controller and your time you have taken to help. Have a great one!

bonnie.anderson59 -

Thank you for the guide !

julio rosica -

Used this guide to disassemble a PS4 controller and had no issues at all! Thank you for the guide

jvoric -

This doesn't look easy and there are opportunities to mess things up. Also, it might be hard to find an unused analog stick cover. I would try silicone joystick caps from eBay before attempting this guide.

Sometimes plastic or rubber items I handle become extremely sticky and can't be cleaned. This is a very annoying problem for me. I remember my stepdad yelling at me because I'd made swimming goggles sticky, and he also thought I'd covered bicycle handlebars with glue to make my hands stick better. Really I think it's just resins and plasticizers leeching out because of my sweat. I had the same problem with my PS4 controller's joysticks. No matter how carefully I wash my hands or clean the controller they're sticky. If I were to sell it for parts I wouldn't want someone to buy my sticky joystick covers.

I bought some silicone joystick caps from eBay and they were easy to install, I just stretched them over my existing joysticks. They've even got some little bumps that help with grip.

Gary F -

As of March 14, 2023, this guide has been updated! Comments regarding step procedures may no longer be relevant.

Clay Eickemeyer -