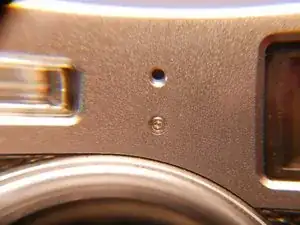
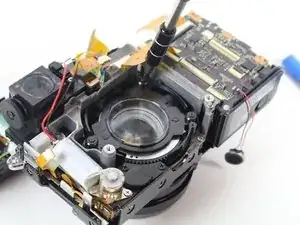
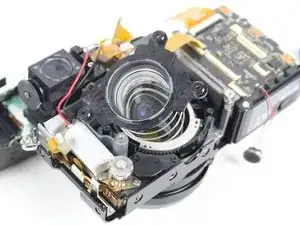
Einleitung

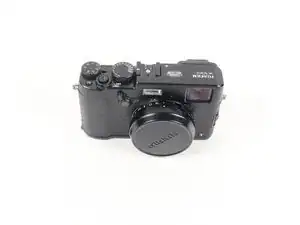
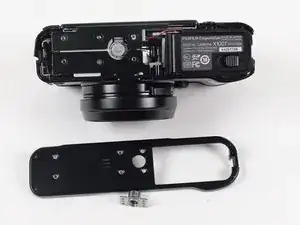
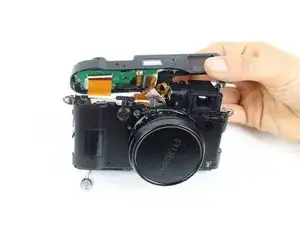
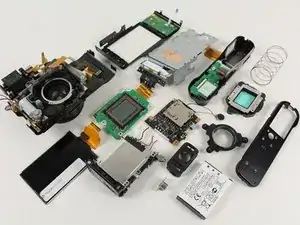
Diese Anleitung zeigt, wie die Fujifilm X100T in ihre Hauptbestandteile inklusive Objektiv und Hauptplatine zerlegt wird.

  1. R5TkQy33OsUfcttR
    R5TkQy33OsUfcttR
    LO5h1MCmSOHMgrr5
    JnmDQbFULMvlKw3D
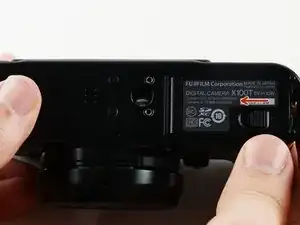
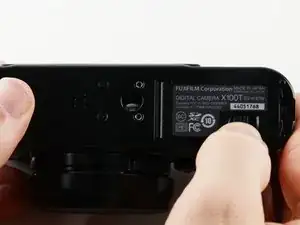
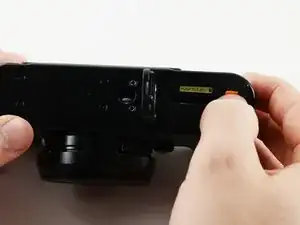
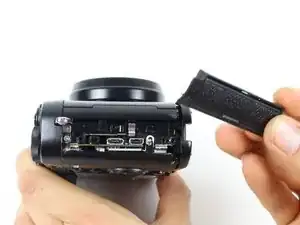
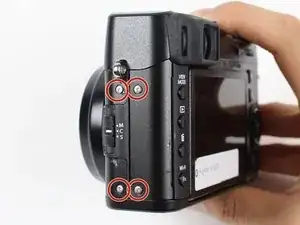
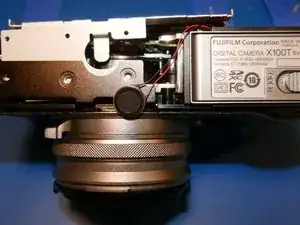
    • Schiebe den kleinen schwarzen Riegel an der Unterseite der Kamera nach links, um die Akkuklappe zu öffnen.

    I would Like to find out the price for the mother board s4250wm fine pix for the fujifilm

    lucasroger75 -

  2. Enjhj5nrUbUavOkW
    Enjhj5nrUbUavOkW
    rmxrkVqA3Ffg1gZo
    anDUTqurPufYXcFI
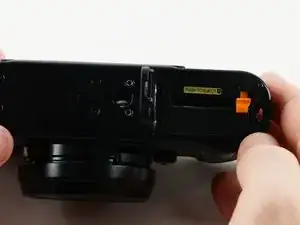
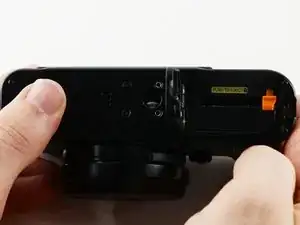
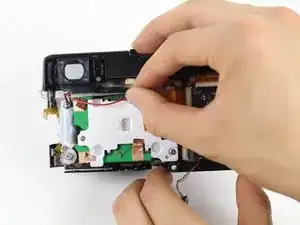
    • Drücke auf die orangene Taste, um den Akku zu entriegeln.

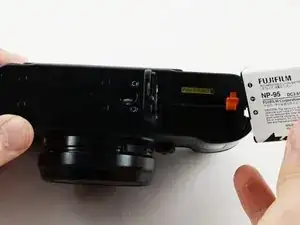
    • Schiebe den Akku aus der Kamera heraus.

    • Drehe die Kamera um, damit der Akku leichter herauskommt.

  3. CaGPZIU6v3VlIZb2
    CaGPZIU6v3VlIZb2
    5fveIjbTIFjNdFMF
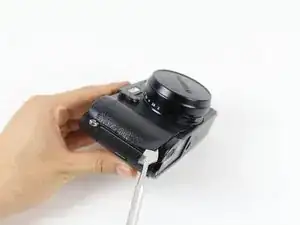
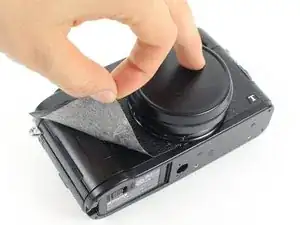
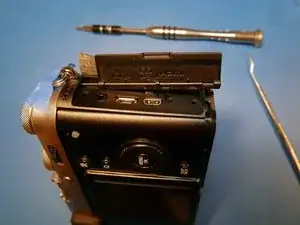
    • Nimm einen Spatel und heble die Lederhülle von der Kamera ab. Fange damit in einer Ecke an.

    • Bei der Arbeit an elektronischen Geräten solltest du Geräte verwenden, die sicher gegen elektrostatische Schäden sind. Ein Metallspatel ist stabil und kann eine bessere Hebelwirkung erzeugen, verwende aber grundsätzlich lieber einen Spudger oder Hebelwerkzeug aus Kunststoff.

  4. VCyphdXYWk3RYdxv
    • Ziehe die Lederhülle langsam und behutsam mit der Hand von der Kamera ab.

  5. kFCN3OR2KXPCuNll
    kFCN3OR2KXPCuNll
    PRQwe6RZnN1ZchJL
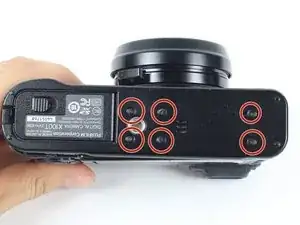
    • An der Unterseite der Kamera befinden sich sechs 4,0 mm lange Schrauben.

    • Nimm einen JIS-Schraubendreher #000 und drehe die Schrauben heraus.

    The two srews on the left can be left in place as these just keep the tripod mount fixed to the bottom plate. (see pictures at step 7)

    Frank -

    Exactly as Frank said.

    Please update the repair guide for those who don’t read all the comments.

    Ondrej Pok -

  6. HOJkrcbDn4PVNnAw
    • Diese Kamera wird von einem japanischen Hersteller gebaut. Deswegen werden JIS (Japanese Industrial Standard) Schrauben verwendet.

    • Nimm lieber keinen normalen Kreuzschlitz-Schraubendreher. Ein normaler PH#00 passt notdürftig in JIS#00, ist aber nicht ideal. Die Schraubenköpfe werden leicht beschädigt.

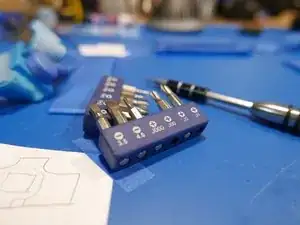
    • Verwende JIS#00 und JIS#000 Schraubendreher. Zum Glück sind sie in iFixits Mako Driver Kit - 64 Precision Bits enthalten.

  7. KFwQbRscusJu2kWS
    • Hebe die Bodenplatte und das Stativgewinde mit der Hand ab.

    • Das Stativgewinde wird mit einigen Passstiften an seinem Platz gehalten.

    Actually it’s not that simple. I was stuck here until I realised that two more screws need to be loosened. See step 10 and loosen the bottom one behind the port cover and step 12 loosen the bottom right one. This is why you need to peel the leatherette skin in step 4.

    Frank -

    Thanks Frank. This is a good comment. I was stuck here until I read your comments about loosening the screws in Step 10 and 12.

    Chin Keat Seng -

  8. DGDUwyRPXIXqvaYl
    DGDUwyRPXIXqvaYl
    WcKwVfYchIsn4DaD
    J5wHooTRRavsymVp
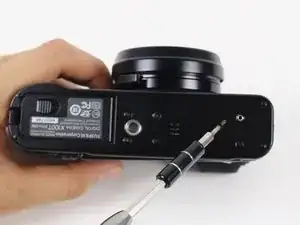
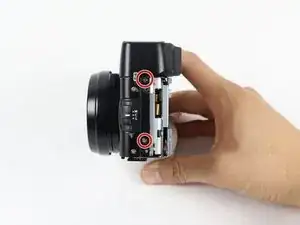
    • Halte dein Werkzeug bereit.

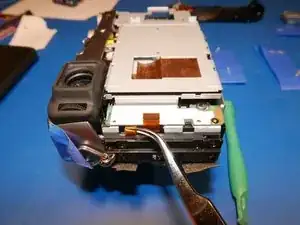
    • Um in die Kamera zu gelangen, muss zuerst die Anschlusseinheit an der rechten Seite entfernt werden. Danach kommst du an die Schrauben heran, mit denen die anderen Bauteile befestigt sind.

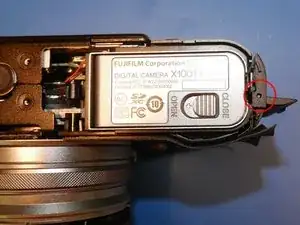
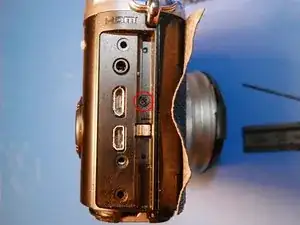
    • Am rechten Rand der Bodenplatte ist ein kleines Loch. Drücke mit einem spitzen Werkzeug hinein.

    • Daraufhin löst sich ein kleiner Kunststoffstab. Dieser Kunststoffstab ist die Achse, um die sich das Scharnier dreht.

    I can not release the plastic rod..

    Zusmitha Jane Corpuz -

    I can not even press the hole. Can someone help me

    Zusmitha Jane Corpuz -

    Try rotating the hinge by moving the flap back and forth. Then try pushing out the rod again. Good luck.

    Anthony Kouttron -

  9. QsI1Iw6mPr15QQTD
    QsI1Iw6mPr15QQTD
    DK4kSLhJY3dsqMsh
    ILGZ5tBkCqGKHvs5
    • Aber Fuji! Wie oft haben wir dir gesagt, dass du keine Schrauben hinter Klappen verstecken solltest! Das ist unter deinem Niveau, versprich, dass das nicht mehr vorkommt.

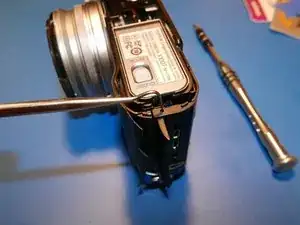
    • Bei dieser Kamera ist der Teufel im Detail. Schiebe die Abdeckung der Anschlüsse von der Kunstoffachse ab.

    • Ziehe die Achse mit einer Pinzette von der oberen Abdeckung der Kamera ab. Nun kommst du endlich an alle Schrauben heran.

  10. FekeSMxWqFIMoUGo
    FekeSMxWqFIMoUGo
    1Zh3ylFMaDp1pIXd
    kIwMKIXcXSNBaR5b
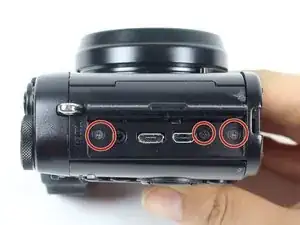
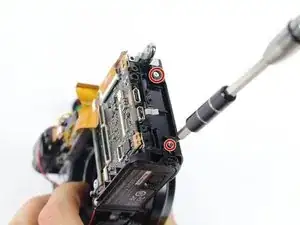
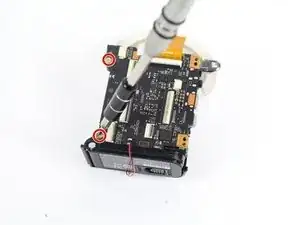
    • Entferne die drei 5,0 mm langen Schrauben bei den Anschlüssen.

    • Entferne die Schraube, die unter der Achse versteckt war.

    • Die Abdeckung der Anschlusseinheit sollte sich leicht ablösen. Wenn es schwer geht, hilf mit geeignetem Werkzeug aus Kunststoff nach.

    There is a fourth screw under the flap part that must be removed before the plastic facing will come off the frame.

    cyrways -

  11. DOOolgwGN1YqBDwR
    • Entferne die beiden 6,0-mm-Schrauben unter der Anschlussabdeckung.

    the bottom one, where the screwdriver is in the picture is already removed in the previous step. only one screw left at this stage.

    savooi -

  12. XMDKife6fnmnB5fR
    • Entferne die vier 5,0 mm langen Schrauben an der Kameraseite gegenüber vom Akku.

  13. kvgqvNvWXGk4vltn
    kvgqvNvWXGk4vltn
    bKniNQGQoHfdmuoK
    • Entferne die beiden 2,5 mm langen Schrauben am Boden.

    • Nun sollte sich die LCD- und Tastenbaugruppe nach rechts oben schwenken lassen. Die Flachbandkabel zum LCD und zu den Tasten werden sichtbar.

  14. FmS1YfW5bLDH2dDf
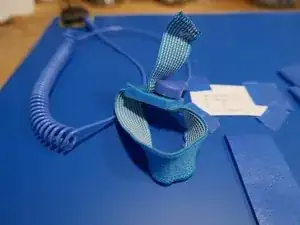
    • Spätestens jetzt solltest du das Gerät gegen elektrostatische Schäden (ESD) sichern. Elektrostatische Entladungen können mit extrem hohen Spannungen die wertvollen Bauteile im Inneren zerstören.

    • Verwende eine ESD-sichere Matte und Erde dich mit einem ESD-sicheren Armband. Schließe die Matte und das Armband an Erde an. Frage jemanden, der sich damit auskennt, wenn du unsicher bist.

  15. TE4d6hppYVYvfR5F
    TE4d6hppYVYvfR5F
    GyFAwZVYo2CQQXbf
    HFm1dQbCWFVS3J1l
    • Öffne den ZIF-Anschluss am orangenen Flachbandkabel mit einem Werkzeug aus Kunststoff oder einem Zahnstocher. Ziehe das Flachbandkabel heraus.

    • Dadurch wird das LCD von der Hauptplatine abgetrennt.

    In my camera an additional black tape is securing the ZIF connector and the orange ribbon cable. After pulling it off I could flip the ZIF connector open from the side of the ribbon cable. A magnifying glass was very helpful.

    Frank -

  16. KSBZdQyJOZLRwjYW
    KSBZdQyJOZLRwjYW
    m5fZXlHZLOJSeLWN
    • Ziehe das weiß/blaue Flachbandkabel mit der Hand vorsichtig von der Hauptplatine ab.

    • Nun ist die LCD-und Tastenbaugruppe vollständig abgetrennt.

  17. D64CbG3JiknS6P1K
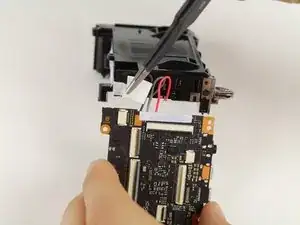
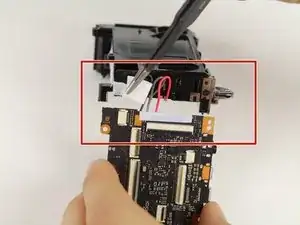
    • Entferne die 2,5 mm lange Schraube in der Mitte über dem ausgebauten LCD.

    • Entferne die beiden 4,0 mm langen Schrauben rechts.

  18. v3gdujTdmWvYcFUY
    • Entferne die beiden 4,5 mm langen Schrauben an der Seite gegenüber vom Akku.

  19. TtoBMbhxpYu3PG3J
    • Ziehe das Kupferband ab, mit dem der Rahmen und die Hauptplatine verbunden sind.

    • Das Kupferband dient als Erdung und zur teilweisen Wärmeableitung.

  20. CYP3JaNRR5CHRhYt
    CYP3JaNRR5CHRhYt
    ZBmGdRltGfuElAep
    • Entferne das Klebeband, mit dem der Lautsprecher befestigt ist.

    • Der Lautsprecher ist mit doppelseitigem Klebeband befestigt. Ziehe ihn vom Metallrahmen ab und bewege ihn zur Unterseite der Kamera hin.

    • Dadurch werden die Lautsprecherkabel davor geschützt, dass sie beim Entfernen des Metallrahmens abgeschnitten werden.

  21. KorOCQJohqAJNCGs
    • Löse diese beiden Flachbandkabel ab, damit sie beim Entfernen des Metallrahmens nicht durchtrennt werden.

    • Nimm zum Ablösen eine Pinzette oder ein anderes stumpfes Werkzeug. Sie sitzen sehr knapp, arbeite langsam und geduldig.

  22. bLcxdclOrhNRQ5CK
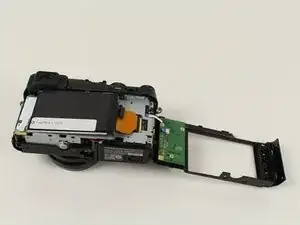
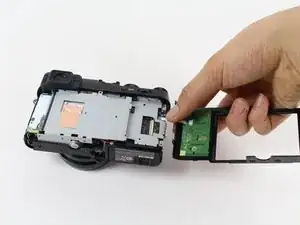
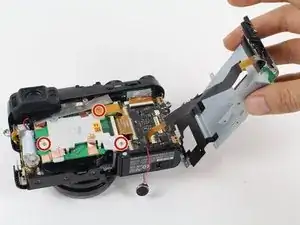
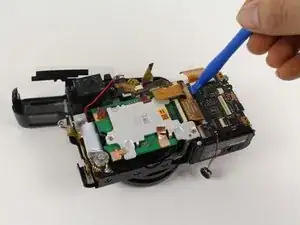
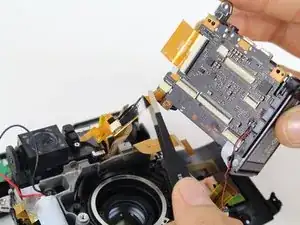
    • Hebe den Metallrahmen nach oben und klappe ihn mit der Hand zur Seite.

    • Achte darauf, dass der Rahmen nicht von der Kamera abgetrennt wird.

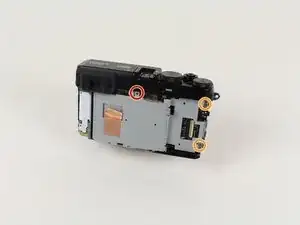
    • Drehe die drei 4,2 mm langen Schrauben an der grünen Leiterplatte heraus.

  23. kUCvYUvqs1wNQBxp
    kUCvYUvqs1wNQBxp
    FKsmxbAo6DHZ1oVG
    CPvQ55XVtPVFX2km
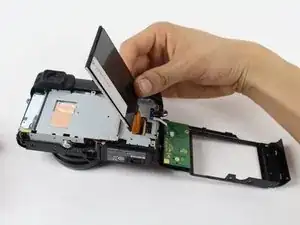
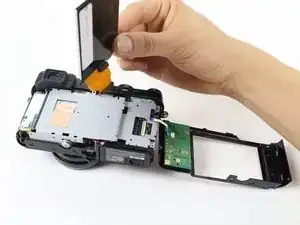
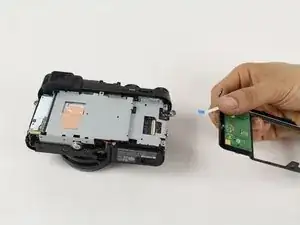
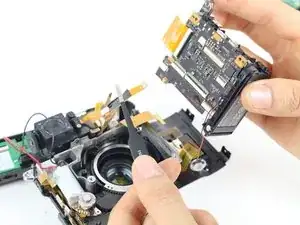
    • Finde das orangene Flachbandkabel an der Seite, wo der Akku ist.

    • Nimm ein Kunstoffwerkzeug, öffne den ZIF-Anschluss und löse das Flachbandkabel.

    • Hebe das Flachbandkabel mit den Händen heraus und entferne es.

  24. 6yEKhvteYKuEyNQL
    6yEKhvteYKuEyNQL
    d5QUuHTUWdVDBB2U
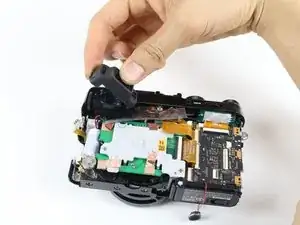
    • Hebe die Augenmuschel aus Gummi mit den Händen ab.

    • Wenn das nicht leicht geht, macht eine alte Geschenkkarte aus Kunststoff kurzen Prozess!

    • Beachte die Mohs-Härteskala. Bei dieser Kamera wird sehr viel metallisierter Kunststoff verwendet.

    Can you remove this part without doing the first 23 steps?

    Cornelius Ryan Paglomutan -

  25. khgGaUeQmQLQUOrd
    khgGaUeQmQLQUOrd
    tNGh6jZoIbKBQriy
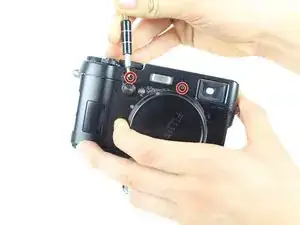
    • Entferne die beiden 4,0 mm langen Schrauben an der Vorderseite der Kamera. Höchstwahrscheinlich T1 Torx.

    • Es kann nicht genug darauf hingewiesen werden, wie winzig die sind. Wie eine Bleistiftspitze.

    • Fuji: Schrauben sind was Schönes. Warum versteckst du sie?

    • Im iFixit Schraubenkit passt der Torx #2 am Besten.

    • Ein falscher Biteinsatz kann leicht zu Schäden an den Schraubenköpfen führen.

  26. H24XPWS3uNjFAdFN
    • Hebe das Oberteil der Kamera ab, ziehe es nach hinten und entferne es.

  27. KsBZvfjDihtJD5e2
    KsBZvfjDihtJD5e2
    413RK6VivfaenVMM
    • Löse die beiden Flachbandkabel mit einem Kunststoffwerkzeug vom Oberteil ab.

  28. IsX1NLg2PaieJYcQ
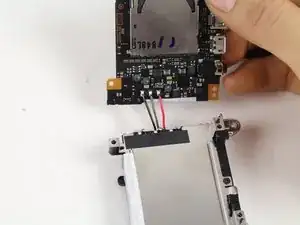
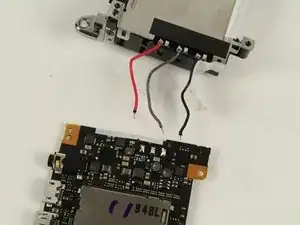
    • Das schwarze und das rote Kabel über der grünen Leiterplatte ist leicht festgeklebt.

    • Löse die beiden Kabel mit der Hand vorsichtig aus der Klebeverbindung.

    • Entferne das Kupferband mit denen die Erdung zwischen dem Kühlkörper des Sensors und der Leiterplatte des Sensors hergestellt wird.

  29. gEnRTZyfk4LafvEq
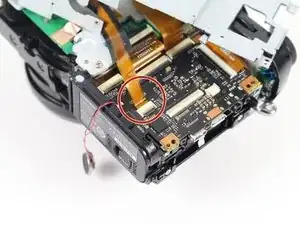
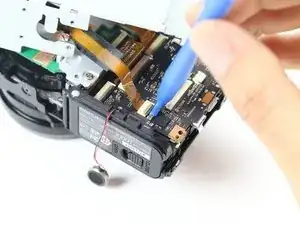
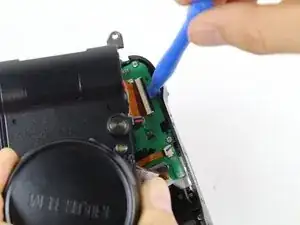
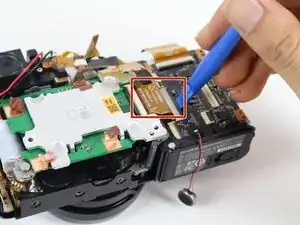
    • Heble das Flachbandkabel rechts oben an der grünen Leiterplatte mit einem Kunststoffwerkzeug ab.

  30. HIUWm6hlPpQXKXID
    HIUWm6hlPpQXKXID
    TejpQpZNdJsSVTHT
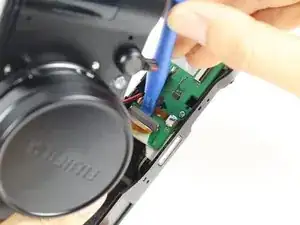
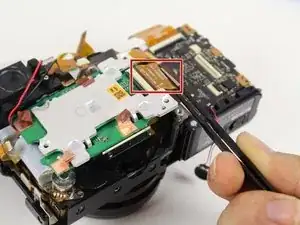
    • Hebe das Flachbandkabel im oberen rechten Mittelteil der grünen Leiterplatte mit einem Kunststoffwerkzeug und einer Pinzette ab.

    • Wenn du weiter in die Kamera hinein gehst, wird die Einstellung des Sensors garantiert zerstört. Die Sensorebene ist mit der Objektivebene ausgerichtet. Schon wenn du eine der Befestigungsschraube löst, ändert sich die Justierung.

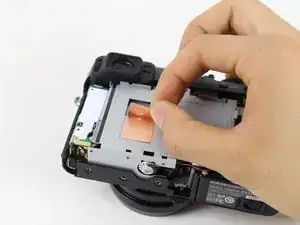
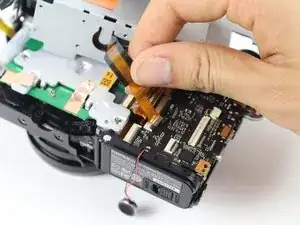
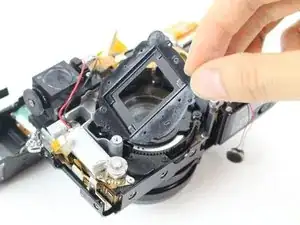
    • Hebe den Kühlkörper aus Aluminium vom CMOS mit den Händen ab. Der Sensor, die Leiterplatte und der Kühlkörper bilden eine Einheit.

    • Wenn die Sensoreinheit entfernt ist, siehst du die silberne Objektivabdeckung darunter.

    Twofold question here:

    * It's not easy to tell from the photos, but what is preventing removal of the motherboard without removing the image sensor?

    * With some cameras it's possible to mark the positions of the sensor mounting screws, tighten them all the way down to determine their absolute position, then remove them--yielding some sort of confidence in the ability to reinstall them to their original position. Is that feasible here?

    Great teardown guide, thanks!

    Jeremy Rosenberger -

  31. BieBkAYhYS3Ek5SX
    • Bei der Arbeit an der Objektiveinheit solltest du Nitrylhandschuhe tragen. Fettspuren von den Händen an den Linsen machen dir beim Zusammenbau ganz schöne Kopfschmerzen.

    • Wenn trotzdem Fingerabdrücke entstanden sind, musst du erst feststellen, ob die Linse aus Glas oder Kunststoff ist, um das richtige Reinigungsmittel zu verwenden. Bei Glas nimm Isopropylalkohol und ein geeignetes Tuch, für Kunststoff einen milden Reiniger. Es gibt Kunststoffe, die von Isopropylalkohol milchig werden.

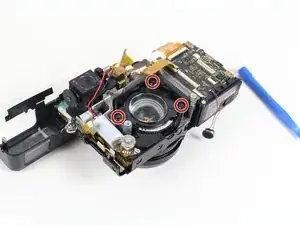
    • Entferne die vier 3,2 mm langen Schrauben an der silbernen Objektivabdeckung.

  32. MWtk5KMTYgXWQHiZ
    • Hebe die silberne Objektivabdeckung mit einem Kunststoffwerkzeug ab.

    • Darunter wird die schwarze Objektivabdeckung sichtbar.

  33. jtshsQOdiT5fWfn6
    • Entferne die vier 3,5 mm langen Schrauben an der schwarzen Objektivabdeckung.

  34. gnyShCXOeqavUdZ5
    • Hebe die schwarze Objektivabdeckung mit der Hand ab.

    • Nun wird das Objektiv sichtbar. Es steht unter Federspannung.

  35. gwdOCWvuOmGHnmrB
    gwdOCWvuOmGHnmrB
    MAB4iPR1ewRCYABS
    • Entferne die drei Schrauben an der unter Federspannung stehenden Abdeckung.

  36. MBkPbMKGDBCYnKbn
    • Hebe das Objektiv und die Feder vorsichtig nach oben ab.

    May i know where is the capacitor connected?

    Zusmitha Jane Corpuz -

    I accidentally dettached the two wires..

    Zusmitha Jane Corpuz -

    Can someone help me? Ty

    Zusmitha Jane Corpuz -

  37. njsjNx1SP5hQYqcy
    njsjNx1SP5hQYqcy
    uTmVxwMar36PlRKj
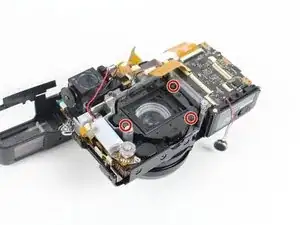
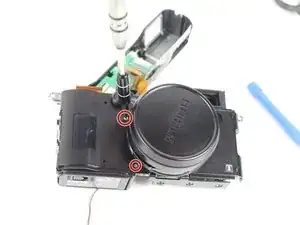
    • Drehe die Kamera herum. Entferne die beiden 4,0 mm langen Schrauben nahe bei der Objektivabdeckung auf der Vorderseite der Kamera.

  38. pUu4Iw1TybP1vuOw
    • Entferne die beiden 4,0 mm langen Schrauben an der Seite der Kamera.

  39. pLGb3bNCdytKUeGE
    pLGb3bNCdytKUeGE
    EPqK2UTJKkWXVauX
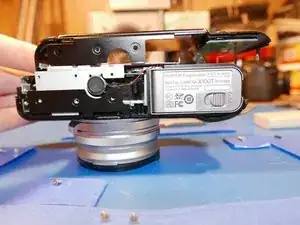
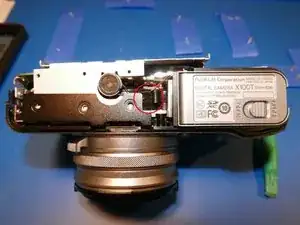
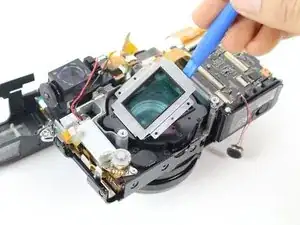
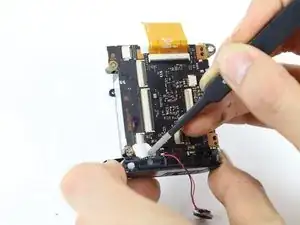
    • Nun ist die Hauptplatine frei. Ziehe sie langsam aus der Kamera heraus.

    • Achte darauf, dass dabei das orangene Flachbandkabel nicht beschädigt wird.

    • Löse das orangene Flachbandkabel mit einer Pinzette von der Hauptplatine ab.

    • Die Hauptplatine ist mit dem Akku verbunden.

  40. vnVMFwREeIqLxjC5
    vnVMFwREeIqLxjC5
    11UtPZafcWOrSyJ1
    XngBxg3bmt3gnLer
    • Entferne den weißen Klebestreifen mit einer Pinzette von der Ecke der Hauptplatine.

    • Entferne die beiden 4,0 mm langen Schrauben von der oberen und unteren linken Ecke der Hauptplatine.

    • Trenne vorsichtig das Akkufach und die Hauptplatine voneinander.

  41. MycmITGUkPrL2Suq
    MycmITGUkPrL2Suq
    ghnhChBZeMLA4oyI
    • Setze ein Kunststoffwerkzeug unter die schwarze Lasche am Anschluss des orangenen Flachbandkabels und heble vorsichtig nach oben. Löse das Kabel ab.

  42. RyacqXOFrJOOC5cy
    RyacqXOFrJOOC5cy
    QnPpGR1WWFEdLGEy
    2qfKpvEDiWMhXXk5
    • Beim nächsten Schritt brauchst du Lötkenntnisse. Unsere Lötanleitung hilft dir dabei.

    • Entlöte die Kabel zwischen Akkufach und Hauptplatine.

    • Die Hauptplatine ist frei.

    Hello,

    If we change the motherboard, do the new one needs to be configured by an official store ?

    Paul -

  43. kqEXuETYYXSraYmU
    • Du hast die Fujifilm X100T komplett zerlegt!

Abschluss

Um dein Gerät wieder zusammenzubauen, folge den Schritten in umgekehrter Reihenfolge.

Christian Johansen

Mitglied seit: 12/01/16

404 Reputation

27 Kommentare

yeey I can now finaly try to fix sticky aperture blades problem on my x100

inorog -

good one, good humor... buy a black one or a high serial number

lechter -

Thanks for great guide. 1 little question. I have dust on the front cover of viewfinder. Can I just take the top cover (step 19,20) without disassembling other parts in previous steps?

Thank you in advance

desolatorbui -

+1

i would like to see top cover disassembled too - same issue, dust in viewfinder

amadeuszleonardo -

That should be possible! Based on posted pictures it seems to me that top plate is being hold in place by 5 points. Two of them are easily accessible from the front (step 19) but other 3 are hidden and may require partial disassembly to get proper access. There is one screw on each side of a camera (step 9 on top and step 14 n top) but most difficult is the one hidden behind back panel (step 13 red circle) to get there may really require taking the whole back of the camera off. Unless You are skilled with some level of previous experience .... I would let the technician to clean the dust out.

krakowiak1 -

I have done something akin to that partial disassembly procedure on old rangefinder film cameras (exactly for the same reason - to clean the dust out of viewfinder) but never worked on modern electronic cameras. If You take a look at step 12 you will realize one flex connecting main controls on the camera back ... it could be easily damaged making your back camera controls pretty unresponsive ... even some of them ... for me this is a game stopper ;-)

krakowiak1 -

Thats a very good question. I think dust might have entered from the diopter adjustment wheel gap. There doesnt seem to be anything stopping that from reaching the front outside part of the viewfinder.

Have you tried compressed air or blowers right in that same gap? Might make the dust spec move.

allanwl -

Here is a partial disassembly guide for the X100 to remove the top plate:

http://www.bolland.be/blog/2014/06/09/fu...

The X100T screws look similar, between these 2 guides you should be able to figure out the easiest way to partial disassemble the X100T to remove the top plate. Note that in the other directions you still have to remove screws for front and rear shell so that you can move them to access the hidden screws that secure the top plate.

madmaxmedia -

Is it possible to further disassemble and replace the viewfinder element? The diopter adjustment on mine is broken and impossible to set to a neutral position.

Joao -

Hi! I've gotten some soda in my manual focus ring, and it's sticky and impossible to turn. This guide and others like it do not mention disassembly of the front part of the lens and focus ring. Do I jave to do a full disassembly of the camera or can I get to it from the front?

glenruben -

Hi, I've got a problem with my X100, probably the internal battery ... but I can't see that in all theses steps ? Can you tell me if we can change the internal battery without change the internal motherboard ?

damiengiraud -

It’s not a battery, it’s a capacitor. And yes, you can change it by soldering it off and replacing it with one from a junk board off ebay or something. If you can find the specs, you may find the component by itself, but Fuji won’t provide it because they rarely receive individual components.

dep37junkmail -

Step 6 is not working for me. The plastic port cover assembly is stuck in place, even when all 3 screws are removed. I have tried wedging plastic shims under the sides of the plastic assembly and it still will not budge. It is stuck in the middle somehow. Is there some mechanism holding it in, in the middle? Is there a mating plastic clip on the opposite side of the plastic port cover? How did you remove it?

Thanks.

Tony -

How about the fix lens how can I disassemble

Melvin Dela cruz -

As a former Fuji tech, this break down is about 80% correct. I would not recommend ever removing the CMOS sensor from the lens unit. They are shimmed and calibrated using computers and you run the risk of throwing your focus completely out of whack as well getting dust on your sensor. I also see no mention of discharging the flash capacitor. Unless you like getting shocked, I would recommend discharging it before sticking your fingers or any metal object in the camera. One wrong touch will not only shock you a bit, but also short out certain components on the board if you’re not careful.

dep37junkmail -

Thanks for your feedback! If you click Edit in the right top corner of any guide step, you can add warnings and edit guide text. It will initially get sent to our filters for review, but other community members with higher rep will approve them.

Kelsea Weber -

Hi sir how about the on off switch with shutter button,can I repair on that particular parts or we need to replace whole top plate

Melvin Dela cruz -

very high precision, high-quality guide! This is very professional.even a child could follow these step-by-step town procedure… not sure the child could make it finally! Congrats, well done?!

Olivier Sirven -

There isn’t much in this review about the front fascia of the camera. I’m curious about the bezel ring around the front of the lens. On the silver edition of this camera, that part is silver (It is black on this camera) and I wonder if that ring could easily be removed and replaced with a silver ring? Possible?

I suspect it is simply threaded on and threadlock is underneath which makes it nearly impossible to remove, but perhaps you can let us know.

Daniel Rucci -

Is there a way to just remove the battery door without dissasembly the whole camera ?

Sergio Tkaczek -

This is a really great set of instructions. My x100t took a bath in a river. After drying it, everything seems to work, however there’s a spot that shows up in some photos. It looks like it repeats on each lens element, however I think it’s one spot of dirt on one lens that shows up more weakly with each lens element. I’d like to take it apart and clean it, but I’m worried about throwing off the calibration of the sensor box in the camera after reading the warning in the instructions. Will it be thrown off? Has anyone else had problems after disassembly? Is it likely I’ll have problems? I’m debating if I should mess with it since it’s only noticeable in some photos. It really shows up in landscapes with sky. It’s not noticeable in busier photos. Should I roll the dice?

Jason Lehrer -

great!

How I can fix the hot shoe of my x100 that is a bit rickety??

thank you very much

Francesco Campanella -

Hello,

I was thinking to edit your guide, but then I made a new guide, you can find it at this link:

Fujifilm X100 and X100S lens partial Disassembly , from the FRONT.

It would be great if you can have a look at it and give me your feedback.

Roberto.

Roberto Toso -

I hope anyone is still opening this aged forum..

My shutter button is not working. I think some of the pieces are detached or broken. Do you think I can fix it by opening the head unit and rearrange it back?

I gave the camera to fujifilm to be repaired and they said I have to change the whole top frame but they don’t have it anymore. So they offered me to buy another which I don’t want to.

I think the shutter problem can be tricked or something… someone help me :(

Bindi Purnama -

Same problem i tried to fix it, but turned out to be a mess.. you can buy remote shutter in amazon or ebay instead.

zusmithajane.corpuz -

Thanks a lot for this. Very interesting, but too advanced for me..

I have a question about the OVF/EVF lever on the front of my x100T. It has become loose on my camera, in the sense that the top of the lever can be moved ca 3mm out from the body. Is it possible to take off the circular plate on the lever and tighten some screw behind there? Or some other way too make the lever again only move firmly along the body and not out from it? Thanks in advance to anyone answering!

Eirik Mikkelsen -

Someone mentioned the capacitor can be changed by desoldering, but it's not clear which component it is nor how far into the disassembly process is necessary to change it. Anyone?

Nick B -