Einleitung

Diese Anleitung wurde von iFixit-Mitarbeitern erstellt und nicht von Google unterstützt. Erfahre hier mehr zu unseren Reparaturanleitungen.

Folge dieser Anleitung, um den Bildschirm deines Google Pixel 4a 5G auszutauschen.

  1. BjHu3IQZrLUOOOfX
    BjHu3IQZrLUOOOfX
    whCVBCH5sAn2AjWX
    2jAVOXWTQEtatJHY
    • Um das Display ausbauen zu können, musst du es nach oben aushebeln. Lies dir die nachfolgenden Hinweise sorgfältig durch, bevor du anfängst.

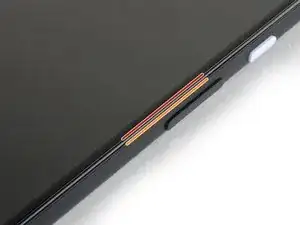
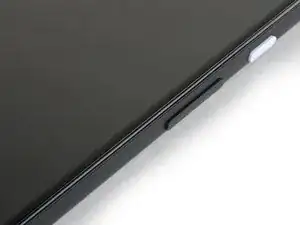
    • Beachte die beiden Nähte an der Kante des Smartphones:

    • Displaynaht: Diese Naht trennt das Display vom restlichen Smartphone. An dieser Stelle muss angesetzt werden.

    • Rahmennaht: hier trifft der Kunststoffrahmen auf die Rückseite. Er ist verschraubt. Hier darfst du nicht hebeln.

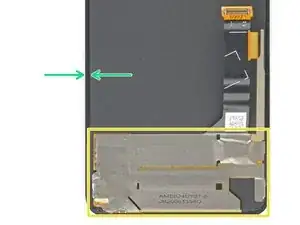
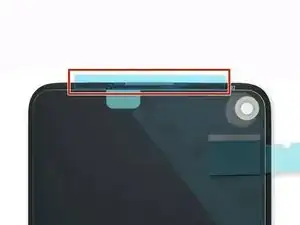
    • Merke dir vor Reparaturbeginn folgende Stellen am Display:

    • Flachbandkabel zum Display: Setze das Öffnungswerkzeug nicht tiefer als angegeben ein, ansonsten riskierst du Beschädigungen am Kabel.

    • Schmaler Kleberand: Wenn du an diesem schmalen Kleberand hebelst, ohne das Plektrum anzuwinkeln, kannst du das OLED-Panel beschädigen.

    i don't understand the "screen flex cable" nor the "adhesive perimeter" instructions

    Jonas Baumann -

  2. 1shUoWThMUmcKsOP
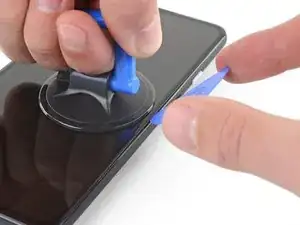
    • Erwärme den rechten Displayrand eine Minute lang mit einem erwärmten iOpener, um den Klebstoff aufzuweichen.

    • Optional kann hierfür auch ein Haartrockner, eine Heißluftpistole oder eine Heizplatte verwendet werden. Hierbei muss jedoch darauf geachtet werden, dass das Smartphone nicht überhitzt wird. Sowohl das Display als auch der interne Akku sind anfällig für Hitzeschäden.

  3. 22sNsmCMdWrQj2dT
    22sNsmCMdWrQj2dT
    bGfHPsVOSiS6AIx2
    adhLllJ3twF4oWNB
    • Sollte dein Display stark gebrochen sein, kann durch ein Überkleben des Displays mit durchsichtigem Paketband der Saugheber besser halten. Alternativ kann entweder mit Panzertape ein Griff geklebt oder der Saugheber mit Sekundenkleber auf das Display geklebt werden.

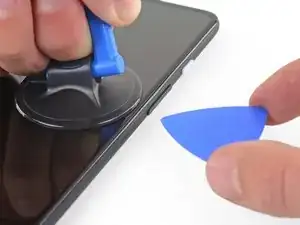
    • Platziere einen Saugheber so weit wie möglich an den rechten Displaykante.

    • Ziehe den Saugheber kräftig und gleichmäßig nach oben.

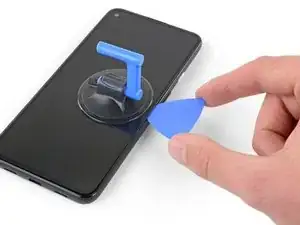
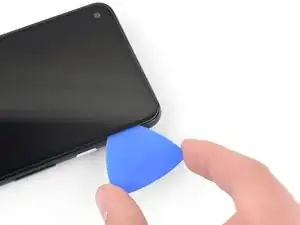
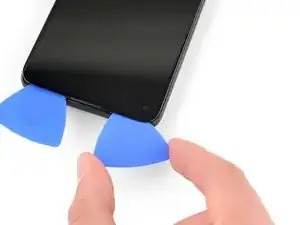
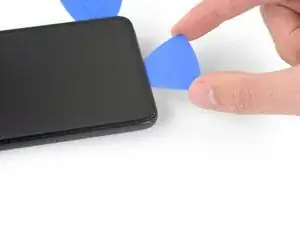
    • Setze die Spitze eines Plektrums nicht weiter als 1 mm in die Bildschirmnaht ein.

    When "lifting" the suction cup, press down while pivoting the handle away from the front/edge, as if opening a door.

    Soon-Hee -

    For a very cracked screen, I placed clear packing tape on top of the screen to use the suction cup at all. Also had to suction cup and pry/pick at multiple sides of the screen. Small fragments of broken glass won't pry up, so had to use tweezers to pull at glass fragments to release them from the adhesive underneath.

    Soon-Hee -

  4. EKWSEDUtR4UMD4kh
    EKWSEDUtR4UMD4kh
    Fn1sUW1B2NmQPv11
    sNcqGLdHL1lNTpbI
    • Dieser Schritt zeigt, wie das Plektrum eingesetzt wird, ohne das OLED-Panel zu beschädigen. Führe dies durch, bevor du mit dem Durchtrennen des Klebers beginnst.

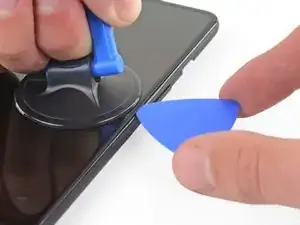
    • Sobald sich das Plektrum 1 mm weit im Spalt befindet, klappe es nach oben, so dass es einen steilen Winkel bildet.

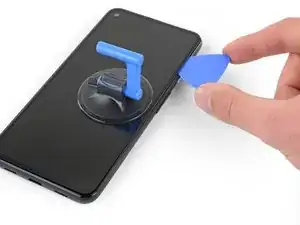
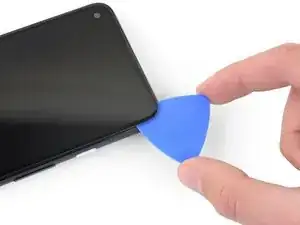
    • Schiebe das Plektrum vorsichtig in einem steilen Winkel etwa 6 mm in das Smartphone. Das Plektrum sollte unter das OLED-Panel hineinrutschen.

    • Stoppe sofort, wenn du spürst, dass du mit der Spitze auf eine Kante stößt. Das Plektrum drückt möglicherweise gegen die Kante des OLED-Panels. Neige das Plektrum und versuche es erneut.

    You don't exactly have to be utterly careful about damaging the panel. The glass+OLED screen as a whole is being replaced here. So it doesn't really matter if you accidentally damage the old OLED panel.

    Soon-Hee -

    If only the battery needs to be replaced, be sure to pay attention to the angle at which the pick is moved. Even the slightest deviation and the display is crap. I followed the instructions, but obviously I got to the display somewhere. Unfortunately the display now remains black and I have a flashing green bar at the top. So be careful.

    RiKER “MANiAC -NI-” -

  5. QWiugoSfJ62HsgtF
    QWiugoSfJ62HsgtF
    IDLicOJLOMeF4SGR
    qqjwfukS22qIkiPE
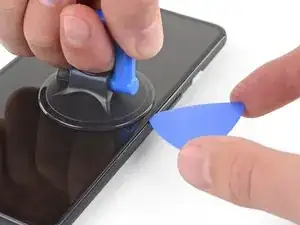
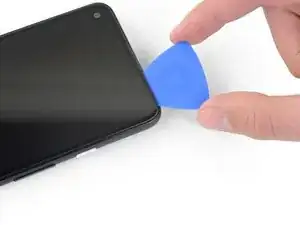
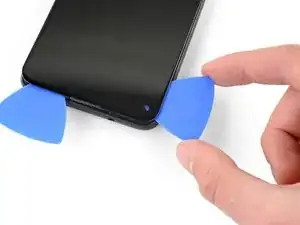
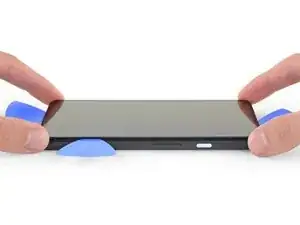
    • Schiebe das Plektrum an der rechten Kante des Displays entlang, um den Kleber zu durchtrennen.

    • Setze das Plektrum nicht weiter als 6 mm ein, da sonst das Flachbandkabel des Displays beschädigt werden kann.

    • Lasse das Plektrum in der oberen rechten Ecke stecken, um zu verhindern, dass sich der Kleber wieder verbindet.

  6. kc43OPZSOSOINTxD
    kc43OPZSOSOINTxD
    NQGH5UQSENiB6xJl
    KCRVSKDPmdIuAeAD
    • Der Ohrhörer-Lautsprecher am oberen Displayrand ist mit einem Gitter geschützt. Wenn du kein Ersatzgitter hast, dann beschädige oder verliere dieses Teil nicht.

    • Der Displaykleber ist schwach und es sollte keine erneute Wärmeanwendung erforderlich sein. Wenn sich der Displaykleber dennoch nur schwer durchtrennen lässt, kannst du die entsprechenden Stelle eine Minute lang erwärmen und einen neuen Versuch starten.

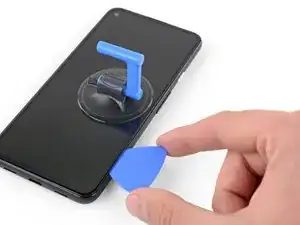
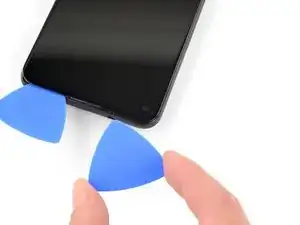
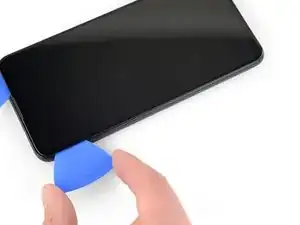
    • Führe ein weiteres Plektrum schräg in den rechten Rand des Handys ein, wo sich bereits ein Spalt gebildet hat, um eine Beschädigung des OLED-Panels zu vermeiden.

    • Schiebe das Plektrum an der Oberkante des Smartphones entlang und trenne den Kleber auf.

    • Lass das Plektrum in der Oberkante stecken, um ein erneutes Verkleben zu verhindern.

    The replacement screen I purchased from iFixit Oceania in Sept 2022 included a new speaker mesh, already attached to the screen.

    Chris -

    The corners seems particularly tricky with the adhesive. Make sure to reapply heat in the corners. I cracked my screen while detaching the corners.

    Patrick Nantel -

  7. yRFEhejVGu2mS5YM
    yRFEhejVGu2mS5YM
    LyPSEqvXePhN1S1X
    l2NREA1KkHMXfF24
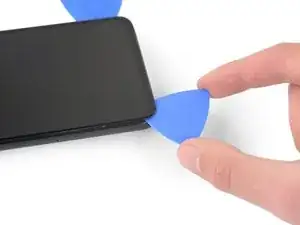
    • Setze ein weiteres Plektrum schräg an der Oberkante des Handys in den bereits entstandenen Spalt ein, um eine Beschädigung des OLED-Panels zu vermeiden.

    • Schiebe das Plektrum um die linke obere Ecke, dort wo das Kamerafenster ist.

    • Wenn sich der Displaykleber schwer durchtrennen lässt, erhitze die betreffende Kante eine Minute lang und versuche es erneut.

    • Lasse das Plektrum in der linken Kante des Handys stecken, um ein erneutes Verkleben zu verhindern.

  8. pDikbRxBHG5uQeSP
    pDikbRxBHG5uQeSP
    6MwZMZRBrFJivhZO
    T4qM4wocYcLLfWYD
    • Schiebe das Plektrum zum Auftrennen des Klebers an der linken Kante des Smartphones entlang.

    • Wenn sich der Displaykleber schwer durchtrennen lässt, erhitze die betreffende Stelle eine Minute lang und versuche es erneut.

    • Denke daran, dass du dabei nahe am Flachbandkabel des Displays und dem Touchscreen arbeitest.

  9. rBRGU4Pt26RKVkyF
    rBRGU4Pt26RKVkyF
    XxsCXeWkHfbPsNGn
    SeXRscJBBBGL4Bvk
    • Schiebe das Plektrum zum Auftrennen des restlichen Klebers um die untere linke Ecke herum und an der Unterkante des Smartphones entlang.

    • Wenn sich der Displaykleber nur schwer durchtrennen lässt, erhitze die Problemzone eine Minute lang und versuche es erneut.

    • Denke daran, dass du dabei nahe am Flachbandkabel des Displays und dem Touchscreen arbeitest.

  10. 6fD2WJPFoOK4akuO
    6fD2WJPFoOK4akuO
    tcSavu6p6KTwYkYv
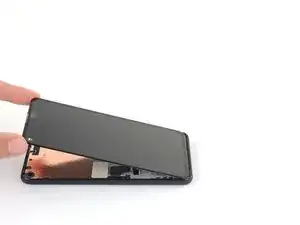
    • Wenn der Kleber rund um das Handy durchtrennt ist, kannst du das Display an der rechten Kante ein wenig wie eine Buchseite aufklappen.

    • Entferne das Display noch nicht.

    • Verwende ein Plektrum, um etwaige Klebstoffrückstände durchzutrennen.

  11. aOUSRLAvkpRuPCkg
    aOUSRLAvkpRuPCkg
    4mkUQNpF1jiFBN2D
    tROQPeoMEqE2UVTu
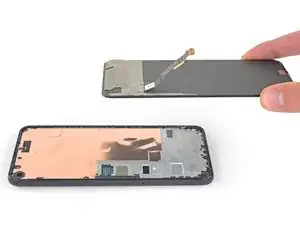
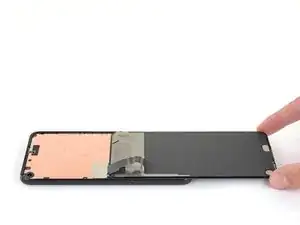
    • Hebe das Display an der Oberkante an und klappe es über die Unterkante, bis es mit der Glasseite nach unten abgelegt werden kann.

    • Sei vorsichtig, dass das angeschlossene Flachbandkabel nicht überstrapaziert wird.

  12. 2LZI2wXoNHhEOebu
    2LZI2wXoNHhEOebu
    NO5L6wkKncYYGiSU
    UwcqyVs6gG1putuL
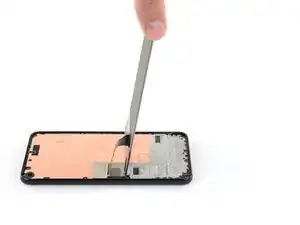
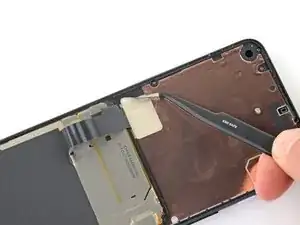
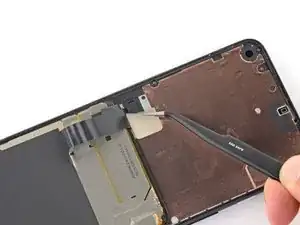
    • Der Displaystecker ist mit einem Stück Klebeband bedeckt. Ziehe es mit einer Pinzette oder dem Fingernagel ab.

    • Wenn es noch in gutem Zustand ist, kannst du es beim Zusammenbau wiederverwenden. Wenn nicht, ersetze es durch ein Stück Kaptonband.

    The replacement screen I purchased from iFixit Oceania in Sept 2022 included a new piece of tape.

    Chris -

  13. KyEBG1F6liiXaYU2
    KyEBG1F6liiXaYU2
    MMC1UB5BKiEs4Y6L
    MSOrjLPXIuxOPqmU
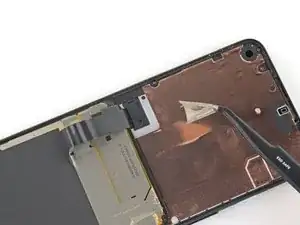
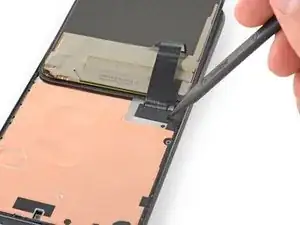
    • Setze die Spudgerspitze in die Öffnung an der Kunststoffabdeckung ein, die das Flachbandkabel zum Display befestigt.

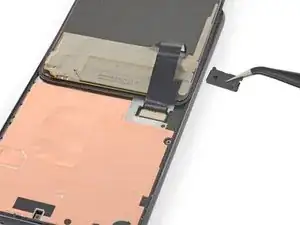
    • Heble die Abdeckung nach oben, bis sie herauskommt.

    • Die Abdeckung kann herausspringen.

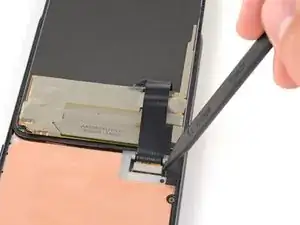
    • Entferne die Kunststoffabdeckung.

  14. 2DYGeYNekFXLSXaS
    2DYGeYNekFXLSXaS
    wDhTCYcdJViRdGb3
    • Heble das Flachbandkabel zum Display mit der Spudgerspitze nach oben und trenne es ab.

    • Um Druckstecker wie diesen hier wieder zu verbinden, richte ihn zunächst sorgfältig aus. Drücke erst eine Seite herunter, bis sie einrastet, und dann die andere. Drücke den Stecker auf keinen Fall in der Mitte herunter. Wenn er nicht richtig ausgerichtet ist, können sich die Kontakte verbiegen und dauerhaft beschädigt werden.

  15. DWFEe15Sga1wOdE1
    DWFEe15Sga1wOdE1
    tvMRDtG5fBofNPYN
    4PGalXujTnMKhxhI
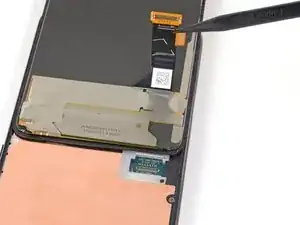
    • Entferne das Display.

    • So wird das neue Display eingebaut:

    • Überprüfe, ob das neue Display mit einem Gewebe über dem Lautsprecher und Klebestreifen an der Oberkante ausgestattet ist.

    • Wenn ja, benötigst du die Klebestreifen an der Oberkante nicht.

    • Wenn nein, entferne die große durchsichtige Schutzfolie vom Klebestreifen an der Oberkante und bringe ihn am Display (nicht am Rahmen) an. Achte darauf, dass der größere Ausschnitt für das Gewebe des Lautsprechers passt.

    • Folge dieser Anleitung, um vorgestanzte Klebestreifen zu anzubringen.

    • Das dritte Bild zeigt, wie die Klebestreifen platziert werden.

    • Beim ersten Neustart nach der Reparatur wird das Display eine Kalibriersequenz durchlaufen. Berühre das Display dabei nicht, der Touchscreen könnte nicht richtig kalibriert werden, was zu einer schlechten Funktion führen kann.

    There are four adhesives provided in the current kit provided by ifixit. They have a blue and clear backing with a thin black strip, as shown on here. The adhesives instructions provided in this general guide are not very clear and I messed up my first one, which made the other three useless leading me to just buy a b-7000 adhesive instead. However, for anyone wanting to correctly use the ifixit adhesives, first line up the black strip on the edge of your phone where the screen will rest and peel off the first clear portion. Then peel off the blue portion and you will be left with a thin black adhesive strip. Do this for all four pieces in the configuration shown on the page linked above and then place your screen on, press down gently, then turn the phone screen down and place some books on to provide stronger contact between the adhesive and the new screen. Good luck!

    Graduate Agriculture -

    thanks a lot!

    Zurdits -

    That was so much clearer thank you!

    Jason De Dios -

    Super Anleitung. Allerdings habe ich die Kalibriersequenz leider nicht gesehen. Das Display funktioniert, aber der zweifinger Zoom arbeitet nicht. Kann man die Kalibriersequenz neu aufrufen oder was kann ich tun. In manchen Anleitungen steht, das man im Recovery Mode Display Befehle ausführen kann. Ein Werksreset des Pixel 4A 5G hat nicht geholfen.

    Beim ersten Neustart nach der Reparatur wird das Display eine Kalibriersequenz durchlaufen. Berühre das Display dabei nicht, der Touchscreen könnte nicht richtig kalibriert werden, was zu einer schlechten Funktion führen kann.

    Danke im voraus

    SteffenZimmWeimar -

    The adhesive strips do not cover the corners, and I guess there is a good chance of dust comming into the device. Had issues with the front camera after the first repair. Maybe the rounded corner strips could be included in the repair kit?

    Michael Bappert -

    I had a lot of old glue on the display. Since I only swapped the battery I recommend to remove all all glue on the display do guarantee that the new glue has a good sticking and nothing is too thick when pressing the old display on the new glue.

    Hassani Sabbah -

Abschluss

Vergleiche dein Ersatzteil mit dem Originalteil—Möglicherweise musst du fehlende Teile übertragen oder Schutzfolien vom Neuteil abziehen, bevor du es einbauen kannst.

Um dein Gerät wieder zusammen zu setzen, befolge die Anleitung in umgekehrter Reihenfolge.

Entsorge deinen Elektromüll fachgerecht.

Die Reparatur verlief nicht wie geplant? Versuche es mit einigen grundsätzlichen Problemlösungen oder frage in unserem Forum um Hilfe.

Sam Omiotek

Mitglied seit: 25/02/19

87355 Reputation

29 Kommentare

Where is the best place to purchase a replacement screen?

SoYouWantMoore -

I was just wondering the same thing and it seems everywhere is sold out, only place I can find it is on eBay…

Brandon Baggett -

This was an excellent tutorial. One thing I would add here that caught me in reassembly: the proximity sensor is built into the inner lip on the top of the screen about 3mm to the right of the speaker grill (if you shine a bright light in that location, you will see a little blue dot where this is locate through the screen). If you are putting new adhesive on make sure not to block this proximity sensor with the adhesive.

BvZ -

Great tutorial. I just used the new original google pixel parts and this guide worked great! Only thing i wish was that there was a bit more clarity on how to apply the adhesives

Quan Dao -

Same! I needed to order another set of adhesive because at first time I ruined. Specifically that part where speaker goes. We need to attach it on screen. and all other on Phone case itself.

Also noticed that after some time, screen bends and we see gaps. I need to press time to time so it stick again. Not sure why this is so.

Justas Markauskas -

Took me some time to realize the adhesives should be applied to the screen, not the body -- the shape of the earphone side didn't line up on the body.

To Justas' comment, I also noticed that the adhesives tutorial says to hold firmly for 20-30 seconds. (Tip: turn phone over onto flat surface and press on the back for more even pressure than trying to do that from the front.)

I've seen other tutorials that require long holds and 24 hour set time for this type of adhesive. I have also used a silicone pipe sealer tape that adheres to itself, not the pipe, and after a month (when I did the real repair) I could not unwrap the adhesive, and it adhered well to the uneven pipe surface anyway. So I think these types of silicone based adhesives have a certain flow rate to them, and they require pressure and time for them to adhere properly. This is different from regular old tape and other more antiquated adhesives.

Kiki -

This guide is let down by next to no steps on applying the adhesive. Expected better, you give everything and then go missing on the last steps!?

Shane Crawford -

No adhesive steps. Too bad!

cbdude -

Very sad to see what appears to be 2/3rds of a guide on how to replace a screen

Seb H Miller -

al in all 8/10 guide- the process was pretty simple and along with a few youtube videos to clarify a few points, I found the repair to be pretty smooth. The only thing I would have liked to see was instyructions on the double sided tape provided with the kit but I understand how varied these might be depending on the vendor. THANK YOU IFIXIT! You've allowed me a few more years with a device that is otherwise perfect and have prevented unecessary waste and purchase of a new device. I will definitely recommend and use your service again

Seb H Miller -

Update: The adhesive strips do not cut it and the screen keeps lifting. Also the multitouch does not work on the screen- still unsure if this is a hardware or software issue. Anyone getting the full kit from ifixit would do well to also get some B-7000 to re-glue the screen as the provided adhesive strips are not enough. I would recommend supplying a small tube of this stuff instead of these custom adhesive strips.

Seb H Miller -

Great guide and really helped me to install the genuine replacement part I bought from iFixit!

My recommendation would be to line the holes on the adhesive strips up with screws and indents on the device.

Also when you're reconnecting the screen flex cable, you need to use some force - don't be too scared like I was for a while :)

Jordan Keightley -

Got my replacement screen and tools today. Getting the screen off was the easy part since it was already broken. Getting it attached was a bit of a struggle but the trick is to connect the ribbon cable then insert the plastic part. Make sure to reboot when you do.

Jesse Earl -

This guide told me the tidbits I needed to know to do this successfully. I purchased the replacement screen and tool kit for this (mostly for the "iOpener" heat tool) and it worked like a champ. I did have one small issue with the pre-cut adhesive that came with the screen: the piece for the top of the screen was "mirrored" so I had to do a bit of fiddling to cut it into a couple smaller pieces and apply it that way to avoid blocking the proximity sensor. But if you're doing a repair like this odds are this isn't going to be a big deal for you if yours comes this way too.

Brian Trump -

I noticed this too, until I suddenly realized that it works perfectly if applied to the screen and not the body of the phone -- then it is aligned perfectly. The adhesive was quite confusing as the blue template was meaningless.

Kiki -

This guide was written for removing an intact screen. If your screen is shattered there are extra steps to take. A piece of packing tape on the screen will help the suction cup work over cracks as well as help to contain the many tiny glass fragments. If it's the right side that has the most cracks then start on the left side. If your screen was badly shattered you will have to spend some time removing all the tiny pieces that remain around the edge of the phone. Avoid getting the shards into the body of the phone. I temporarily covered the larger openings with small pieces of packing tape. The packing tape is also useful for collecting all the tiny shards from the surface of your work area.

Chris -

Even if your screen is in one piece, you'll still need to remove the glue remnants from the rim of the phone so that the new screen has a perfectly flat surface to be installed onto. A bit of isopropyl alcohol will aid in loosening the glue and preparing a clean surface for the new adhesive. A piece of tape over the rear cameras housing will help protect it from being scratched by any glass fragments on your work surface as you move the phone around cleaning up the old glue.

If your screen shattered from a drop, there will inevitably be some damage to the plastic frame. Ensure that any deformation is addressed, perhaps with a razor blade, so the new screen can sit flat.

Chris -

I didn't understand how the pre-cut adhesive strips worked until I used them. It's only the black goo that is the adhesive. Once you peel off the clear side, place the strip and then peel off the coloured side, all that's left is the black goo, hopefully exactly where it needs to be. Mine could be carefully re-aligned with tweezers as necessary before setting the screen into place.

I bought a tube of glue as a previous commenter recommended, so I can repair again if the screen lifts but I have faith in the adhesive supplied on the pre-cut strips, since the surfaces were clean and flat.

Chris -

Thank you for the explanations on the adhesive strips, they helped more than the actual guide above. One thing to mention would be order of operations: it's easier to clean the sides and apply the adhesive strips BEFORE plugging in the screen and having to fiddle around with the ribbon cable. The adhesive has cutouts and you see how they match with the screws in the board. Top adhesive is already applied to the screen so you have a backup piece in case something goes wrong. Also, when lowering the screen in place over the adhesive make sure to align the bottom first otherwise you'll get an uneven set with the top part having like a small gap and forcing you to lift it again and screwing the adhesive bands. Overall I would recommend getting the B-7000 or T-7000 glue that another poster mentioned, seems like a more easy installation. The corners are also better covered with liquid glue, since the strips don't actually go there.

Adrian -

Used this guide to replace a shattered screen using the iFixit kit. Heating the adhesive thoroughly was important, especially when having to reinsert the picks because the pick wasn't able to slide smoothly across the cracks. As others have said, the instructions about where to apply the adhesives wasn't super clear, but the success of the assembly doesn't seem to have been too dependent on precise placement as long as they were in the rails.

Brian Erly -

how important is the plastic cover in step 13?

yeah it went flying, she gone

sell replacements?

lukey -

After placing the screen back on the phone if you notice it is not aligned perfectly just heat up the glue with the iOpener and move the screen into place, this worked for me.

Harry -

I agree with the adhesives comments! However, it seems like the two long strips are interchangeable.

My new screen actually came with the top adhesive already in place. The blue protective plastic peeled away with the bubble wrap when I opened it. Apart from the strip coming off sooner than I wanted, it was actually very helpful to have the adhesive in place already. Especially since the bottom adhesive strip had rubbed against the package for the alcohol swab during shipping and was stuck firmly to the paper packaging. I was able to salvage some of it and then apply the extra strip from the top onto the bottom.

The ribbon cable was really tricky to re-attach. That took longer than any other step.

Prying the old screen off was made easier by inserting the pick underneath where the glass had already broken. If you are replacing the screen (and not just opening the phone for other repairs) there's not much point in worrying about damaging the edge of the OLED since you are replacing that too!

Lead Sheep -

"To reassemble your device, follow the above steps in reverse order."

So you want me to remove the screen, disconnect the display, flip the screen over, slice through the display adhesive, insert an opening pick, and then heat the edges. Got it. Should go perfectly.

Please update with specific instructions on reassembly.

Matt -

Tutorial is incomplete, only talks about disassembly. It needs to cover the assembly and the adhesive or glue part of the screen which is the hardest part of the job...

Adrian -

So grateful for the parts and excellent tutorials! This is my second replacement. I certainly couldn't afford a whole new phone each time.

Kiki -

After changing the screen, the touch screen is not working. The display works properly but no touch is detected. with a USB mouse I made a factory reset and still no luck. I cant test with the older screen since its torn to pieces and the phone wont boot with the old screen connected. Any suggestions?

Zurdits -

Tutorial parfait, merci !

Oui il faudrait un peu plus d'infos sur le collage des adhésifs.

Guy Om -

Have had to follow the guide (again) as my youngest broke the glass a second time. Worked smooth. However, I suggest to buy with your replacement kit also the Tesa stripes for the corners as the adhesive strips included do not cover the corners of the case. That is, there is an excellent chance that dust will settle especially on the front camera--already had issues with a clear view in the front camera after the first repair.

Nevertheless, thank you all for the guide and iFixit for the repair kit!

Cheers

Michael Bappert -