Einleitung

Diese Anleitung wurde von iFixit-Mitarbeiter:innen verfasst und ist keine offizielle Reparaturanleitung von Google. Hier erfährst du mehr über unsere Qualitätsstandards.

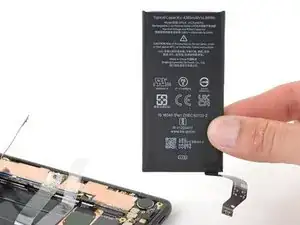
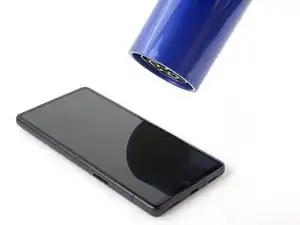
Folge dieser Anleitung, um den Akku in deinem Google Pixel 7a zu entfernen oder zu ersetzen.

Lithium-Ionen-Akkus haben eine begrenzte Lebensdauer. Wenn sich dein Smartphone zu schnell entladen sollte oder unerwartet den Geist aufgibt, ist es möglicherweise an der Zeit, den Akku zu ersetzen.

Hinweis: In dieser Anleitung wird das Verizon-Modell Google Pixel 7a (G0DZQ) verwendet, das über eine 5G-mmWave-Antenne verfügt. Wenn du ein Modell eines anderen Anbieters haben solltest, unterscheiden sich einige Fotos in dieser Anleitung, aber das Verfahren ist das Gleiche.

Wenn dein Akku aufgebläht ist, musst du entsprechende Vorsichtsmaßnahmen treffen.

Für diese Reparatur benötigst du Ersatzkleber.

Hinweis: Bei jeder Reparatur kann die Dichtigkeit beeinträchtigt werden. Ob die Wasserdichtigkeit nach der Reparatur erhalten bleibt, hängt davon ab, wie gut du den Klebstoff wieder anbringst.
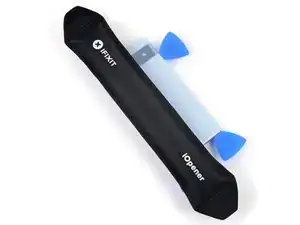
  1. oTvToevuIyEPXQJt
    oTvToevuIyEPXQJt
    DgiJJLhpPrIMBAmo
    • Entlade deinen Akku auf unter 25 %, bevor du mit der Reparatur beginnst. Ein geladener Lithium-Ionen-Akku kann gefährlich sein.

    • Ziehe alle Kabel von deinem Smartphone ab und schalte es vollständig aus.

    If you purchased the iFixit kit, now is a good time to ensure you have all the parts: If you go to the kit page, and expand Kit Contents, you'll see the full list. The full list contains links to details on adhesive sets. These links are also in this guide document, in the upper right, in a scrollable window.⏎

    Newer batteries seem to come with the 1IP Torx Plus bit taped in the tray of the battery part tray (Repair Part box). It is not in the Tools, found in the Repair Tools box (if you purchased the Fix Kit).⏎

    Familiarize yourself with all the parts, including the six adhesive items. Ensure none of the components fell behind the parts tray and are left in the parts box (they are tiny adhesive tabs). The adhesive is VERY sticky. Don't remove the backing until you are ready to use, and then be prepared to lay the piece in place once ANY contact is made. Removal, even an edge, to better align an adhesive part is often not possible(!). The adhesive will stretch and bunch up.⏎

    As noted at the beginning of the guide, proper installation of the adhesive is required to maintain water resistance, but also to transfer heat correctly.

    Chris Romer -

  2. cV6nABEAOv1E1h5B
    • Lege einen erwärmten iOpener drei Minuten lang auf den unteren Rand der Rückabdeckung.

    • Alternativ kannst du auch einen Fön, eine Heißluftpistole oder eine elektronische Heizplatte verwenden, um die Rückabdeckung zu erwärmen.

    • Erhitze das Smartphone nur soweit, bis es sich schön warm anfühlt. Starke Hitze kann das Display, die Rückabdeckung oder den Akku beschädigen.

    If you have an IR Thermometer or Thermal Camera, you're going for 85C/185F. Even with mini heat guns, this comes up fast; just a few seconds of heat.

    Chris Romer -

  3. 2nFrVZPM1Vs5Cw2S
    2nFrVZPM1Vs5Cw2S
    ZaSO3HSB4d15Canr
    LIqICQXRWEg22AXF
    • Die nächsten drei Schritte zeigen, wie die Anti-Clamp funktioniert, ein Werkzeug das wir entwickelt haben, um das Öffnen eines Smartphones zu erleichtern. Wenn du die Anti-Clamp nicht nutzt, überspringe für eine alternative Methode die nächsten drei Schritte.

    • Für eine ausführliche Beschreibung und Bedienungsanleitung der Anti-Clamps. schau dir diese Anleitung an.

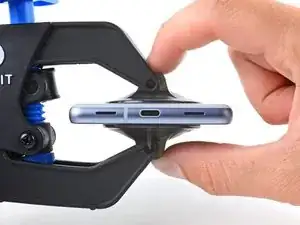
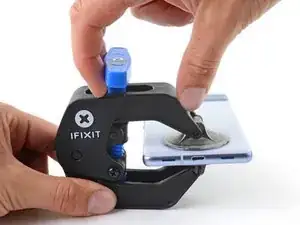
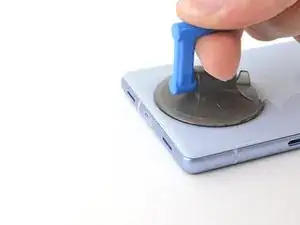
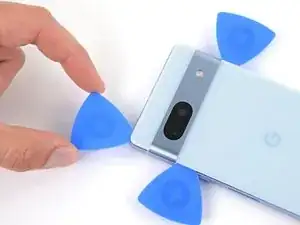
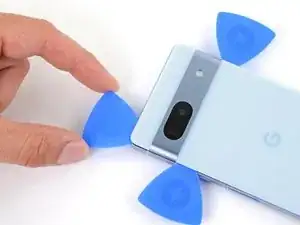
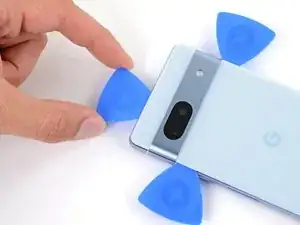
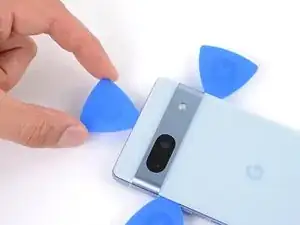
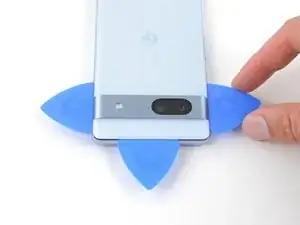
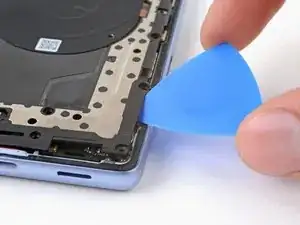
    • Ziehe den blauen Hebel zurück, um die Arme der Anti-Clamp zu entsperren.

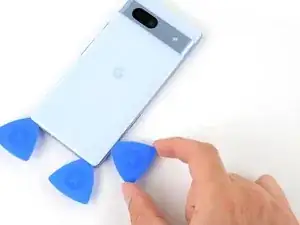
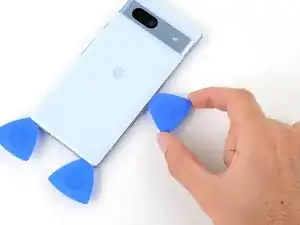
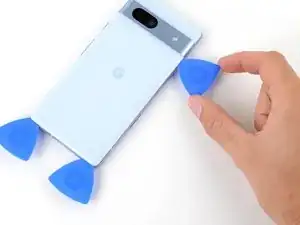
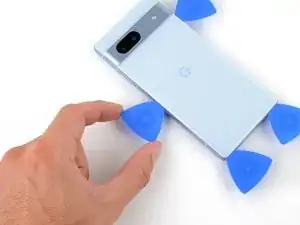
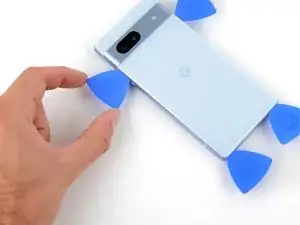
    • Ziehe die Unterkante des Smartphones zwischen die Arme des Anti-Clamp, wobei sich jeweils ein Saugnapf am Display und einer an der Rückabdeckung befinden sollte.

    • Drücke die Saugnäpfe zusammen, damit sich diese am Smartphone festsaugen.

  4. mJxNwDjfRSEj5QCy
    mJxNwDjfRSEj5QCy
    BAmIdyTxLtSQIUQ3
    LuEvLFlAcctEF6Hw
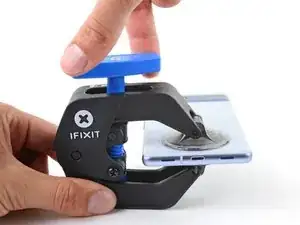
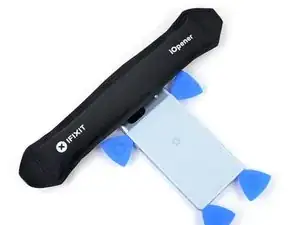
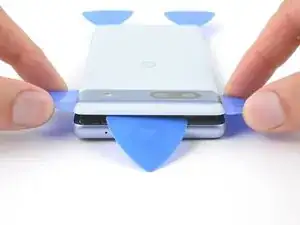
    • Ziehe den blauen Hebel nach vorne, um den Mechanismus zu blockieren.

    • Drehe den blauen Hebel eine volle Drehung (360°) im Uhrzeigersinn , oder bis die Saugnäpfe anfangen sich zu dehnen.

    • Stelle sicher, dass die Saugnäpfe auf einer Höhe bleiben, während sie sich dehnen. Wenn diese andauernd verrutschen, kannst du zusätzlich zur Anti-Clamp Klebeband verwenden, um eine griffigere Oberfläche zu. schaffen.

  5. u1pcy4CDGbHBhpm2
    • Die Hitze eines iOpeners ist i.d.R. ausreichend, um die Rückabdeckung zu lösen, beim Anlegen der Anti-Clamp kann der Kleber aber wieder abkühlen. Erhitze die Rückabdeckung erneut, falls du mehr Zeit zum Anlegen brauchst.

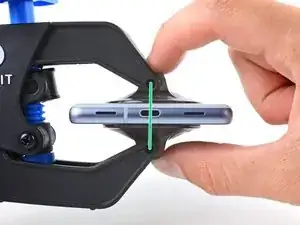
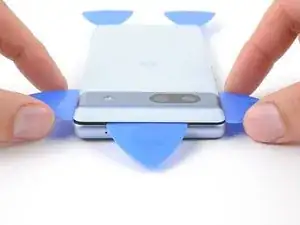
    • Platziere einen Gegenstand unter dein Smartphone, damit dieses horizontal zwischen den Armen des Anti-Clamp liegt.

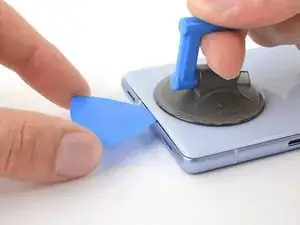
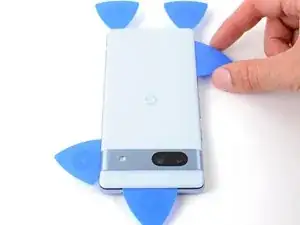
    • Warte eine Minute, oder bis sich der Kleber löst und sich eine Lücke an der Unterkante des Smartphones bildet.

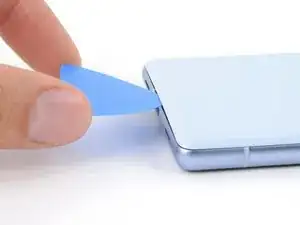
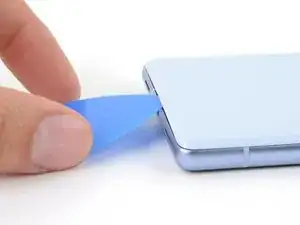
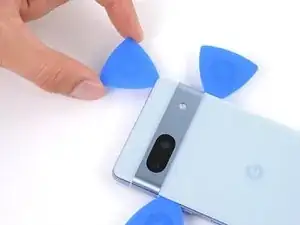
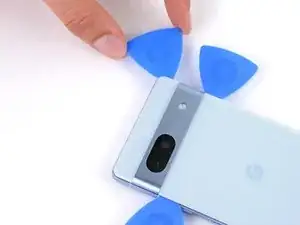
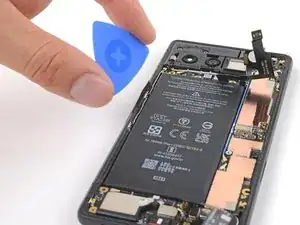
    • Setze ein Plektrum in die Lücke zwischen Rückabdeckung und Rahmen.

    • Löst sich der Kleber nicht, drehe den blauen Hebel eine viertel Umdrehung in Uhrzeigersinn und warte eine weitere Minute. Erwärme die Rückabdeckung erneut mithilfe eines Föns oder einer Heißluftpistole, wenn sie zu sehr abkühlt.

    • Entferne die Saugnäpfe der Anti-Clamp mittels der Zuglaschen und lege die Anti-Clamp beiseite.

  6. t2aXMNQXyZurQsBd
    t2aXMNQXyZurQsBd
    PWk2UrCggILhfvZC
    Y2GVFAEqwtEqbeXe
    • Wenn du bereits erfolgreich ein Plektrum mithilfe Anti-Clamp zwischen Rahmen und Rückseite eingesetzt hast, überspringe diesen Schritt.

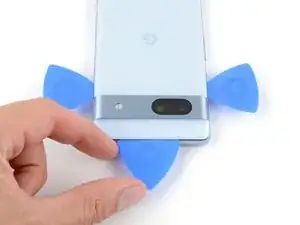
    • Setze einen Saugheber mittig unten auf die Rückabdeckung.

    • Ziehe mit einer kräftigen und gleichmäßigen Bewegung am Saugheber, bis sich eine Lücke zwischen Rückabdeckung und Rahmen bildet.

    • Setze nun vorsichtig ein Plektrum in die Lücke.

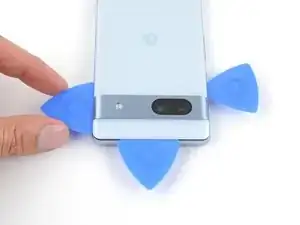
    • Entferne den Saugheber.

  7. 3NP2iNpt5cXvk1WA
    3NP2iNpt5cXvk1WA
    2RTUKCdHHHUGlBBu
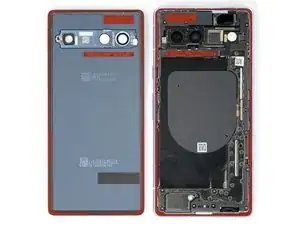
    • Die Rückabdeckung ist ringsrum und im Bereich der Kamera mit Klebstoff am Gehäuse befestigt. Nutze dieses Bild, um dich zu orientieren, während du den Kleber durchtrennst.

    There is also a plastic bezel attached to the rear cover which you DO NOT want to remove. It's a very similar (temperature wise) adhesive that connects that bezel to the cover, as connects the bezel & cover to the frame, but since only the frame side adhesive is provided in the kit, you want to try not removing that bezel from the rear cover.

    Chris Romer -

    If you did remove the rear cover bezel, while removing the rear cover, grab some T7000 glue, which has a precision application needle tip. Follow the instructions on how to apply the iFixit adhesive which you'll reach at and perimeter pieces at the end of this guide, but hold off on removing the blue tape pieces facing the cover. Make sure you know how to orient the bezel (there is a little notch ridge that goes over the USB-C power port. Clean up the bezel of adhesive, but don't remove the cover liner, which seems to stay in place even with the heat and prying that accidentally broke the bezel adhesives. Install rear cover, with loose bezel, to check you have it right.

    Remove, apply a bead of T7000 around the rear cover and then lay the bezel into that bead, carefully checking orientation. Pull your blue strips, install the cover with freshly glued bezel, and press the assembly overnight (using some clean cloths and a few books works - I used soft auto polishing microfibers and a kit of hydraulic caps).

    Chris Romer -

  8. AQwYAfstUZJttvVH
    AQwYAfstUZJttvVH
    HogKVqwBC5cpUOvQ
    wiwVUXVSDUAomxuB
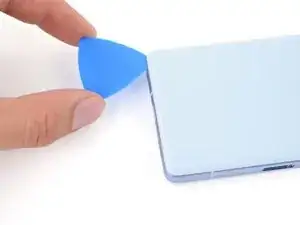
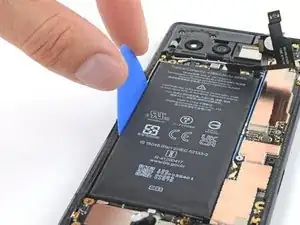
    • Richte dasPlektrum etwas nach oben, sodass die Spitze vom Rahmen weg zeigt.

    • Ab hier solltest du alle Plektren nach oben richten, während du den Kleber durchtrennst, bis die Rückabdeckung komplett abmontiert ist.

    • Schiebe dein Plektrum in die untere linke Ecke der Rückabdeckung.

    • Belasse das Plektrum an dieser Stelle, um zu verhindern, dass sich der Klebstoff an dieser Stelle erneut festklebt.

  9. avWfNxrrXPe6kPep
    avWfNxrrXPe6kPep
    TvMqvbhHWjb4GkAc
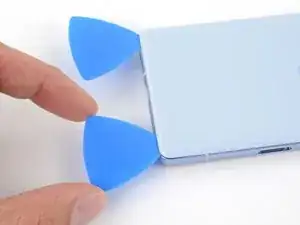
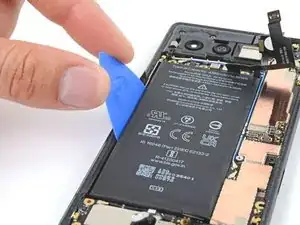
    • Setze ein zweites Plektrum in die untere linke Ecke.

    • Schiebe das neue Plektrum zur unteren rechten Ecke, um den Klebstoff an der Unterkante zu durchtrennen.

    • Belasse das zweiten Plektrum an dieser Stelle, um verhindern, dass sich der Klebstoff an dieser Stelle erneut festklebt.

  10. DKlYHQF4LSt6NVel
    • Erwärme die rechte Kante der Rückabdeckung zwei Minuten lang mit einem erhitzten iOpener.

    • Alternativ kannst du auch einen Fön, eine Heißluftpistole oder eine Wärmeplatte nutzen, um die Rückabdeckung zu erwärmen. Achte darauf, das Gerät nicht zu überhitzten.

  11. J5QUccAnUJXeCOiX
    J5QUccAnUJXeCOiX
    jSIFhTRHqEpZRCZA
    kMUATS3TefLs6iHj
    • Setze dein Plektrum an der rechten Kante nicht tiefer als 5 mm ein, um Schäden an der drahtlosen Ladespule zu vermeiden.

    • Der Einfachheit halber kannst du dein Plektrum 5 mm von der Spitze aus mit einem Permanentstift markieren.

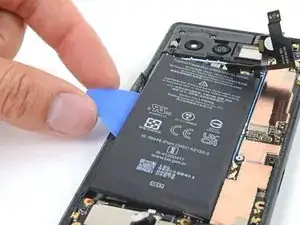
    • Setze ein drittes Plektrum in die untere rechte Ecke der Rückabdeckung ein.

    • Schiebe dein drittes Plektrum an der rechten Kante der Rückabdeckung hoch, um den dortigen Kleber zu durchtrennen. Halte an, sobald du den Kamera-Balken erreicht hast.

    • Lasse das Plektrum an dieser Stelle stecken, um zu vermeiden, dass der Kleber wieder anhaftet.

  12. ic6DqNBw6gEsV4eH
    • Lege einen erwärmten iOpener zwei Minuten lang auf die linke Kante der Rückabdeckung.

    • Alternativ kannst du auch einen Fön, eine Heißluftpistole oder eine Heizplatte verwenden, um die Rückabdeckung zu erwärmen. Achte aber darauf, das Smartphone nicht zu überhitzen.

  13. XioQJbam3XoK23Jt
    XioQJbam3XoK23Jt
    ln2ImOJPnFy4Bh4n
    yTWprCsR1vm4MZfk
    • Setze dein Plektrum an der linken Kante nicht tiefer als 3 mm ein, um zu vermeiden, dass die kabellose Ladespule und das Schaumstoff-Pad der Rückabdeckung beschädigt werden.

    • Der Einfachheit halber kannst du 3 mm von der Spitze aus abmessen und mit einem Permanentstift markieren.

    • Setze ein viertes Plektrum in die linke untere Ecke der Rückabdeckung ein.

    • Schiebe das vierte Plektrum an der linken Kante der Rückabdeckung nach oben, um den Kleber zu durchtrennen. Halte an, sobald du den Kamera-Balken erreicht hast.

    • Lasse das Plektrum dieser Stelle stecken, damit sich der Kleber nicht wieder verbinden kann.

  14. 41KCEE1YxewiMkTc
    • Lege einen erwärmten iOpener zwei Minuten lang auf die Oberkante der Rückabdeckung.

    • Alternativ kannst du auch einen Fön, eine Heißluftpistole oder eine Heizplatte verwenden, um die Rückabdeckung zu erwärmen. Achte aber darauf, das Smartphone nicht zu überhitzen.

  15. IqvBbUcJWfhnMApB
    IqvBbUcJWfhnMApB
    EIjeJGYAAdGggjVn
    hY16PNqOwBSo6ZFW
    • Entlang des Antennen-Gehäuses befindet sich ein dicker Klebestreifen.

    • Setze ein fünftes Plektrum zwischen 8 mm und 10 mm tief, oder knapp über die Hälfte zwischen der Spitze und dem iFixit-Logo, in die obere linke Ecke ein.

    • Falls du das Plektrum nicht einsetzen kannst, fange in der schmalen Lücke vom vorherigen Plektrum nahe am Kamera-Balken an.

    • Schiebe dein Plektrum von der linken Ecke bis zur Mitte der Oberkante, um den Klebstoff der Antennen-Halterung zu lösen. Halte in der Mitte der Oberkante an.

    This is the trickiest part, because the camera bar wants to keep the back cover from lifting. It's like a break in the leverage, of the lower part of the case. Go easy.

    Chris Romer -

  16. GgcnyWYLgTYAOWmv
    GgcnyWYLgTYAOWmv
    oGGQmwRQenW5xj6r
    5XaUUxNDxyRnEios
    • Ziehe dein Plektrum bis auf 3 mm heraus.

    • Schiebe das Plektrum bis zur oberen rechten Ecke, um den restlichen Kleber an der Oberkante zu durchtrennen.

    • Setze das Plektrum in diesem Bereich nicht tiefer als 3 mm ein, um eine Beschädigung des Graphitstreifens des Antennengehäuses zu vermeiden.

  17. dyVTstLOWl1ngxCQ
    dyVTstLOWl1ngxCQ
    IyKaSb2k3MGZYoS1
    1uRjMyEmQejxDKAQ
    • Denke dran, deine Plektren nach oben und vom Rahmen weg zu setzen.

    • Drehe das Plektrum der Oberkante so, dass sich die flache Kante unter der Rückabdeckung befindet.

    • Drehe die Plektren auf jeder Seite des Kamera-Balkens so, dass sich ihre flache Kanten unter demKamera-Balken befinden.

  18. ageyUQfkPqcOVZqj
    ageyUQfkPqcOVZqj
    WIsd2bWoFXn4D4fu
    2viWKASpyWEZQSMB
    • Unterhalb des Kamera-Balkens ist die Rückabdeckung mit einem langen Klebestreifen befestigt.

    • Nutze die Plektren unter dem Kamera-Balken, um die Oberkante der Rückabdeckung vorsichtig vom. Rahmen zu hebeln.

    • Hebel vor und zurück bis sich der Kamera-Balken löst.

    • Achte darauf, die Rückabdeckung nicht zu verbiegen. Heble immer nur so weit, dass der Kleber gelöst wird. Ist dies nur unzureichend, kann eine leichte Rotationsbewegung der Rückabdeckung von einer Seite zur anderen eine weitere Lockerung des Klebers bewirken.

  19. fUPBYgpMX5swDKEu
    fUPBYgpMX5swDKEu
    xKOSiRhNENJfjiMm
    NBDMbyQjyvfOkxWR
    • Schiebe die Plektren vom Kamera-Balken aus an den langen Kanten der Rückabdeckung nach unten, um sicherzustellen, dass der gesamte Kleber durchtrennt ist.

  20. BOMJgYhYT6AD1SEC
    BOMJgYhYT6AD1SEC
    gWCAw3TeQCw1Ww6Y
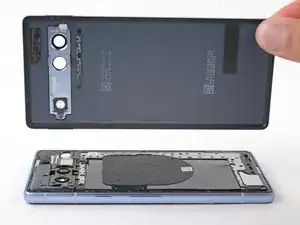
    • Entferne die Rückabdeckung.

    • Während des Wiederzusammenbaus:

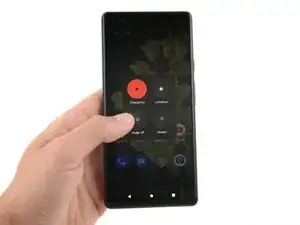
    • Jetzt ist ein guter Moment, um das Smartphone zu testen, bevor es wieder zugemacht und verklebt wird. Schalte das Smartphone an, kontrolliere, ob alles korrekt funktioniert und schalte es dann wieder aus, bevor du mit dem Zusammenbau weitermachst.

    • Folge dieser Anleitung, um neue Klebestreifen anzubringen und die Rückabdeckung wieder einzubauen.

    This reassembly link, "Follow This Guide" is really important. It's a shame they did it this way, but make a note of it for when you come back through.

    Chris Romer -

  21. 5kLOEwNTxZvOYyXh
    5kLOEwNTxZvOYyXh
    jNJRvbGSZH1SHwjy
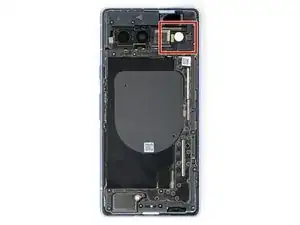
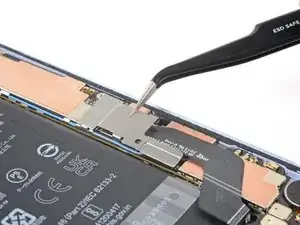
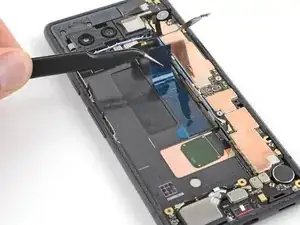
    • Lege einen erwärmten iOpener eine Minute lang auf die Blitzeinheit, um den Kleber aufzuweichen, mit dem sie an der Abdeckung des Logic Boards befestigt ist.

    • Du kannst die Blitzeinheit auch mit einem Haartrockner oder einem Heißluftgebläse erhitzen.

    • Die Blitzeinheit darf nur so heiß werden, dass sie sich warm anfühlt. Der Akku und weitere umliegende Bauteile können leicht durch Hitze beschädigt werden.

  22. SXjp1JXKVHFpddrC
    SXjp1JXKVHFpddrC
    xqSIDQS2BJiWrKID
    • Achte darauf, dass das Blitzkabel nicht abrutscht und reißt, da es sehr empfindlich ist.

    • Schiebe ein Plektrum zum Auftrennen des Klebers unter die rechte Kante der Blitzeinheit.

    Not a good place to pry as there is a little ridge blocking access to the flash unit. Just use a tweezer to slightly lift the other side of the cable, the unit comes out easily (with proper heating).

    Yong Wang -

    Cuidado en este procedimiento, algo dañe y el flash quedo en color azul.

    Aurelio Garcia -

  23. FxVoF2i4GqWgnrWm
    FxVoF2i4GqWgnrWm
    nVbR1JlDdPZsnvqL
    SCYEfpWuTiK6cLnl
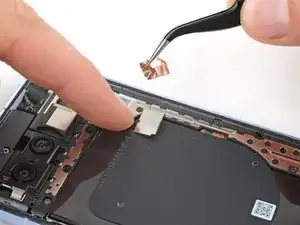
    • Wenn sich die Kupferfolie zusammen mit der Blitzeinheit abgelöst hat, dann entferne die Reste des schwarzen Schaumstoffs mit den Fingern oder einer Pinzette von der Abdeckung des Logic Boards.

  24. lF5X6B3uFRgPnWFB
    lF5X6B3uFRgPnWFB
    EbYCHAI1NYB4jpdm
    jXTebXfCgAMooay6
    • Achte darauf, dass der Akku bei diesem Schritt nicht durch dein Werkzeug beschädigt wird.

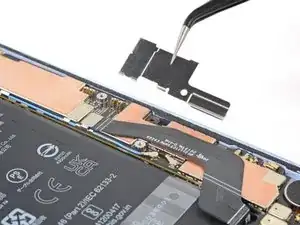
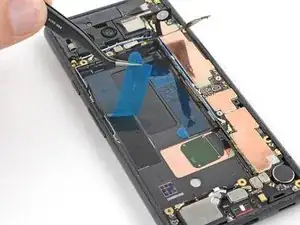
    • Lege einen erwärmten iOpener eine Minute lang auf die Unterseite der Blitzeinheit.

    • Halte das Ende des Blitzkabels fest, ziehe die Kupferfolie mit einer Pinzette von der Blitzeinheit ab und entferne sie.

    • Wenn die Kupferfolie an der Abdeckung des Logic Boards verblieben ist und du einen Ersatz dafür hast, dann entferne jetzt die alte Folie.

    It can be a little tricky applying the new copper tape. I was able to get through it by:

    - Pressing down the black adhesive on the logic board cover,

    - Lining up the new copper with the flash's backside,

    - Sandwiching them both when pressing the flash back into place.

    pinballwizard -

    Did not find the new copper tape in my kit, and this was really confusing. Would be helpful to show the part, from the kit here.

    Chris Romer -

    I didn't notice the replacement copper tape until I got ready to put the back cover on again. In the kit, it's attached to the same piece of plastic that has the edge adhesive.

    David Y -

  25. jCWwLMYmPwqcdiEx
    jCWwLMYmPwqcdiEx
    S1XQUOTNDcOBlt4D
    • Beim Pixel 7a werden Torx Plus Schrauben verwendet, möglicherweise geht es aber auch mit Standard-Torx-Bits. Wenn dein Kit mit Standard-Torx-Bits geliefert wurde, verwende den T2-Bit, um die 1IP Torx Plus Schrauben herauszudrehen, und den T3-torx-Bit, um die 3IP Torx Plus Schrauben herauszudrehen.

    • Achte darauf, dass du gleichmäßig und fest nach unten drückst, damit die Schraubenköpfe nicht beschädigt werden.

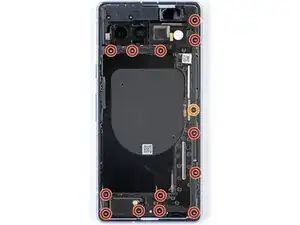
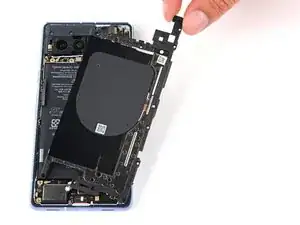
    • Benutze einen 3IP Torx Plus Schraubendreher und entferne die dreizehn 4,3 mm langen 3IP Torx Plus Schrauben, mit denen die Abdeckung des Logic Boards befestigt ist.

    • Nimm einen 1IP Torx Plus Schraubendreher und entferne die einzelne 1,5 mm lange 1IP Torx Plus Schraube, mit der die Abdeckung an der rechten Seite befestigt ist.

    The T2 Torx driver that came with the tool kit does not fit. It seems a bit too large. Is this really T2 Torx?

    Yong Wang -

    This is right. This is because the Pixel 7a uses Torx Plus screws, which are less commonly available than regular Torx bits. We're only able to provide regular Torx bits in our kits, for now. So, the bit size is slightly different to reduce the likelihood of stripping your screws out. When using the T2 bit to remove Torx Plus 1IP screws, use constant downward force to keep the bit fitting as well as possible.

    Clay Eickemeyer -

    こんにちは、1IPネジが少し舐めたので、交換しようと思っています、代替となるものはM1 1.5mmでしょうか?

    勝山ゆ う や -

    結論から言うと、おそらくネジの専門家でも現物を見ないと判断できないので、長さ1.5mmのM1ネジを入手できるお店をご存知ならネジの現物を持っていって判断してもらうのが間違いないです。そのようなお店をご存知なくて、元々のネジが再利用できそうなら、再利用するのが正解だと思います。

    私はPixel 7aの実機を持っていないのでネジ頭の種類は画像で判断するしかないのですが、おそらく低頭ネジ(pancake head、締め付け面が平ら)か皿ネジ(flat head、締め付け面が円錐形)かと思われます。トルクスプラスの1IPネジを作っているメーカーのサイズ表を見てみましたが、低頭ネジについては太さの情報がありませんでした。皿ネジについてはM0.9とM1の2種類の記載がありました。

    仮にこの2種類のどちらかであるとしても、どちらかを判別するには専用の道具が必要になりますし、別のサイズの特注品の可能性もあります。また、自力で判別できたとしてもこのサイズのネジを扱っているのはネジの専門店だけだと思われますので、結局ネジの専門店に現物を持ち込んで相談するのが最適解になるかと思います。

    なお、トルクスプラスIPネジと普通のトルクスネジではネジ頭の溝形状が異なるので、トルクスプラスIPネジを通常のトルクスドライバーで扱おうとすると隙間ができるはずです。そもそも強い締め付け力が必要な場所でもなさそうですし、ネジの締め付けや取り外しに問題ない程度の舐め具合であれば、元々のネジを再利用するのが現実的ではないかと思います。

    なお、私はネジの専門家ではないですしPixel 7aの実機を持っているわけでもありませんので、上記の内容に問題がある可能性があることはご了承ください。また、不備を見つけた方がいらっしゃいましたら訂正していただければ幸いです。

    最後に参考資料として、トルクスプラスネジの寸法規格表を紹介しておきます。どちらも英語です。

    Weha Tools社のトルクスプラスネジ寸法一覧表

    ポップリベット・ファスナー社のトルクスプラスねじパンフレット(PDF)(サイズ表は14ページ)

    Servause -

    Can’t remove T2 screw.

    Brenda -

    needs a T1 torx

    folbaeni -

    It is unbelievably disingenuous to claim that the T2 Torx bit you supply fits the 1IP Torx Plus Screws. I'm sitting here with my phone half-dissembled searching Amazon to see if I can find a T1 Torx bit or a Torx Plus bit that can be delivered today. Hopefully anyone who reads this guide before buying, opens these comments and decides you aren't worth their time. I also plan to leave a review on the kit itself. I can't believe I paid $10 in shipping and waited a full week for this half-assed kit.

    Nick Hughes -

    This si a scam, don't waste your money on this. They make you buy a hole set of tools even when the know the don't have the proper tools to get the work done! That T2 Torx IFIXIT is selling doesn't work.

    Cristian González -

    Agree with previous comments. Included T2 bit does not even come close to fitting in the torx plus 1ip screw. Having to overnight a T1 bit in hopes it works.

    Aaron -

    After overnighting a precision bit set, it now appears that the T2 bit included in the iFixit kit may be out of spec. The T2 bit from the Amazon bit set fit as described and allowed me to complete the fix.

    Aaron -

    Got this far just to realize the same as above. The t2 bit that comes with the kit is wayyy to large to fit this screw

    Bilal Shaikh -

    Also chiming in here to advise that the T2 bit supplied is too large...hopefully this gets addressed!

    Elliott Marter -

    I am another person who is Too late to read this comment :). And further I have a Torx set with a T1 and even that doesnt work on this tiny complicated screw. I will be taking this to a local shop for repair and hope for some luck.

    h a. S -

    The provided T2 bit in the kit does not fit the screw here

    Joseph -

    I borrowed a friends T2 bit and it fit the screw perfectly. The ifixit T2 bit was the problem here.

    Joseph -

    This is a complete rip off to advertise a one stop shop kit and then knowingly include the wrong bit, which doesn't fit the phone. What a terrible experience. I've got a disassembled phone and now have to wait to order the proper bit. Never using ifixit again. Terrible experience.

    Ludwig von Rochau -

    I have a half disassembled phone that I can't take to work because of this t2 issue. Do not recommend

    Konrad Cichocki -

    Read through the guide before buying the kit, but I wish I had read the comments. As mentioned by everyone else, they literally do not provide the proper tools in the battery replacement kit...

    Mikko Saavalainen -

    Can confirm that I wasn't able to unscrew the 1LP Torx plus screw with the torx 2 bit which came with the kit. I'm stuck with a half disassembled phone :(

    Anup -

    My kit came with a 1lP bit in the battery package, so was able to complete the battery replacement no issues.

    Graeme Watson -

    Mine was the same.

    Chris Romer -

    I was able to use a 0.7 Allen bit( i think its Allen, not sure though) from my Mako kit to unscrew it. the screw on my phone wasn't tight thankfully so it came off rather easily but if the screw is too tight it might strip the screw so beware

    Graystar3 -

    This needs to get fixed. Same issue as everyone else. Disassembled phone, now unable to fix it due to wrong bits included. Not very happy with ifixit.

    Sam Hoffman -

  26. ICea21FXMHfa5Brr
    ICea21FXMHfa5Brr
    h2ugsK2hSLiuShQa
    • Setze ein Plektrum zwischen der unteren rechten Ecke an der Abdeckung des Logic Boards und dem Rahmen ein.

    • Heble nach oben, bis sich die Raste an der Abdeckung löst.

    iFixit Staff - Please provide instructions for how to secure this clip during reassembly.

    ChelseaH -

  27. eIY2pHwlfr2jr4YJ
    eIY2pHwlfr2jr4YJ
    ALMXW3AYOBQiZhwt
    RbFAFJ5iGysfcYhF
    • Hebe die Abdeckung des Logic Boards langsam an der Oberkante an und führe die Blitzeinheit durch ihren Ausschnitt durch.

    • Führe beim Zusammenbau die Blitzeinheit wieder durch diesen Ausschnitt, während du das Logic Board an seinen Platz absenkst.

  28. WDd6J1cULDQdHuNp
    WDd6J1cULDQdHuNp
    OekHpOYRC4vJiNtb
    • Entferne die Drahtlos-Ladeeinheit.

    For Step 28, during reassembly, thread the flash through its cutout as you lower the logic board into place. (This note from Step 27 should really be provided here).

    ChelseaH -

  29. ZhWqgckhmVl1ZeEi
    ZhWqgckhmVl1ZeEi
    SxRBQcy4gIgVTMfm
    1WEPDKcNwZClODqO
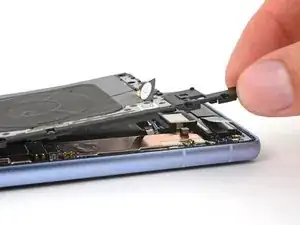
    • Nimm einen 1IP Torx Plus Schraubendreher und entferne die einzelne 1,5 mm lange Schraube, mit der die Abdeckung des Steckers befestigt ist.

    • Entferne die Abdeckung mit einer Pinzette oder deinen Fingern.

    • Platziere beim Zusammenbau die obere linke Ecke der Abdeckung unter den Haken am Logic Board, bevor du ihre Schraube eindrehst.

    For my model (from T mobile), it is T1 Torx, not T2. The one underneath is also T1, not T2. In other words, a T1 Torx driver works OK but not T2.

    Yong Wang -

    Very unimpressed that you ship a product that does not have the correct hardware. This device needs a T1. Unable to get a T2 bit to work.

    Dan Pawlowski -

    I was also unable to get the T1 screw out in this step. I'm not sure why the correct tools weren't just provided, but it creates an incredibly frustrating experience when trying to complete the repair.

    Stephen Caren -

    Yeah, I had the same issue as the above people - and I literally don't have a T1 bit. I assumed the guide would include it.
    I will be complaining, but first I have to figure out how to get a T1 bit.

    Jared Elick -

    The ifixit T2 bit provided in the kit did not fit the screw. I borrowed another T2 bit of another brand from a friend and it fit perfectly on the screw.

    Joseph -

  30. 1SDhtN1x3MqmqkPO
    • Das Verizon Modell des Google Pixel 7a (G0DZQ) hat einen zusätzlichen Stecker für die 5G mmWave-Antenne. Es sei denn es wird konkret darauf hingewiesen, ist das Verfahren ist das Gleiche für beide Modelle.

  31. LJNAJcYOd4aADwEY
    LJNAJcYOd4aADwEY
    rHXL5JjRN3iKAWHJ
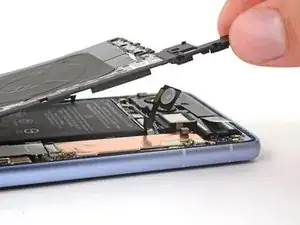
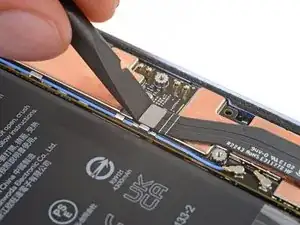
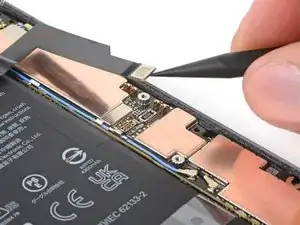
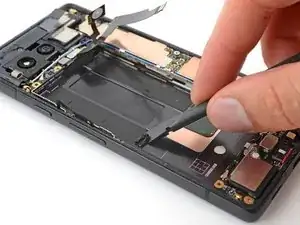
    • Setze einen Spudger mit dem flachen Ende unter die Oberkante am Druckstecker des Akkus.

    • Heble gerade nach oben und trenne den Druckstecker ab.

    • Um Druckstecker wieder zu verbinden, musst du ihn erst über dem Anschluss ausrichten und dann vorsichtig auf einer Seite andrücken, bis er einrastet. Wiederhole das Gleiche dann an der anderen Seite. Möglicherweise braucht es mehrere Versuche, bis der Stecker richtig ausgerichtet ist.

  32. 56tlmbSciskcVSgt
    56tlmbSciskcVSgt
    lxNvKuTBFkPLhdyA
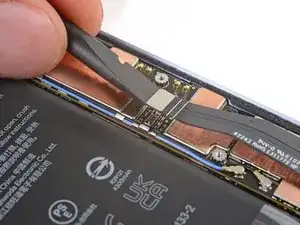
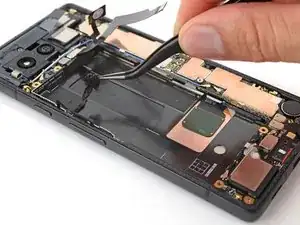
    • Verizon-Modelle: Verwende die Spitze deines Spudgers, um den 5G-Millimeterwellen-Pressanschluss aufzuhebeln und zu trennen.

  33. YJb6dHQAyGlUreJk
    YJb6dHQAyGlUreJk
    RvTUPWqZUfGthp4g
    KvagowBhExOZdyPs
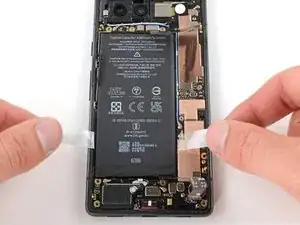
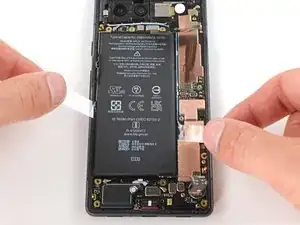
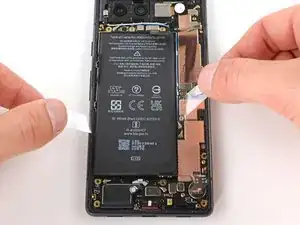
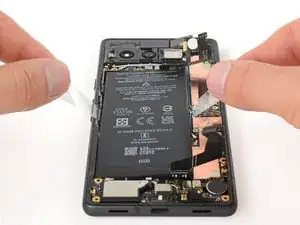
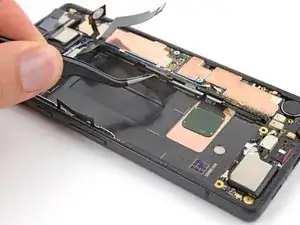
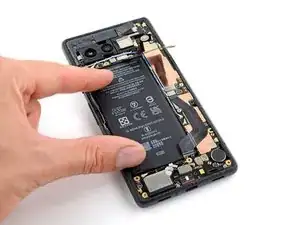
    • Biege das Kabel zur Unterkante des Smartphones hin, so es neben dem Akku liegt.

    • Verizon Modelle: Biege das 5G mmWave-Kabel zur Oberkante des Smartphones.

  34. wiNBHSFIScNCMytI
    wiNBHSFIScNCMytI
    MqmLZcC2LYJuhnVu
    B5U1KgsRDqYhKstE
    • Löse beide Seiten der Akku-Ummantelung vom Akku ab.

    • Wenn du ein Werkzeug verwendest, dann achte darauf, dass der Akku damit nicht beschädigt wird.

  35. pdtJnODvGGS23Gol
    pdtJnODvGGS23Gol
    xXvQh11obpGOHBKW
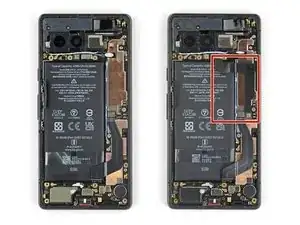
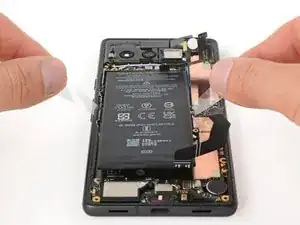
    • Die obere Hälfte des Akkus ist mit zwei Klebestreifen befestigt. Die Ummantelung des Akkus befindet sich direkt unter diesen Klebestreifen.

    • Drehe das Smartphone herum und benutze einen Haartrockner, ein Heißluftgebläse oder eine Heizplatte, um das Display gleichmäßig so zu erwärmen , dass der komplette Rahmen sich gerade noch anfassen lässt.

    • Sei vorsichtig und erwärme das Display nicht zu stark, es ist sehr hitzeempfindlich. Achte darauf, dass es nicht stellenweise zu heiß wird.

  36. pArlkJQYNNPxnYnd
    pArlkJQYNNPxnYnd
    RZiCmxPryjrAoifO
    1DGXrbBNK3RuguLb
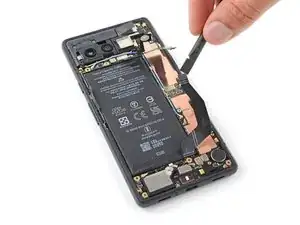
    • Fasse die Ummantelung des Akkus an beiden Seiten fest an. Halte sie flach, aber doch so hoch, dass sie sich nicht an Komponenten auf der Hauptplatine oder am Rahmen schaben können.

    • Schiebe die beiden Enden in einer sägenden Bewegung zur Oberkante des Akkus hin, um den unteren Teil des Klebers aufzuschneiden.

    • Wahrscheinlich benötigst du mehrere solche Sägeversuche, bevor der Kleber ganz aufgetrennt ist. Wenn die Ummantelung reißt, überspringe die nächsten beiden Schritte für eine alternative Methode.

    • Höre auf zu sägen, wenn die Ummantelung halb auf dem Weg nach oben angekommen ist.

    This step should mention that if you use the battery jacket sawing motion up too far, you will for sure cut the 'side button tab' which is not mentioned until the next step. If you cut this tab, your volume buttons will no longer work, and you will need to purchase "Power On Off/Volume Buttons Flex with Flash Light Sensor for Google Pixel 7A" (iFixit does not sell this part). You will also then need to fully remove the logic board to replace that part. This really screwed me up.

    Mekkel Richards -

    I fully agree with Mekkel's comment - this step should have a warning about the side button tab, which is also black, touches the battery and will get cut with the "sawing motion". It is crazy that this is only mentioned in point 39!, when the damage is done.

    I now need to get the new cable and replace it, including the complex motherboard removal (which may damage other parts if I rely on the poorly written iFix instructions.

    Mirek Bober -

    Just did the same thing, UGH. Plan on just using menu controls and ditching the buttons since I don't want to open it again.

    Patrick Smolinsky -

  37. eVwZhfmJMwDEQhkb
    eVwZhfmJMwDEQhkb
    KWAjdZjgoL1gWlkh
    • Ziehe eine Minute lang kräftig an den beiden Enden der Ummantelung des Akkus und löse allmählich den Kleber ab.

    • Wenn der Akku sich nicht lösen lässt, dann erwärme ihn nochmals oder gehe zum nächsten Schritt für eine alternative Methode.

  38. J5DmEgMTLvKRJDCe
    J5DmEgMTLvKRJDCe
    e6mdAivtwxHfbQpg
    • Wenn du den Akku nicht mit Hilfe der Ummantelung entfernen konntest, dann folge den nächsten drei Schritten für eine alternative Methode.

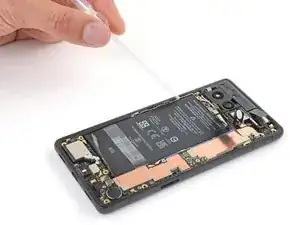
    • Fülle eine Pipette oder eine Spritze mit hochkonzentriertem isopropylalkohol (mindestens 90%ig).

    • Tröpfle etwas Isopropylalkohol zwischen die linke Akkukante und den Rahmen.

    • Lasse den Alkohol eine Minute lang einwirken, damit der Kleber weich wird.

  39. uJjiNlMkSupqChCV
    uJjiNlMkSupqChCV
    2pFjuoGETM6iCl2N
    OmmESX4JdP5oqPPf
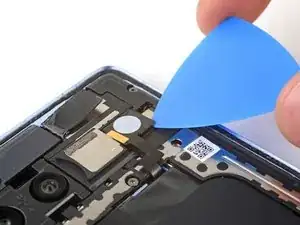
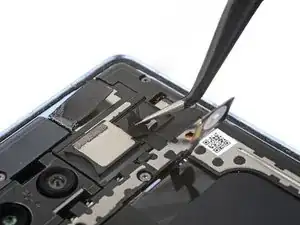
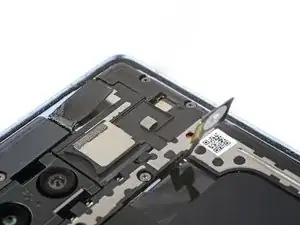
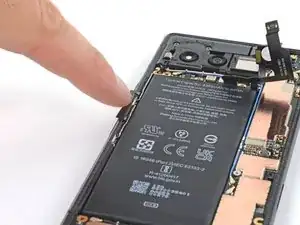
    • Bewege die Lasche an der Seitentaste nach links vom Akku weg.

    • Setze ein Plektrum mit dem flachen Ende zwischen die linke Seitenkante des Akkus und den Rahmen ein.

    I broke the side button tab that is mentioned in step 39. How screwed am I? :'-(

    Laura Speich -

    Mine tore on the volume button side -- did your phone at least still turn on? Im hoping I can just control the volume from menus.

    Patrick Smolinsky -

    Same happened to me. Well, I'm actually sure it was broken before, like... When my battery swell so much it pushed open the phone and tore of the back cover slowly?

    Anyway.... How to fix the side button tab? Cuz now the loud and quiet button is useless and its just some small, thin plastic, it seems

    Ann Christin S -

    I just did the same thing -_-

    Patrick Smolinsky -

  40. BUDTUR6EpbdrGL6h
    BUDTUR6EpbdrGL6h
    xASogPIgk3ltFrhU
    AxaLZrliqKapHBkU
    • Achte darauf, dass der Akku nicht angestochen oder verformt wird. Ein beschädigter Akku ist ein Sicherheitsrisiko.

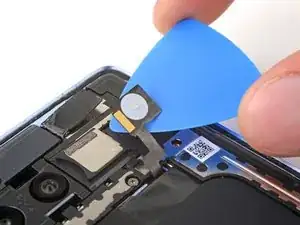
    • Biege das Plektrum fest vom Akku weg. Halte den Druck auf das Plektrum eine Minute lang aufrecht.

    • Wenn der Kleber beginnt, sich abzulösen, dann schiebe das Plektrum tiefer unter den Akku und heble weiter nach oben.

    • Wenn sich der Kleber nach einer Minute nicht lösen lässt, dann tröpfle etwas mehr isopropylalkohol daran und versuche es nochmals.

  41. fCmJgwlJmEW6Jgvg
    fCmJgwlJmEW6Jgvg
    BFeLddE2UonZHfNJ
    • Entferne den Akku.

  42. wvED2xSQLi3eUaDD
    wvED2xSQLi3eUaDD
    ubxAZTMHCaIqwjID
    TlMZddflyjqmMrDI
    • In den nächsten drei Schritten siehst du, wie neue Klebestreifen befestigt und ein neuer Akku eingebaut wird.

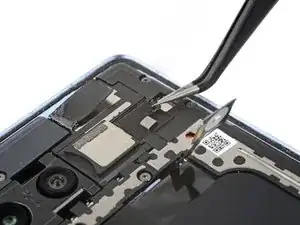
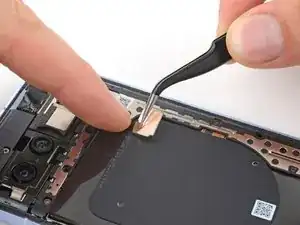
    • Schabe eine Kante des alten Klebestreifens mit dem flachen Ende des Spudgers zu einer Kugel zusammen, so dass ihn mit einer Pinzette fassen kannst.

    • Beseitige alle Kleberreste mit einer Pinzette oder deinen Fingern vom Rahmen.

    • Wenn noch Reste übrig sind, dann tröpfle noch etwas hochkonzentrierten Isopropylalkohol (mindestens 90%ig) auf den Rahmen und wische sie mit einem fusselfreien (Mikrofaser-) Tuch weg.

    Isopropyl or Denatured Alcohol works here on the residue. Dampen a cloth with either, and wipe over residue. You'll see it roll up.

    Chris Romer -

  43. 4UyrcxEBdXuS4XeK
    4UyrcxEBdXuS4XeK
    uTtO6mN4L15uVm2f
    bhJSCyCZnrCvxNFn
    • Wenn an deinem Ersatzakku bereits Klebestreifen angebracht sind, dann ziehe ihre Schutzfilme ab und überspringe diesen Schritt.

    • Ziehe die beiden Akkuklebestreifen von der großen Schutzfolie ab.

    • Bringe den kurzen Klebestreifen an der rechten Seite in der Vertiefung für den Akku an, wobei die weißen Streifen auf dem Rahmen eine Orientierungshilfe sind.

    • Bringe den langen Streifen an der linken Seite der Vertiefung an.

    • Ziehe die blaue Schutzfolie von den Klebestreifen ab.

    Hardest part of this portion. As you can see in the photo, on the right, short strip, they might not lay flat (see bubble near top - the tweezers are pointing right at it). You might get a wrinkle, but you can't work that out. Little imperfections will be fine. What you DO NOT want to do, is try to recenter a piece once it touches. Once it touches, you are committed. If you try to pull it off, it will stretch and become a mess. Try your best to align it, and once it touches, you must lay it down.

    Chris Romer -

  44. umvg6PPjJFMmh3DD
    umvg6PPjJFMmh3DD
    kEaaAZ4swUNfsXyu
    XX6XBIBhnBivhawi
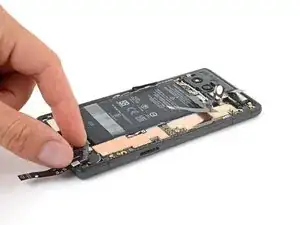
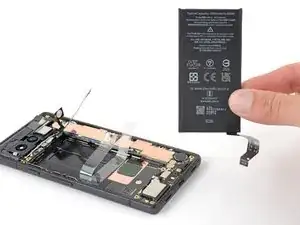
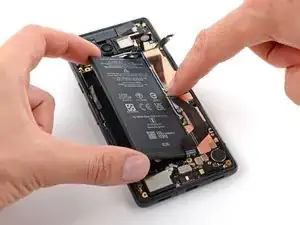
    • Halte den Akku direkt über seiner Vertiefung im Rahmen und schließe sein Kabel wieder an.

    • Drücke den Akku an seinem Platz fest.
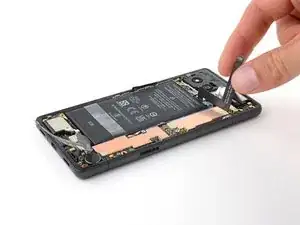
    • Trenne den Akku ab.

    So, I wish they would NOT have said reverse the order after this step, and I can't comment there, so I will comment here. Step 20 has a link to the precise steps in applying the THREE adhesive components (perimeter, long skinny piece, and shorter wider strip). Be careful with all of these adhesive pieces. Keep scraps away from the assembly, and don't make contact until you want to commit to the placement.

    Chris Romer -

    ...also, I believe this should say "Connect the battery."

    Chris Romer -

Abschluss

Um dein Gerät wieder zusammenzubauen, folge diesen Anweisungen in umgekehrter Reihenfolge, ab diesem Schritt.

Nach Abschluss dieser Anleitung solltest du deinen neu eingebauten Akku kalibrieren. [[Battery Calibration|kalibrieren|new_window=true].

Das Gerät ist mit einem eingebauten Diagnosetest ausgestattet. Hier siehst du, wie du das Pixel Diagnostic Tool starten kannst.

Entsorge deinen Elektromüll sachgerecht.

Hat die Reparatur nicht ganz geklappt? Versuche es mit ein paar grundständigen Lösungen, ansonsten findest du in unserem Forum Hilfe bei der Fehlersuche.

Clay Eickemeyer

Mitglied seit: 19/09/22

85412 Reputation

24 Kommentare

I may have made a mistake in this process. I have a question for you. How can I chat with you?

先輩ゲーマー -

Through here is just fine! If you have a more general question, I might recommend you ask in the answers forum.

Clay Eickemeyer -

先輩ゲーマー -

Which part did you lose?

Clay Eickemeyer -

This is the Picture .

先輩ゲーマー -

Hello- I started to replace my battery, but I had two serious problems:

1) The small brass sticker under the flash had unstuck from it's lace on delivery. I eventually found it, but it was stuck to another piece of the packaging. As was the black foam. But, I am not sure if that's a problem yet because...

2) My Torx t2 bit DID NOT fit the one screw it was supposed to. Perhaps it was a t1? Now, I think I have stripped that screw out trying to make the T2 bit work.. I'm not sure what to do from her except get a new phone and request a refund from you.

I've put all the screws back in and resealed my phone, but the batter has not been changed. Thoughts?

Thank you,

~Paul

Paul Bernard -

Beyond drilling it out, you can try dab some hot wax into the screw and see if you can make a bit get traction. Otherwise cut a small slot into the screw so you can use a small flat-head bit.

Imad Knight -

Great guide, however I ended up needing to buy a 1IP bit to complete the guide, otherwise I would have stripped the screw in step 29.

Peter Farkas -

Yeah, I was too broke to pay their shipping again, and no hardware store locally had it - so my phone was unsafe to use for almost 2 weeks while I fought them to update the guide and kit.

Jared Elick -

Good guide, easy to follow and execute. However here are some tips to anyone else doing it:

- If you have trouble with the plastic tab under the battery, and don't have any isopropyl alcohol at hand, I can recommend (gently!) pushing some dental floss under the battery, and then working the adhesive loose. A long piece wound around two fingers gives better leverage - just be careful as not to rip off the little ribbon cable on the left side by the battery!


- It would have been nice to have a step on re-applying the back adhesive. I stuck it onto the phone itself, but I think that sticking it to the back glass would have been smarter, as I managed to twisted one edge.

- Also, I agree with @paulbernard & @peterfarkas1513 regarding the incorrect bit being specified/provided in the fix kit. I made the t2 bit work as I needed the phone up and running asap, but I could have been left with a stripped screw.

Finally, I'd recommend starting the phone after reconnecting the battery, before gluing it down, to make sure everything works.

Imad Knight -

Thanks for the excellent guide. The crisp, high-res photos and detailed explanations made a world of difference.

I can't imagine having to do this job without this guide.

Well done.

pinballwizard -

Don't Buy it! The tools they send doesn't work. Read the comments on the 25th step.

Cristian González -

Very bad. The 1IP screw cannot be opened using the T2 bit provided. I'll ask for a refund.

Alessandro Dragoti -

Worked fine .. had to have some extra stuff other than the things provided .. having proper screw driver etc helped a lot. Would not like to take the screws out manually with tools provided.

Thanks

Ian Home -

DO NOT use a Torx 2 driver. It will not work. Quickly order or request the right bits, you can only damage it, you cannot unscrew it, with any T2 bit I've found.
And their "compensation" is a $20 off $50 or more coupon, and some cheap stickers that advertise for them... Which is really a discount, not compensation

Jared Elick -

I can not open the Torx Plus 1IP screw with the provided Torx T2 in the kit (step 25)

Joseph -

The provided ifixit T2 bit did not fit the 2 1IP screws. I borrowed a friends' T2 bit of another brand and it fit the screw perfectly and I was able to complete the replacement.

Joseph -

Extremely disappointed. This "kit" does not include the required T-1 bit, but includes an unneeded Phillips bit. This is unacceptable.

Dave A -

Step 39 problem... Even tho I used step 37 method....

How to fix the side button tab if it broke off? I'm still pretty sure the battery did it when it tried to brake itself out of the case because it had developed Adipositas.... But problem remains the same and I can't find any replacement in store :((

Ann Christin S -

背面カバーの接着剤は何をつかうのがベストですか?

よろしくお願いします

b-7000 が良いようですが、別のものでも大丈夫ですか?

Kazumi -

Google純正の交換用接着剤を使うのがベスト、というのが模範回答だと思います。

このページの右上にある「必要な工具と部品」のパーツのコーナーにあるGoogle Pixel 7a Rear Cover Adhesive Set - Genuineが該当しますので、お求めの場合はそちらから購入するのがよろしいかと思います。

Servause -

Good guide, but a warning about the risk of cutting volume up/down cable in step 36 is needed. It is noted in step 39, but this is TOO LATE!

Mirek Bober -

My pixel 7a battery expanded and in the process it caused a little tear in the black plastic thing between the wireless charging coil and the battery. I just want to ask if its okay to keep it or is the black plastic thing important?

Louise Berania -