Einleitung

Diese Anleitung wurde von iFixit-Mitarbeiter:innen verfasst und ist keine offizielle Reparaturanleitung von Google. Hier erfährst du mehr über unsere Qualitätsstandards.

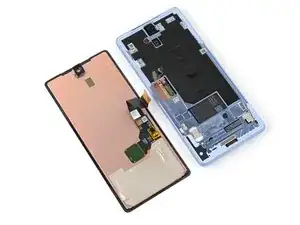
In dieser Anleitung zeigen wir dir, wie du bei einer Google Pixel 7a Display Reparatur vorgehst. Mit dieser Anleitung kannst du dein Pixel 7a Display selbst austauschen.

Dein Ersatzdisplay sollte mit einem neuen Fingerabdrucksensor ausgestattet sein. Wenn er nicht vorhanden ist, musst du den bisherigen Fingerabdrucksensor auf das neue Display übertragen und ihn danach neu kalibrieren, sonst funktioniert er nicht richtig.

Außerdem brauchst du für diese Reparatur neue Klebestreifen für das Ersatzdisplay.

Hinweis: Ob dein Gerät nach der Reparatur noch wasserdicht ist, hängt davon ab, wie gut du es beim Zusammenbau versiegelst. Die IP-Zertifizierung wirst du jedoch verlieren.

  1. oTvToevuIyEPXQJt
    oTvToevuIyEPXQJt
    DgiJJLhpPrIMBAmo
    • Entlade deinen Akku auf unter 25 %, bevor du mit der Reparatur beginnst. Ein geladener Lithium-Ionen-Akku kann gefährlich sein.

    • Ziehe alle Kabel von deinem Smartphone ab und schalte es vollständig aus.

    If you purchased the iFixit kit, now is a good time to ensure you have all the parts: If you go to the kit page, and expand Kit Contents, you'll see the full list. The full list contains links to details on adhesive sets. These links are also in this guide document, in the upper right, in a scrollable window.⏎

    Newer batteries seem to come with the 1IP Torx Plus bit taped in the tray of the battery part tray (Repair Part box). It is not in the Tools, found in the Repair Tools box (if you purchased the Fix Kit).⏎

    Familiarize yourself with all the parts, including the six adhesive items. Ensure none of the components fell behind the parts tray and are left in the parts box (they are tiny adhesive tabs). The adhesive is VERY sticky. Don't remove the backing until you are ready to use, and then be prepared to lay the piece in place once ANY contact is made. Removal, even an edge, to better align an adhesive part is often not possible(!). The adhesive will stretch and bunch up.⏎

    As noted at the beginning of the guide, proper installation of the adhesive is required to maintain water resistance, but also to transfer heat correctly.

    Chris Romer -

  2. HT1ZTxX1oNs4XryD
    HT1ZTxX1oNs4XryD
    eyuuYBXSLKEiVgUj
    • Glasscherben können den Auseinanderbau verkomplizieren oder schlimmer, dich verletzten. Wenn dein Handy einen gebrochenes Display hat, folge diesen Schritten:

    • Klebe Klebeband über das gesamte Display.

    • Klebe nur das Glas ab, nicht den Rahmen.

    • Trage eine Schutzbrille bei der Reparatur, um deine Augen vor Glasscherben zu schützen.

  3. 1TQDVgpOwJiqlSJO
    • Das Display ist stark mit dem Rahmen verklebt, hat keine Clips und lässt sich nicht biegen. Es braucht ziemlich viel Hitze, um den Kleber zu lösen.

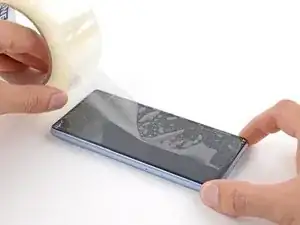
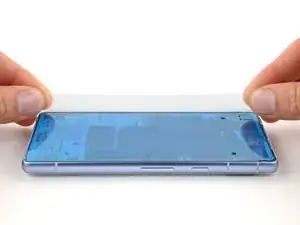
    • Benutze einen Fön, eine Heißluftpistole oder eine Wärmeplatte, um die Oberkante des Displays so lange zu erhitzen, bis du sie kaum noch anfassen kannst.

    • Sei vorsichtig, dass du das Handy nicht überhitzt. Der Akku und Plastikteile sind empfindlich gegenüber Hitze. Höre mit dem Erhitzen auf, wenn der Rahmen zu heiß zum Anfassen wird.

  4. L2GMNNVAAdPVjP2b
    L2GMNNVAAdPVjP2b
    VALpbABicsHrK1sy
    J2ZisEDANkEHpNKA
    • Das Einsetzen eines Plektrums ist ziemlich schwierig. Sei geduldig und erwärme das Display nochmals, wenn es schwergängig wird.

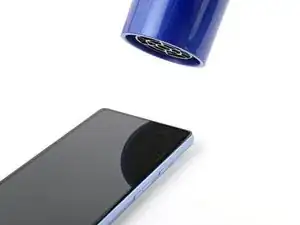
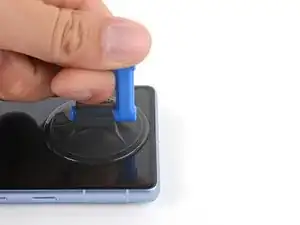
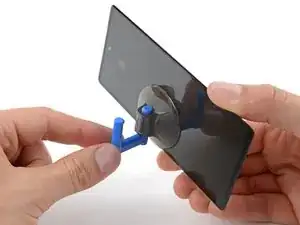
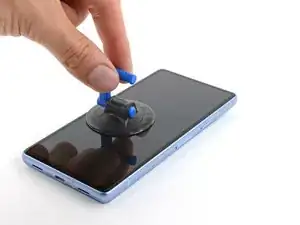
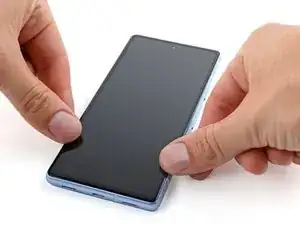
    • Bringe einen Saugheber am oberen Rand des Displays in der Mitte an.

    • Wenn es dir nicht gelingt, einen Saugheber zu befestigen, dann versuche, ein Stück starken Klebebands zu einem Handgriff zu falten.

    • Setze das Plektrum nicht tiefer als 2 mm ein, sonst könnte die Frontkamera beschädigt werden.

    • Ziehe fest und gleichmäßig am Saugheber (bzw Handgriff).

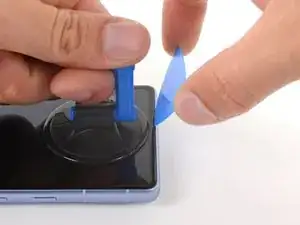
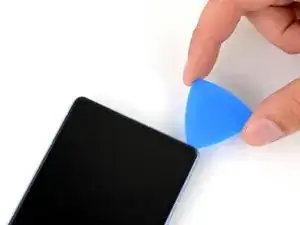
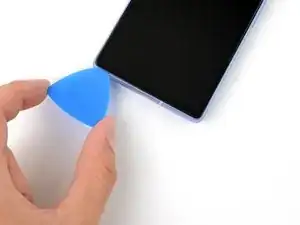
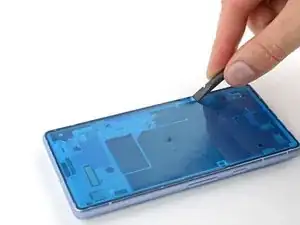
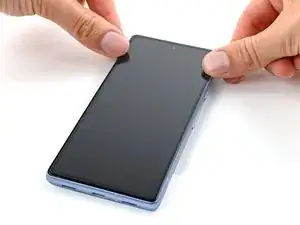
    • Setze ein Plektrum mit der Spitze in die linke Seite des Ausschnitts für den Ohrhörer-Lautsprecher ein.

    • Drücke das Plektrum fest in den Ausschnitt hinein und senke es parallel zum Display ab, so dass es unter das Glas gleitet.

    • Wenn dein Plektrum so dick ist, dass es nicht unter das Glas rutschen kann, dann versuche es mit einem flacheren Werkzeug, wie z.B. einem Jimmy.

    I was replacing a shattered screen and none of the methods worked:

    1. I couldn't get the suction cup to seal against the screen

    2. None of the tapes I used (packaging, duct, & gorilla) would adhere to the screen

    I ended up using a craft knife to pry open the seal. The opening picks worked great on the non-shattered portions of the screen. This step took me a few hours to troubleshoot

    Parker Kincaid -

    I second Parker's comment, if your screen is badly shattered like mine, a craft knife does the trick. You'll scratch the edge of the frame, but there's no avoiding that. Don't be scared to crack the screen more with the knife, you can take if off shard by shard if you have to. At some point you'll have enough leverage to remove the display part as one big piece and then just scrape off any leftover glass and adhesive once the Screen is removed.

    Gabriel Will -

    I third these comments. Enter through the earpiece speaker like the guide says and chip away the glass little by little. Put tape over the section you're cracking so glass doesn't fly everywhere. Rinse and repeat with more small sections of tape. It's a pain, but after you get the edge glass off, the lcd will be loose. I tried iso, I tried heat, but nothing moved this screen. It even broke my suction cup.

    Isaiah Kolesar -

    Replacing the screen is pretty straight forward with the guide. I would get the Jimmy tool. This tool makes it super easy to remove the old screen.

    Justin S. -

    As other comments mentioned, the pick supplied is too thick to lift the screen. I found a method to open it without the Jimmy tool and without breaking the screen. Follow all steps as mentioned but use an utility knife just for the initial lift of the screen (1mm depth is enough, 2mm max). That creates enough gap for the plastic pick to get inside and slide around all edges.

    Alonso -

  5. HvEeM3cpUJsmXJK2
    HvEeM3cpUJsmXJK2
    kA1CD6tOds5fAk2q
    jvZcZhEyEjJLH2dN
    • Setze das Plektrum nicht tiefer als 2 mm ein, du könntest sonst die Frontkamera beschädigen.

    • Schiebe das Plektrum zum Auftrennen des Klebers an der Oberkante hin und her.

  6. HmAuAqix4Q2Q5hBV
    HmAuAqix4Q2Q5hBV
    jxI2ARJECokoTfUP
    • setze das Plektrum nicht tiefer als 3 mm ein, du könntest sonst die Abstandshalter an dieser Seite beschädigen.

    • Um besser zu erkennen, wie tief das Plektrum eingeschoben ist, kannst du in 3 mm Abstand zur Spitze des Plektrums mit einem Permanentstift eine Strichmarke anbringen.

    • Schiebe das Plektrum zum Auftrennen des Klebers an der rechten Seitenkante nach unten.

  7. UvSmBQCmDPYavYZT
    UvSmBQCmDPYavYZT
    PIKIxRjvG3uGqm2b
    • Wenn du Teile des Displays weiterverwenden willst, setze das Plektrum nicht tiefer als 3 mm ein, du könntest sonst das LCD oder manche Verbindungen beschädigen.

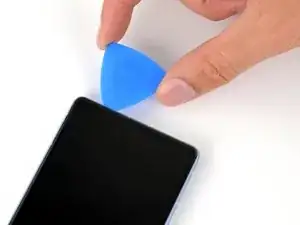
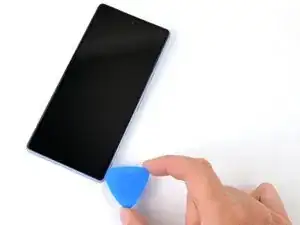
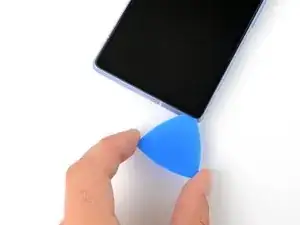
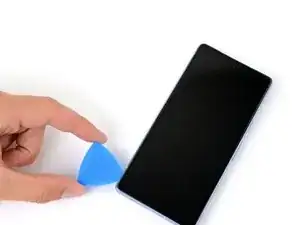
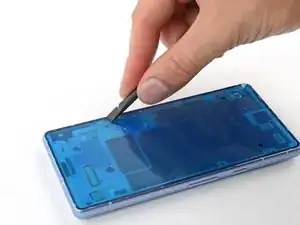
    • Schiebe das Plektrum zum Auftrennen des Klebers an der Unterkante zur unteren linken Ecke hin.

  8. T3dMF44q1KmBY3oX
    T3dMF44q1KmBY3oX
    uKfOQTeZCVpKql5w
    • Wenn du Teile des Displays weiterverwenden willst, setze das Plektrum nicht tiefer als 3 mm ein, du könntest sonst manche Verbindungen beschädigen.

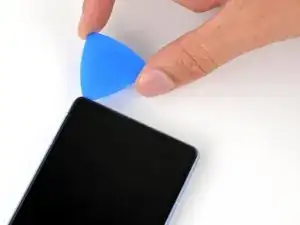
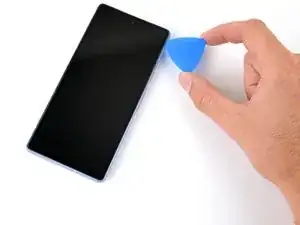
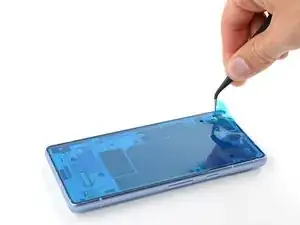
    • Schiebe das Plektrum zum Auftrennen des Klebers an der linken Kante zur oberen linken Ecke hin.

  9. iVIHoUqtPpd62Og2
    iVIHoUqtPpd62Og2
    VfHEZTCkjMOquSWD
    GbUugky4p5MqNPbT
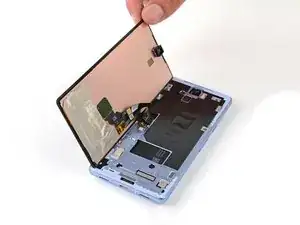
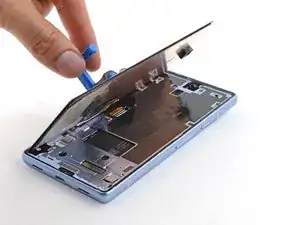
    • Klappe das Display von der rechten Kante her wie ein Buch auf.

    • Achte darauf, dass das Displaykabel nicht zu stark angespannt wird.

    • Lege das Display über der linken Seite des Rahmens ab.

    • Wenn die Dichtung des Frontsensors am Display klebt, setze sie wieder auf den Sensor in der Aussparung des Rahmens. Richte die Dichtung so aus, dass die kleinere Aussparung der Frontkamera am nächsten ist.

    You also have to deal with the square adhesive strip (the one you replace in steps 14 and 17). I ended up forcing the phone open because I was throwing away the old screen.

    I'm not sure how you'd do it if you wanted to avoid damaging the screen

    Parker Kincaid -

  10. cx3lED4XMcYANCj4
    cx3lED4XMcYANCj4
    bATq4FBOiOiWQcvt
    • Biege die Graphitschicht vom Displaystecker weg.

  11. MVW1AG6inFVxvpwR
    MVW1AG6inFVxvpwR
    N5W2ZIVXv4UvOLS6
    trgjRwHGM5CmaYbD
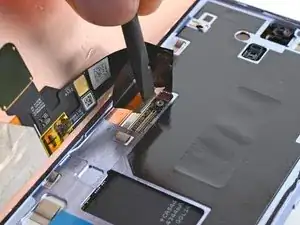
    • Nimm deinen 3IP Torx Plus Schraubendreher und entferne die einzelne 2 mm lange Schraube, mit der die Abdeckung des Displaysteckers befestigt ist.

    • Beim Pixel 7a werden Torx Plus Schrauben verwendet, es geht aber auch mit Standard-Torx-Bits. Du kannst einen T3 Torx Schraubendreher verwenden, um diese Schraube aufzudrehen. Achte darauf, dass du gleichmäßig und fest nach unten drückst, damit die Schraubenköpfe nicht beschädigt werden.

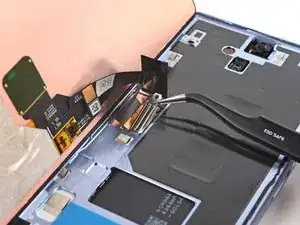
    • Entferne die Abdeckung.

    I lost my screw during this process and am trying to find another online. A 2 mm 3IP Torx Plus screw doesn't seem to exist. Are you sure this is the right one? I tried a 2mm socket head screw just to see if it was the same pitch and size, but it was way too large.

    Kaelyn Swetala -

    I also need a replacement screw. Anybody have any luck finding one?

    Aaron Hill -

    I ended up ordering a variety pack off Amazon. The M1*2mm screw seems to fit.

    Aaron Hill -

  12. GPQ4RSMISbSldgn5
    GPQ4RSMISbSldgn5
    DpoQkMiWCsIdthA3
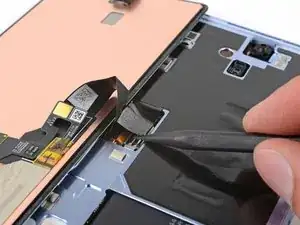
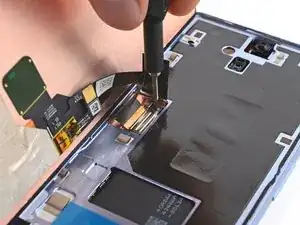
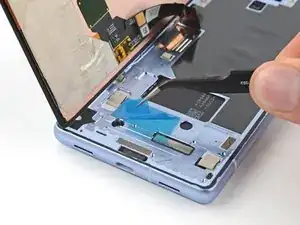
    • Heble den Druckstecker des Displays mit der Spudgerspitze oder deinem Fingernagel nach oben und trenne ihn ab.

    • Um Druckstecker wieder anzuschließen, musst du ihn erst über dem Anschluss ausrichten und behutsam an einer Seite nach unten drücken bis er einrastet. Wiederhole das dann an der anderen Seite. Möglicherweise musst du es mehrmals versuchen, bis er passt.

  13. YNymL1NwqPMqlHHZ
    YNymL1NwqPMqlHHZ
    W3PmmRR3jQCAbdaL
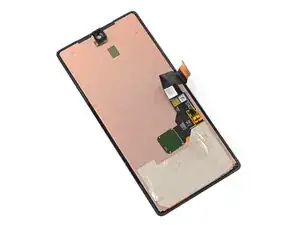
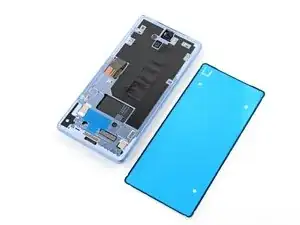
    • Entferne das Display.

    • Die Rückseite des Displays ist sehr empfindlich. Sie kann selbst durch kleinste Kratzer oder eine winzige Macke beschädigt werden.

    • Damit das Display nicht beschädigt wird:

    • Fasse das Display nur an den Kanten an.

    • Wenn du das Display auf die Arbeitsfläche ablegst, achte darauf, dass kein Fremdkörper die Rückseite berührt. Am besten legst du das Display auf ein sauberes, weiches und fusselfreies Tuch.

  14. wRmrA3qrHIS1UhjN
    wRmrA3qrHIS1UhjN
    RITgXtO5OgYjlJcl
    • Die Unterseite des Akkus ist durch einen kleinen Ausschnitt im Rahmen zugänglich. Sei vorsichtig und beschädige ihn nicht mit deinem Werkzeug.

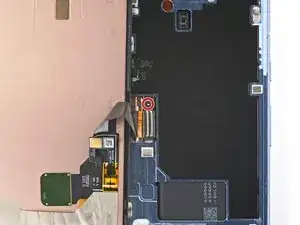
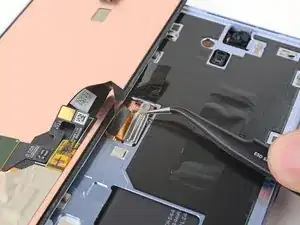
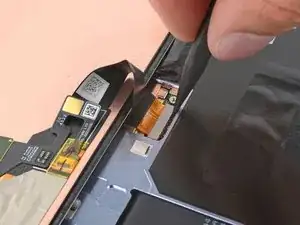
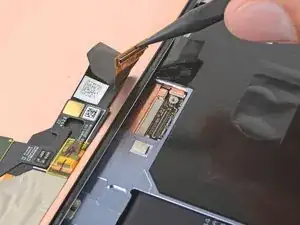
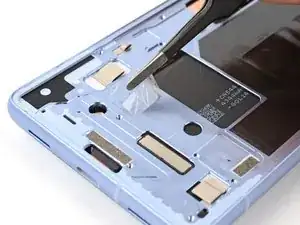
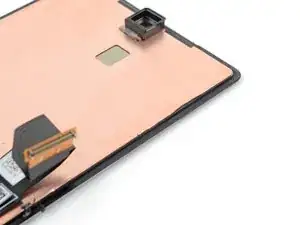
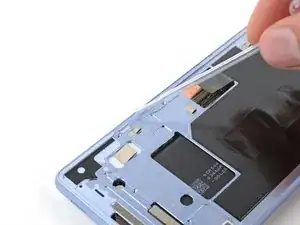
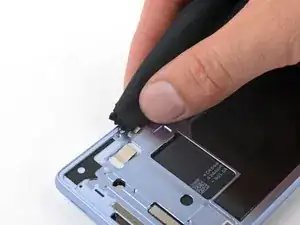
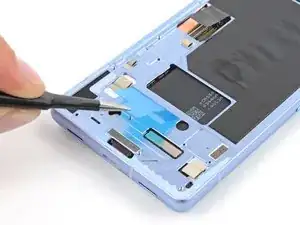
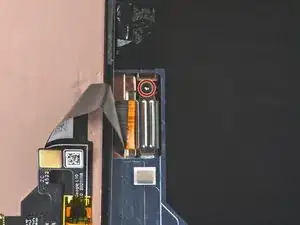
    • Löse den rechteckigen Klebestreifen in der Nähe des kleinen Ausschnitts für den Akku mit einer stumpfen Pinzette oder deinen Fingern ab und entferne ihn.

  15. 2doFKClJsnfipSGj
    2doFKClJsnfipSGj
    l2qCdqgVRtORtmFq
    CEqSpsSZuxUYK2Y4
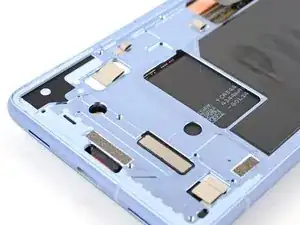
    • Wenn du das alte Display weiterverwenden willst, dann beseitige den alten Kleber vom Displayrand.

  16. baPe3v5oyQvAjqaY
    baPe3v5oyQvAjqaY
    yPQjiEpVkM3OpFef
    pWN1NAtOMPHCUAlC
    • Nimm eine Spritze oder eine Pipette und tröpfle etwas hochkonzentrierten Isopropylalkohol (mindestens 90%ig) um den Rand des Rahmens.

    • Wische den Rand mit einem fusselfreien Mikrofasertuch sauber.

    • Wenn du das Display wieder verwenden willst, dann führe diesen Schritt auch am Displayrand Rand aus.

  17. ZKJxClGdCpgIyUwc
    ZKJxClGdCpgIyUwc
    biJbbQHUAUetAFDr
    HBaVQupOCbZFoXit
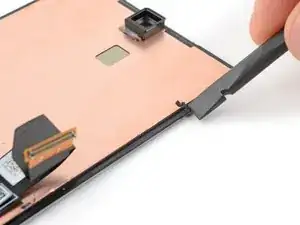
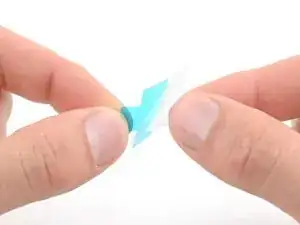
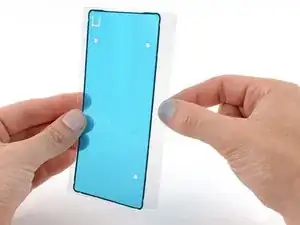
    • Ziehe das rechteckige Stück Displaykleber von seiner großen Schutzfolie ab.

    • Klebe diese Folie an der gleichen Stelle wie die alte Folie direkt unter dem Ausschnitt für den Akku fest.

  18. JKFS1PRUnIPupYFx
    JKFS1PRUnIPupYFx
    tH4ZC4Z42OxT3Cjq
    • Wenn dein Display bereits mit Klebestreifen ausgestattet ist, dann ziehe die Schutzfolien ab, überspringe die nächsten 5 Schritte, um mit dem Wiederzusammenbau fortzufahren.

    • Bevor du irgendwelche Schutzfolien abziehst, halte den Klebestreifen probeweise über den Rahmen, um zu sehen, wie er aufgeklebt werden muss.

    • Achte darauf, dass die blaue Schutzfolie nach oben zeigt und sich der Ausschnitt für die Lasche links von der Frontkamera befindet.

    If you bought the "Fix Kit" version of this, the screen adhesive comes pre-installed on the replacement screen.

    Parker Kincaid -

    Is this the small blue "line" at the edges of the screen? Since on the pictures, it seems that the blue adhesive has the full screen size?

    Stef Pillaert -

    I was confused by the same thing - ifixit, would be helpful to include a close-up of the pre-installed adhesive here. I spent an embarrassing amount of time looking for a screen sized blue adhesive sheet where I unboxed the screen-kit, was going to message you then finally saw the narrow blue pre-install.

    Joe Hopfield -

  19. 3yOvlEFqCLyJ6V2P
    3yOvlEFqCLyJ6V2P
    xvPFJTMBlSTGJoR3
    yKp5caHnMXMh4qJN
    • Lasse dir beim Anbringen des Klebestreifens viel Zeit. Er ist sehr klebrig, und wenn er falsch befestigt ist kann er nicht mehr entfernt werden.

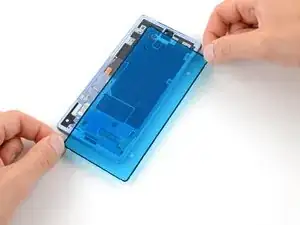
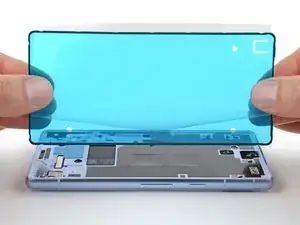
    • Ziehe die rechte Hälfte der großen blauen Schutzfolie ab. Entferne sie aber noch nicht ganz.

    • Halte den Klebestreifen an den kürzeren Seiten fest, wobei die Schutzfolie an der rechten langen Seite halb abgelöst ist, so dass der Klebestreifen frei liegt.

    • Lege die rechte lange Seite des Klebestreifens auf den Rahmen.

  20. SK5PGPpMZo14eMEl
    SK5PGPpMZo14eMEl
    SJWUe6ovZgkxhMtZ
    DSwRKbFK5Lv5rIFs
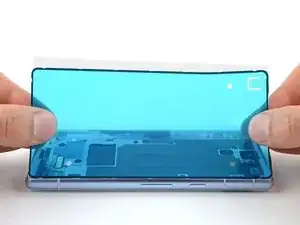
    • Lege den restlichen Klebestreifen langsam auf den Rahmen, wobei du nach und nach die große Schutzfolie abziehst.

  21. 33wLHPmYqWve2tio
    33wLHPmYqWve2tio
    OTpOlxTIqcKMgPWG
    • Drücke den Klebestreifen rundum mit dem flachen Ende des Spudgers fest und befestige ihn am Rahmen.

  22. bZlPyDWQkrnlmkJn
    bZlPyDWQkrnlmkJn
    rEpoqGk2mx4XU2Sf
    3TPTS2jh6iYB2IKc
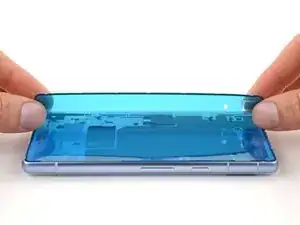
    • Fasse die Lasche am blauen Schutzfilm in der oberen linken Ecke.

    • Ziehe damit langsam den blauen Schutzfilm ab und entferne ihn.

    • Wenn sich der Klebestreifen zusammen mit dem Schutzfilm ablöst, dann überprüfe nochmals, ob du ihn mit dem Spudger ganz an seinen Platz gedrückt hast. Wenn er sich weiterhin ablöst, dann halte ihn beim Ablösen des Schutzfilms mit der Spudgerspitze fest.

  23. ZaBMxLjcMQYjnvSr
    ZaBMxLjcMQYjnvSr
    VVOvqiQlrVUF5JdF
    • Bringe einen Saugheber an der linken Seite des Ersatzdisplays an, so dass der Griff nach links zeigt.

    • Stütze das Display an der linken Seite des Rahmens auf.

  24. RgYcA4HTWI6xvENl
    RgYcA4HTWI6xvENl
    DYJHuhJqGGTHQtc1
    • Richte das Displaykabel über seinem Anschluss aus und drücke es erst auf einer Seite fest, bis es einrastet. Drücke es dann zum endgültigen Verbinden ganz nach unten fest.

    I had to undo the 180 degree bend in the screen cable on the replacement screen, and re-bend it a few millimeters back so the connectors would align with the screen in position. Just a small extra step that might be needed depending on the replacement part you got.

    Andrew Helms -

  25. aYykds1QtQtaE1CG
    aYykds1QtQtaE1CG
    VMvMfdjZ6pSRfkTV
    c2NxjOdHOuo4CXxo
    • Setze die Abdeckung des Displaysteckers in seinen Schlitz auf dem Logic Board ein.

    • Nimm einen T3 Torx Schraubendreher und drehe damit die 2 mm 3IP Torx Plus Schraube hinein, mit der die Abdeckung des Displaysteckers befestigt ist.

    Achtung! nicht zu feste anziehen - nach fest kommt bekanntlich locker. Man kann die Schraube allerdings ordentlich festziehen.

    Ich habe es allerdings zu gut gemeint und mir den Schraubenkopf abgebrochen.

    Jetzt kommt mein Displaystecker dann wohl ohne Schutzabdeckung aus....

    Gian-Marco -

  26. vAKD4Hbe4lrOr1X2
    • Ziehe den blauen Schutzfilm vom rechteckigen Klebestreifen auf dem Rahmen ab.

    • Bei deinem Ersatzdisplay wurden möglicherweise zusätzliche Schutzfolien über der Frontkamera oder den Sensoren angebracht. Überprüfe das gesamte Display und ziehe alle eventuell verbleibenden Schutzfolien ab.

    There should be an overview of the liners that need to be removed. I did not remove the liner over the selfie camera and had to reopen the screen.

    Tusk -

  27. IXsTZCBRqtDLTdvb
    IXsTZCBRqtDLTdvb
    AVkSJvplWCVbuJKo
    ZUJf2kc2JBHIsTF2
    • Halte das Display mit dem Saugheber direkt über den Rahmen.

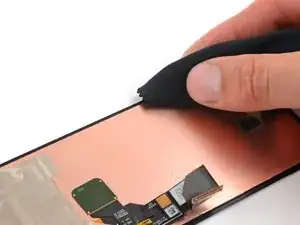
    • Klappe die Graphitschicht mit einem Spudger wieder über das Displaykabel zurück.

    • Drücke das Display an seinen Platz fest.

  28. KUCRVKEiGuqbyhHC
    KUCRVKEiGuqbyhHC
    rkBBtfH26QkXBPOX
    • Entferne den Saugheber.

    • Damit die Verbindung noch besser hält, kannst du das Display leicht mit einem /erwärmten iOpener, einem Haartrockner, einem Heißluftgebläse oder einer Heizplatte erwärmen, bevor du es am Rand andrückst.

    • Drücke das Display rundum am Rand gut an, um es am Rahmen zu befestigen.

    le joint est pré-collé sur l'écran.

    christophe fresco -

Abschluss

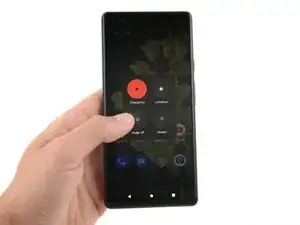
Um den Fingerabdruckleser des Displays zu kalibrieren, kannst du das Pixel Update und Software Repair Tool von Google nutzen.

Entsorge deinen Elektromüll sachgerecht.

Das Gerät ist mit einem eingebauten Diagnosetest ausgestattet. Hier siehst du, wie du das Pixel Diagnostic Tool starten kannst.

Hat die Reparatur nicht ganz geklappt? Versuche es mit ein paar grundständigen Lösungen, ansonsten findest du in unserem Forum Hilfe bei der Fehlersuche.

Clay Eickemeyer

Mitglied seit: 19/09/22

85412 Reputation

29 Kommentare

This guide worked well for me and I was able to replace my screen despite it being severely cracked - expect a lot of screen breakage and glass pieces if that's the case! I set everything in a tray to minimize glass fragments going all over.
Once the screen was installed, the wrapper for the iFixit provided screen has a label that says "UDFPS calibration required" with a QR code.
This takes you to a Google site that tells you how to set up fingerprints on your phone. I don't think that link is helpful.

I needed to go to https://pixelrepair.withgoogle.com/udfps where Google has a tool that allows easy updating of the fingerprint sensor software on your phone, which is a requirement after a new screen is installed. Open that site on a computer (PC or Mac, no ChromeOS, no tablets) and follow the instructions, which include connecting your phone via USB cable.

Hans Chun -

I had trouble with the calibration step. I ended up having to install the Google USB driver. I downloaded it here and followed this guide, using the Windows 10 instructions for Windows 11

Parker Kincaid -

the link worked for me, thank you so much @hanschun.
I was going to flash my phone, but I just checked this guide again, and I scrolled past the iFixit link, and stumbled at your comment
Thank you again

Emmanuel Damola -

The guide worked very well. Although it was very hard to remove the old display (I have two left hands, all thumbs), I was able to exchange it. Thank you very much!

Martin Kinne -

Just replaced my phone 7a screen using the available kit. It was next to impossible to get the old screen off using the heat and pry tools. Would definitely recommend getting their jimmy tool. I ended up shattering the old screen on purpose using a punch tool and peeling the glass off the digitizer and frame. This was easiest for me without ordering another tool. Would NOT recommend doing it this way! The other deviation from these instructions is that the screen replacement version sent to me (10/2023) had the screen adhesive already applied to the screen. Made it much easier to install since there was no human error applying the screen adhesive to the phone frame first then lining up the screen. Definitely an improvement! Overall, took me way too long to complete, closer to 2+ hours due to the issues getting the old screen off. But certainly manageable by any DIYer. Would definitely buy from iFixIt again in the future if needed.

Harry -

You just described my experience exactly. Busting the old screen was awful but it worked. Without better tools, I can't imagine getting that screen off there!

Jeff -

The customers screen was Spider-Webbed pretty badly, and it was a brand new phone basically so the new adhesive was very sturdy. With a few attempts at reheating well under the point you couldn't touch it and finding the text that states to start at the left side of the top speaker, it broke free. The screen was sturdy enough to apply heat and use a jimmy to pull up while attempting to evenly distribute the weight and it worked. Took some force pulling up, somewhat effort commanding to do while making sure you aren't using any part of the internal organs or cosmetic exterior as leverage. With the brand new old spidered screen now out of the way, the rest of the clean up process was a breeze. I did not quite get though why I was provided with a T2 in the screen kit that didn't fit. I am glad I had the client spend the extra for the tool kit with the T2, T3, and T4! I do have them as well in another kit, but I would rather not use a toolset designated for different tasks. Great guide and genuine parts as always. Thanks again! 1.5 Hrs.

Tec Knows -

The absolutely hardest part was getting the old screen off. Everything else was relatively easy, a bit slow trying not to damage anything. But instructions were straight forward and because my phone had all the latest updates it worked straight away especially with the finger scanner.

Ultimately I had to use a steel butter knife at the top left where the speaker phone is to pry it open. I had gotten my phone so hot that the back glass cover's glue started to separate and yet the front was still locked in like a rock.

Im a first timer doing a self repair kit and yeah hopefully won't be anytime soon in the near future took me over 2.5 hours which most of the time spent was just on the glass cover.

Taroi Tofilau -

I bought my 7a as a discounted warranty return, and I am pretty sure the screen had already been replaced once! So I managed to crack the replacement... Repair went well total time just less than 2 hours.

Getting the screen off went easily with heat from a hairdryer and the iFixit picks. Hardest part for me was attaching the new cable and re-fitting the screen connector cover, then driving in the small screw. But I have shaky hands!

Two warnings for others:

1) I messed up by wiping alcohol onto the selfie camera while I cleaned the adhesive off the frame! Now my selfie camera is clouded around the bottom. Luckily I hardly ever use it...

2) I nearly accepted to wipe my phone while trying to re-activate the fingerprint reader. You don't need to do that! My mistake was putting the phone into "recovery mode" before plugging it into the computer. Just leave it in fastboot and the website detects that you need to re-install the fingerprint reader software. Then reboot two times and it will work.

Matthew MacLeod -

Worked great, thanks ifixit dudes and dudettes!

I forgot to reinstall the little bracket that holds the ribbon cable connector in place... but I'll keep it around in case i actually need it some day.

Tony Phipps -

We're glad your repair went well! That bracket is just responsible for keeping the screen connector in place. The only danger is that it may suddenly disconnect following the device hitting the ground or flexing a severe amount.

Clay Eickemeyer -

Merci beaucoup pour ce tutoriel grâce à laquelle la réparation n'était pas trop difficile.
J'ai mis 2 heures pour la réparation , dont 1,5heure pour enlever l'ancien écran car il était cassé en milles morceaux: j'ai doncdû chauffer au fur et à mesure et enlever les petits morceaux d'écran brisés un par un le long du contour.
Ensuite nétoyage des restes de la colle et des petits débris de verre avec le petit outils en plastique fourni.
Cette version d'écran venait déjà avec le pourtour adésif sur l'écran, donc beaucoup plus facile à installer que dans le tuto.
Seule petit problème: le software pour mettre à jour le lecteur d'emprunte digitale ne reconnaissait pas le 7a sur mon PC. J'ai du installer les drivers pour cela.
Un grand bravo à toute l'équipe de Ifixit pour cette super solution de remplacement d'écran.

Eric Le Leu -

Nous sommes heureux que votre Pixel fonctionne à nouveau ! Merci de partager votre expérience.

Clay Eickemeyer -

Just replaced the screen, the screen was shattered which made it complicated. Couldn't find a way in the screen on the top. Eventually after removing small pieces of glass it was possible. I used a Jimmy to open it more and get under the screen itself then I could remove it in a few tries. Did scratch the screen a little bit, but installing was easy. The steps do not mention peeling off the blue liner of the edges of the genuine replacement screen.

timvde -

Have the same experience as others with the not being able to use suction cup, and also I couldn't get the plastic pick or a craft knife further than the sides of the earpiece speaker cutout because of the shattering glass. Countinued to break the glass around the edges, ..absolutely excruciating(!) So after reading this guide I turned my phone off and started the repair at 19% battery. And when I restarted hours later (without any charging) my phone was at 100%. How, what, I really truly don't understand.. Didn't even connect a cable for the fingerprint sensor config as I don't use it. I accidentally made a scratch to the black tape/material covering the battery when removing glass, could this somehow have caused the 80% extra battery level?

Liz -

Remplacement réalisé en environ 2h. Si c'était à refaire ce serait réglé en 30 min.

Le décollage n'a pas fonctionné chez moi malgré le sèche cheveux le lisseur et le iopener...

Le plus simple est de faire levier en partant du haut parleur puis j'ai arraché l'écran en faisant attention aux morceaux de verre.

Attention à bien localiser la nappe pour éviter de l'arracher et faire attention à ne pas endommager ce qu'il y derrière l'écran.

Rien de sorcier si c'est fait calmement.

Le scotch sur l'écran permets de ne pas projeter du verre partout.

Après un bon nettoyage le montage du nouvel écran est très simple. Le résultat est parfait chez moi.

Bien suivre le protocole pour installer le capteur d'empreinte, penser à installer le pilote sur Windows et activer le mode développeur sur le téléphone.

Le kit de réparation n'est pas impératif si vous avez du scotch, un embout torx T3, un tournevis plat très fin, une petite pince et un outil assez fin qui ne marque pas pour nettoyer la colle

Dispo si besoin d'aide.

Pierre-Louis Français -

I just completed this repair two days ago with the replacement screen from this site.

As others have said, removing the glue around the screen with a hair dryer seemed impossible. I ended up shattering the screen, ripping it off with knife between the glass and the foil like material, followed chiseling off any remaing glass around the edges.

Don't be be klutz like me and accidently turn the phone on while removing the screen. Keep your fingers away from the buttons.

I didn't damage anything, but I didnt know for sure until I had the new screen installed.

Once the screen was removed the install of the new one was pretty straight forward. Calibrating the finger print scanner was pretty easy too. Make sure you follow the directions in the order they are listed in this guide.

DirtyChris -

Please note, if your screen comes with the adhesive pre-installed, you will have to remove the blue liner from the edge of the back of the panel, and from the aperture for the camera (both on the back side of the screen.

Andrew Moir -

Really good guide.

Minor improvement suggestions: I think it should mention the rips on the inside of the new screen tho (over the camera lens hole and around the adhesive). Also applying the suction cup centrally is not possible, considering the labels on the screen rip, but it worked equally well for the purpose applied towards the bottom of the screen.

mcsmith1981 -

absolutely not worth trying with the picks the ifixit kit comes with, I was hopeful but they were too thick to even fit in the earpiece let alone pry it, and pixel's adhesive is very very very strong, if your screen is shattered youre better off peeling it away, i shattered mine to peel as i was impatient for a jimmy to arrive. The rest of the process once the screen is off is well written and very easy to follow, seems to be working fine : ] I wish the kit came with a jimmy instead of iopener, seems cheaper and more helpful

FreyrFox -

100%. the Jimmy should be included instead of the picks.

Benji D -

hi ! screen replacement went well, the fingerprint sensor works but not the proximity sensor. did I forget to remove a protective plastic? I've read the guide again, I see no such thing but I've read about it on a pixel 5 guide.

hirsch -

Careful!! The guide doesn't mention that there is a sticker over the proximity sensor and it will prevent it from working if you forget to remove it. I made that mistake and now I have a phone without a working proximity sensor. I won't go through the suffering of removing the glue again

Gonzalo -

Very thorough guide, thank you.

I ended up cooking the old screen pretty good with a heat gun to get the adhesive to release- all the way to permanently changing the color and having to use rags to hold the heated phone- I'm hoping that didn't damage anything else, but TBD.

I lost the screw that holds the ribbon cable in place. It appears to be an m1x2mm, fyi.

The ribbon cable on the new screen was bent in the wrong place. So it required a little extra care and force to set the screen into place.

Aaron Hill -

This is a very thorough guide. Thank you iFixit team. As suggested in a previous comment, I used a craft knife initially to create a wide enough gap to get the blue pry tool into the speaker gap. This did leave some scratch marks on the phone case though. I then used the blue iFixit pry tool rather than the opening picks to lift the screen. This worked really well (I only find the opening picks in the box when I completed the job!!).

There is a rubber hood over the proximity sensor which I needed to remove from the old screen and fit to the new screen.

I had to run the finger print sensor calibration twice in order to get it to work.

Once I completed that the phone is like new and fully functional. My wife is very happy to have a working phone again.

Geoff -

The guide worked really well. My screen was shattered pretty good and therefore getting it off was a bit of a project. Protect your eyes!

Pay attention to the little rubber cap on the proximity sensor just below the front camera. In my case it stuck to the old screen and the sensor failed to work after the first try. I ended up opening the screen again (which was super easy compared to the original one) to properly place it again. Images for steps 24 and 25 show how it should be positioned.

Stefan F -

Ordered the kit and thought, why not, I've had to change a few screens in the past and also ordered the Anti-clamp tool too.....This tool does not work on this phone. Due to the raised camera section on the rear I had to try and remove from the bottom of the screen. Even with the suction tape applied over the rear and side edges, the clamp still pulled the back panel off, while the screen remained firmly in place. The picks also wouldn't get between the frame and screen and i couldnt go in from the speaker section at the top due to how badly the screen was shattered there. It just splintered and the glue wouldn't give way. I gave up with the anti-clamp and I ended up buying a steel spudger from amazon, grinding it down nice and thin and then this eventually got the screen to separate. After this, the rest of the repair was easy. Just make sure you peel the protective film off the camera lens cage. I didn't notice it was there at first.

Jordan Rennie -

Overall happy given that I have a new and functioning screen for my Pixel 7a. I want to leave comments just to fill in some of the gaps between the instructions here and the kit you get from IFixIt.

The kit comes with 3 bit drivers and the screen itself came with another driver. Out of these drivers, you will only need ONE of them to the do the screen repair (Torx T3).

Taking off the old screen is NOT at all easy. Especially if cracked, because it will shatter and crack further as you try to get under it to cut the adhesive. It took me about 3 hours to do this repair and over 2 hours of that was just taking the old screen off.

BUY THE JIMMY TOOL. Was saved by a razor blade I had lying around. The IFixIt pics will not cut the adhesive (at least not when screen is cracked).

BUY THE CLAMP TOOL. If you watch the video on Pixel 7 Pro they use a clamp tool that looks like it works. The suction tool provided does not.

MAKE SURE YOU HAVE ISOPROPYL ALCOHOL AND AN EYE DROPPER. This helps greatly in removing adhesive.

Benji D -

I managed to swap the badly cracked screen on my wife's Pixel 7a.

Removing the screen was way scarier than what is shown here but since the screen did not need to survive I kept going on. Producing lots and lots of small shards of glass. DO WEAR EYE PROTECTION IF YOU NEED TO DO IT AS I DID! Those glass particles do fly everywhere. Be careful and check for any cables and connections under the screen but you do not need to worry too much about the 2 to 3 mm of depth when using the picks. Focus on removing the black goo along the edge of the display. Clean the rim up nicely before installing the new display. Once you got the old stuff out it is really just a walk in the park.

Once everything is up and running go directly to googles fingerprint calibration tool. Do not follow the link provided on the sticker on the display unit. This will/might spare you another scary journey through rescue mode territory.

benschmuecker -