Einleitung

Folge dieser Anleitung, um die Hauptplatine von den Vibrationsmotoren eines Sony DualSense-Controllers zu entlöten.

Dies ist eine grundständige Anleitung. Sie ist Teil einer anderen Anleitung und sollte nicht unabhängig davon verwendet werden.

  1. GTfsKVIR12U1WTFu
    GTfsKVIR12U1WTFu
    ePrmMhAFKkXiSkSe
    • Ziehe das Ladekabel ab und schalte deinen Controller aus, bevor du beginnst.

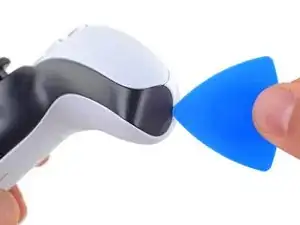
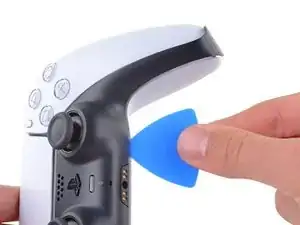
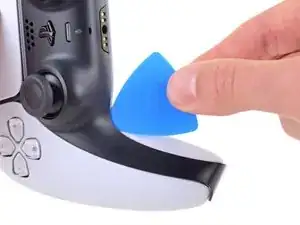
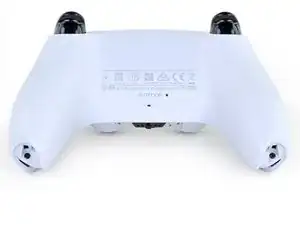
    • Stecke ein Plektrum unter die untere rechte Ecke der Abdeckung, um die Clips zu lösen, mit denen sie befestigt ist.

  2. Rjcu3KDZixCT6wVc
    Rjcu3KDZixCT6wVc
    PTiPbZOkfusF5DVG
    TciAM3EXVAG6wM3E
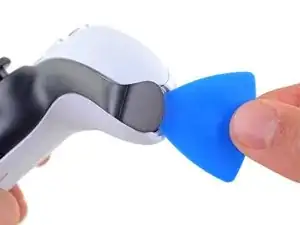
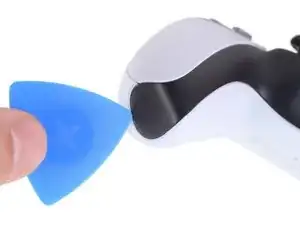
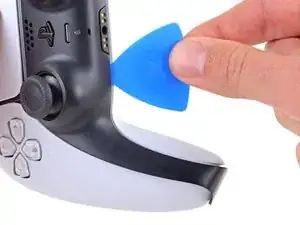
    • Schiebe das Plektrum an der unteren rechten Kante entlang, um die Clips zu lösen, die die Abdeckung festhalten.

  3. d5bIXVWhYD6NuHtO
    d5bIXVWhYD6NuHtO
    VnUyqAC2gatYKPwY
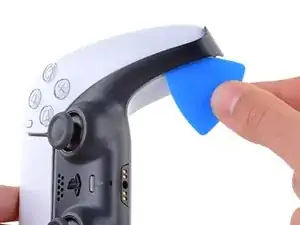
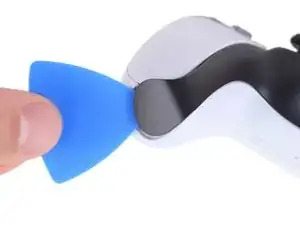
    • Stecke ein Plektrum unter die untere linke Ecke der Abdeckung, um die Clips zu lösen, mit denen sie befestigt ist.

  4. e5VLpDCSJZrCTHZr
    e5VLpDCSJZrCTHZr
    Vmn4XCtKxVVpYw1i
    uGRXgEGmKq2IKNvT
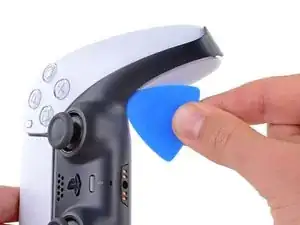
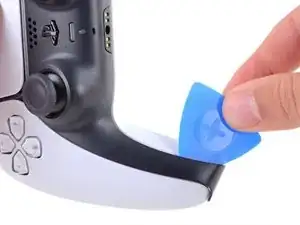
    • Schiebe das Plektrum an der unteren linken Kante entlang, um die Clips zu lösen, die die Abdeckung festhalten.

  5. bQYOnlI5CkoEepwG
    bQYOnlI5CkoEepwG
    FnfBCacKEAvKripH
    MIN3JWiK5kicsBCd
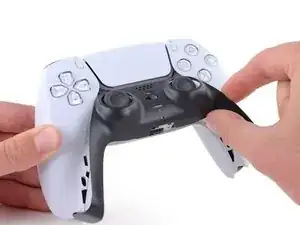
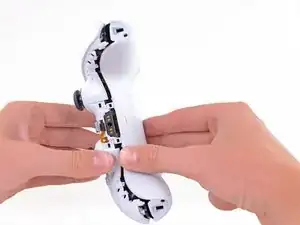
    • Hebe die Abdeckung mit deinen Fingern an der unteren Kante an, um die restlichen Clips zu lösen.

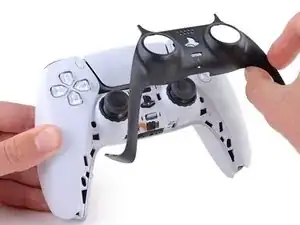
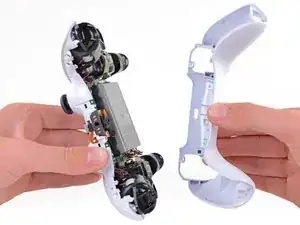
    • Hebe die Abdeckung über die Joysticks, um sie zu entfernen.

  6. bkMg2Eo6RVJBRwJE
    bkMg2Eo6RVJBRwJE
    FkNGiCeBPPV6tcfk
    Bsl3YMbrH2Q5nOTU
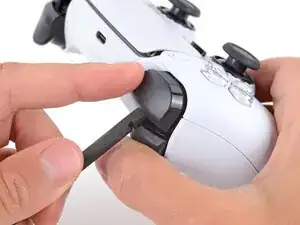
    • Fasse den Kontroller mit einer Hand und halte den linken Auslöser mit dem Daumen gedrückt.

    • Setze das flache Ende des Spudgers mit der anderen Hand zwischen die L1 und L2 Tasten ein.

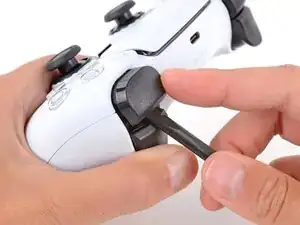
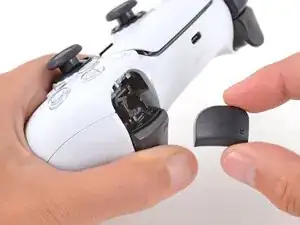
    • Heble die L1 Taste mit dem Spudger behutsam vom Kontroller weg, halte dabei den Finger darüber, damit die Taste nicht davonspringen kann.

    Tried prying from the front of the buttons as pictured and my spudger broke off in the gap. A video I watched showed them being pried off from the back (between the R1/R2 and L1/L2 buttons) which seemed much easier.

    Lora Singleton -

    Agree with Lora's comment above. I was able to use an old credit card to take L1/R1 out this way. I pressed down the L2/R2 button to create space to work in, then came in from between L1/L2 and R1/R2. It's easy to pop one of the outer corners first then you can work the credit card around the top and the rest falls out.

    darkstar448 -

    Man, if I'd just read the thumb part...

    caldugen -

  7. mNyBpuCPfU2EZivG
    mNyBpuCPfU2EZivG
    JR4mA33SaJbxJtnh
    mluWrqHlwtNLXBHV
    • Wiederhole den vorherigen Schritt für die R1 Taste.

    to save a few bucks, the L1 and R1 buttons can be removed without the use of the spudger tool by using any thin prying tool and just pry the buttons from the bottom instead of the top

    Alan Peng -

    What I didn't see addressed anywhere (here or in other similar articles) is that replacement R1 / L1 buttons can be differ enough to be un-usable depending on which model your ps5 controller is. The ones I ordered don't fit and now I can't find a way to be sure I get the right ones because few know there's even a difference.

    Walt Mather -

    Did you already figured it out? The version the we need yo use?, We are in the same situation here.

    Gerald Ross Rodriguez -

    Tried prying from the front of the buttons as pictured and my spudger broke off in the gap. A video I watched showed them being pried off from the back (between the R1/R2 and L1/L2 buttons) which seemed much easier.

    Lora Singleton -

  8. RTMdTIsvXlDMMLCE
    RTMdTIsvXlDMMLCE
    3xBGQ3AXp52YbXKM
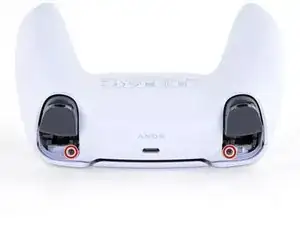
    • Entferne die beiden 6,4 mm Kreuzschlitzschrauben, die die unteren Enden des Gehäuseunterteils fixieren.

  9. rkti2BnvDAh1TREh
    rkti2BnvDAh1TREh
    YyonYJBpMSo32LBL
    • Entferne die beiden 6,4 mm Kreuzschlitzschrauben hinter den L1 und R1 Tasten.

    Same as step 9

    Andy -

  10. Xc1l4aJ6u6BGp5RP
    Xc1l4aJ6u6BGp5RP
    LjguKaIMMeWPUAgo
    dItxRHYBJkALcAlp
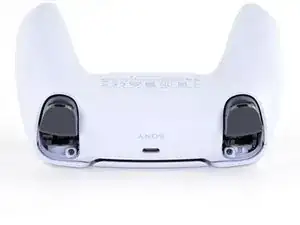
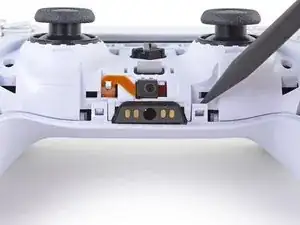
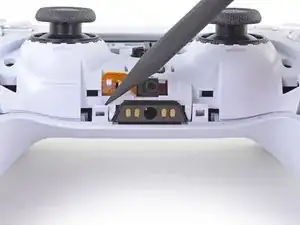
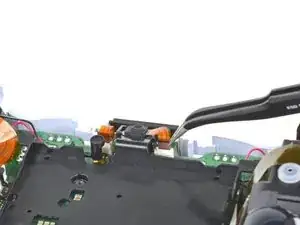
    • Löse die beiden Clips links und rechts von der Kopfhörerbuchse mit der Spitze des Spudgers.

    If these are similar in nature to the DS4’s clips, don’t use too much force so you don’t end up breaking them

    Strings Cat -

    there is a clip that holds the rear cover in place located in R1 and L1

    Zargruzski nakamura -

    Is there a clip in R1 and there's another in L1? Any way to see where exactly? The part of the back cover near L1 and R2 is that one that's not coming off. I can't seem to pull it off easily the way it looks in Step 11.

    tofu -

    For those wondering where the bumper clip is located, it's ~1cm inwards from the end of the back shell where the bumpers are. Take a spudger in that spot and lift it upwards carefully, it should disconnect the clips if they aren't already

    Franz Rolfsvaag -

  11. VZLGleYqNCLAPnRD
    VZLGleYqNCLAPnRD
    OVo1ia2tIbXUTgfA
    • Entferne das Gehäuseunterteil.

    • Bei manchen Modellen wird das Gehäuseunterteil von zwei weiteren Clips gehalten. Diese befinden sich links und rechts neben den zuvor ausgebauten Schultertasten. Wenn das Gehäuseunterteil nicht ohne Kraft entfernt werden kann, überprüfe, ob diese Clips vorhanden sind.

    There are four more clips/hooks hidden in the seams along the outer sides of the handles. If you pull open the controller as shown in this step, then you will shear off the two tiny clips which are right next to the R1 and L1 buttons.

    Therefore, you should first release those clips by prying the seams open sideways.

    I noticed this with the updated design of the controller, not sure whether the hooks are present on the first version.

    The hooks are not critical for the integrity of the controller as the two halves are held together by the screws hidden under the buttons. The damage does show that the controller has been taken apart.

    Nick -

    Thought I'd clarify: The clips next to the L1 and R1 are on the outer side from the L1 and R1 buttons, I'd suggest zooming in on the picture to see them. They're quite easy to break, but also easy to remove using the plastic spudger along the seam, bending the bottom cover outwards

    Franz Rolfsvaag -

    I am still strugling to find the clips. Could someone point them out in the image with a screen shot or something like that.

    aGingerThing -

    I keep getting stuck at this step too with the new DualSense CFI-ZCT1WA revision. The top and bottom shells seem like they are fused together next to L1/R1 but I can't seem to be able to find where these hidden clips are located. My controller is still in warranty so I don't want to break them in case I can't fix my issue.

    but also easy to remove using the plastic spudger along the seam, bending the bottom cover outwards

    I tried this but it seems that the you need a lot of force and I ended up bending the tip of my spudger. Are you sure it's not the top cover that you need to pry away? The bottom cover has a ridge to make sure it's under the top cover so it's not easy to bend outwards.

    @samomio I think there needs to be a step added for these new clips.

    robplease -

    Ok, not seeing a lot of motion on this request, so I've uploaded photos of the hooks to imgur.

    Here ya go: https://imgur.io/a/7NWmQi5

    Sean Murphy -

    Life save Sean. Appreciate the image.

    Vili -

    This guide really needs an update on this. I had a really hard time getting the forward clips to release even after referring to the comments above. Pretty sure I broke them in the end. No big deal but would be great if the iFixit experts could work out a good method for releasing them.

    Marcus Harvey -

    I finally figure it out!!

    The hidden clip is very tricky but once you understand how it works it is easy to remove.

    Use Sean's picture: https://imgur.io/a/7NWmQi5

    What sean is showing, is actually the bottom shell of the seam.

    To disassemble

    1. Use the flat side of the spudger, pry the bottom seam OUTWARDS near the R1/L1 button hole.

    2. (most important) While prying the bottom shell seam outwards, push your thumb on the upper shell and push outward as well (you can do this by applying pressure from the removed R1/L1 button hole towards the seam. And then it will disassemble automatically

    And that's it!

    Penn -

    updated instruction:

    I finally figure it out!!

    The hidden clip is very tricky but once you understand how it works it is easy to remove.

    Use Sean's picture: https://imgur.io/a/7NWmQi5

    What sean is showing, is actually the bottom shell of the seam.

    To disassemble

    1. Use the flat side of the spudger, pry the bottom seam OUTWARDS near the R1/L1 button hole.

    2. (most important) While prying the bottom shell seam outwards, hold your thumb on the upper shell as anchor and then use your other finger to pry the bottom edge of the controller up away from the shell. If you are doing the first step, then don't worry about breaking the clip, just force it open. And then it will disassemble automatically

    And that's it!

    Penn -

    Yes! Thanks a bunch Penn. That did the trick! Much appreciated

    Sean -

    I managed to do it just by pulling harder than what I was already doing. And I don't think I broke anything. So, for me at least, the technique described in this guide worked.

    Riedweg Guillaume -

    The video linked below clearly shows how to open the controllers with the extra clips near the L1/R1 areas.

    See a video here by How To X on YouTube... https://youtu.be/djIvRoclr_E?si=dKFpQCZe...

    Jason Z -

    I really struggled with releasing the rest of the back panel (close to the shoulder buttons.) What finally seemed to do the trick for me, was doing both sides at once with upward turning motion of the back panel with the shoulder buttons approximately at the axis. Trying to release just one side and then the other felt impossible without potentially breaking the case.

    dborba -

    This was what did it for me

    Matthew Williamson -

  12. y641KJMcsYBEboOS
    y641KJMcsYBEboOS
    E6YeMuX4VK4rKsAg
    • Trenne das Akkukabel mit einer Pinzette oder deinen Fingern vom Motherboard.

    • Ziehe beim Abtrennen nicht an den Kabeln, sondern an den Steckern.

    Tweezers aren't gonna grip that the way you need.

    Leif DeWolf -

    For those having trouble using tweezers to pull out the connector, you can grab below the lip of the connector and use the controller as a lever to pull it up as seen here DualSense Kontroller v2 Akku tauschen

    This little trick helped me so much and I believe it should be shown on this guide as well.

    Ezra Worthington -

    Tweezers is too weak for this. I use my finger nails after removing the battery from the slot, straighten the cable lines and slowly wiggle it out.

    Penn -

  13. ONKEXniLxYyiAMwP
    ONKEXniLxYyiAMwP
    OU1aauS5WB3RXnNv
    • Hebe den Akku gerade aus der Halterung.

  14. sVsceB4EJJN4igAW
    sVsceB4EJJN4igAW
    LWv3kRdOD3MyIOxA
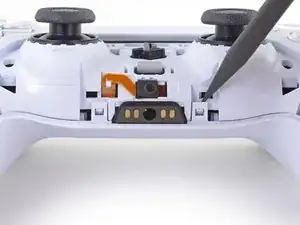
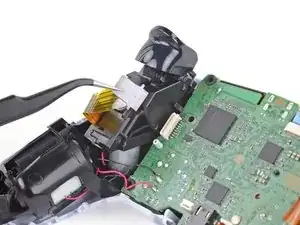
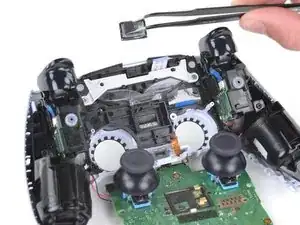
    • Ziehe das Kabel des unteren Mikrofons mit einer Pinzette oder deinen Fingern aus dem Anschluss auf dem Motherboard.

    These ribbon cables have small tabs on either side you can use to help pull out the cable. You can slightly pull up, alternating between the two sides, to slowly wiggle the connector out.

    Tran Anh Nguyen -

    Might be a rookie mistake, but DO NOT REMOVE THE WHITE BRACKETS, only the ribbon! If you do, you’ll have an awful time putting it back and will most likely mess it up. Yes I did.

    Joris D -

    I tried to use metal tweezers to pull this out and absolutely shredded the ribbon in the process. It's just a microphone so I wouldn't expect it to matter but now none of the games get any input from the controller even though the controller works fine in the home menu 🥲

    Probably just use your fingers if you have the dexterity for it.

    Grey -

    As others have said, try to only remove the ribbon and not the white connector. I'd advise holding down the white connector with something (perhaps your prying tool or finger) as you pull the ribbon out gently with the tweezers.

    Best to avoid pulling out the white connector if possible - but its not the end of the world if you do accidentally pull it out, as I did. You can put the connector back in but you need to be very precise with the alignment over the 6 pins it connects to on the circuit board. I had to use a magnifying glass and it took me a few attempts.

    Fruke -

    I didn't read the comments until it was too late and I've ended broken all the pins trying to put it back. There should be some disclaimer in here because I've just lost the mic input trying to fix a joystick and there's no getting that back. And in the most stupid way.

    Jordi -

  15. 1sbxrgZE212ACjfZ
    1sbxrgZE212ACjfZ
    WHQWFFeIquSFVPFh
    • Entferne die 6,4 mm Kreuzschlitzschraube, die die Halterung für den Akku fixiert.

  16. MVqtcLTeGaGZO6Lw
    MVqtcLTeGaGZO6Lw
    eaAKIGVAOolyyZ5Q
    • Hebe die Akkuhalterung vom Motherboard.

    Black and red wires fit neatly under the lower left and lower right arms of the battery bracket, to avoid potential damage when reconnecting the rear case.

    Seomhnasaigh B -

    This needs to be noted. Thanks!

    Nick Gatti -

    Good call on this one for sure. You DO NOT want to crush those cables with the battery bracket.

    Jack Albertelli -

  17. vysKPAMs3LmOUmiY
    vysKPAMs3LmOUmiY
    QLbCmreHvepGMkOB
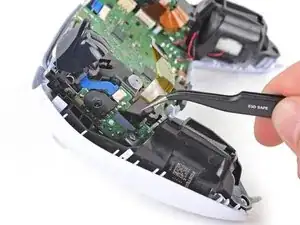
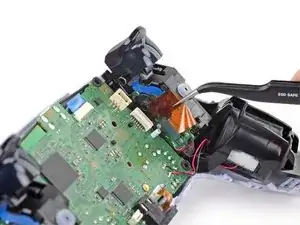
    • Löse das Kabel der rechten Tasteneinheit, indem du es mit einer Pinzette oder deinen Fingern aus dem Anschluss auf dem Motherboard ziehst.

    • Entferne das Flachbandkabel noch nicht ganz.

    If your cables are blue and in a different position, don't sweat. It's all good. Just do the same as they do and if you feel it is necessary, label with a sharpie left and right on each cable. A simple L and R works for this case

    Qbert 2030 -

  18. BgY2EFxlGP1qu1JF
    BgY2EFxlGP1qu1JF
    UEM6rxfOxTPtriIO
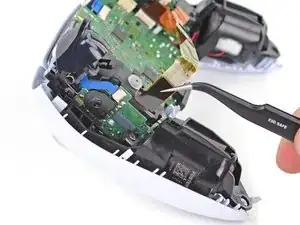
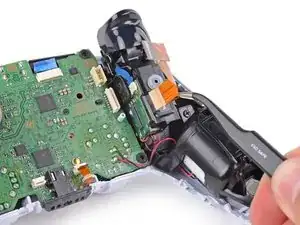
    • Greife die Lasche des Kabels an der rechten Tasteneinheit mit einer Pinzette oder deinen Fingern und trenne es von der Tasteneinheit.

    • Entferne das Kabel.

    Depending on the revision of your controller, these ribbon cables may be slim and white and if you remove it completely, you might have to remove and tear down the trigger assembly to get the ribbon cable back in.

    Robert Borrero -

    maybe I'm missing something but in this case it doesn't seem to me like these cables need to be outright removed.

    TheHooligan95 -

    Agreed… there is no need to remove from the trigger itself. Just the motherboard. This needs to be fixed.

    Jack Albertelli -

  19. DNCfVqeUwEBVL5vx
    DNCfVqeUwEBVL5vx
    fkYnkZICbnGNYmlL
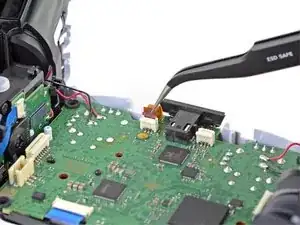
    • Löse das Kabel der linken Tasteneinheit, indem du es mit einer Pinzette oder deinen Fingern aus dem Anschluss auf dem Motherboard ziehst.

    • Entferne das Flachbandkabel noch nicht ganz.

  20. 1mamEpkmIUfdBkY2
    1mamEpkmIUfdBkY2
    rRFlFNnP2UoIL3ad
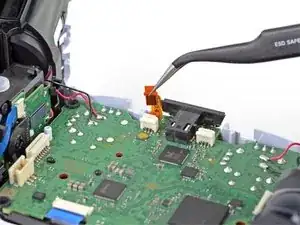
    • Greife die Lasche des Kabels an der linken Tasteneinheit mit einer Pinzette oder deinen Fingern und trenne es von der Tasteneinheit.

    • Entferne das Kabel.

  21. pG1fDWglZbP4iL5N
    pG1fDWglZbP4iL5N
    Hp2VFaarDEOKof3P
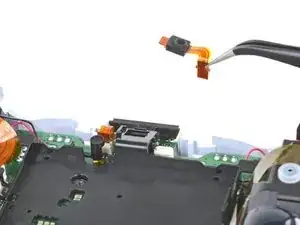
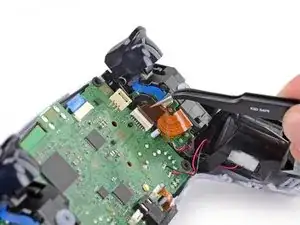
    • Ziehe das Kabel des oberen Mikrofons mit einer Pinzette oder deinen Fingern aus dem Anschluss auf dem Motherboard.

    what is the white thing soldered to the motherboard called where the mic ribbon cable plugs and where can i find the part?

    Abhi K -

    @abhik13943 did you ever find this part?

    DaMej2895 -

    unfortunately, no. i'm just using my controller without a mic.

    Abhi K -

  22. HcN3WXjBdpXKafMs
    HcN3WXjBdpXKafMs
    eYVKcU6OsxOKcb1S
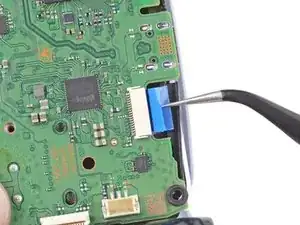
    • Ziehe das Kabel des Touchpads mit einer Pinzette oder deinen Fingern aus dem Anschluss auf dem Motherboard.

  23. GqsGfFE6VFsbGvhX
    GqsGfFE6VFsbGvhX
    4IvPQ2aVt4oyB4MS
    iI24ALvZsMEZZMRI
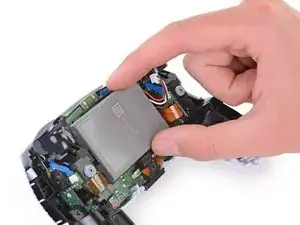
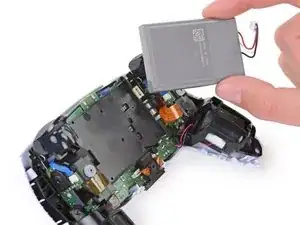
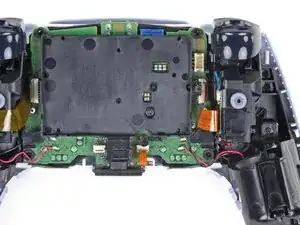
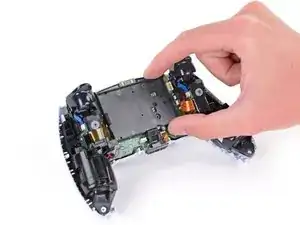
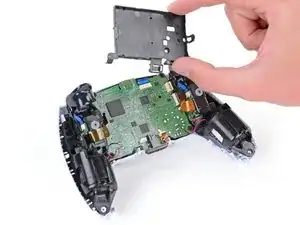
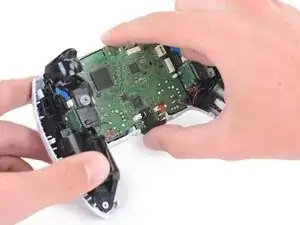
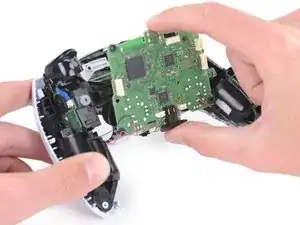
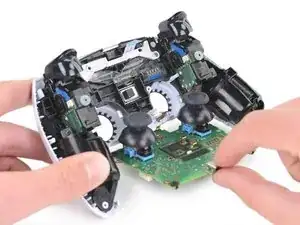
    • Führe die Joysticks vorsichtig durch die Gehäusevorderseite und hebe das Motherboard heraus.

    • Entferne das Motherboard noch nicht vollständig. Vier angelötete Kabel verbinden das Motherboard mit den Vibrationsmotoren.

    Pushing on the joysticks makes this much easier.

    zidek22 -

    My motherboard wouldn't just lift right out. So I noticed there's also a pair of barely visible small black clips, one on each side of the motherboard, holding it down. One is right beside the battery connector and the other's directly across on the opposite side of the motherboard right beside the ribbon cable connector.

    Jason Mulholland -

    Such a good observation!

    zidek22 -

    That helped a lot. If you can push those tabs it comes out a lot easier. I used my tweezers to push the left one and then as others had said pushing on the joysticks from the front of the controller makes it much easier.

    Fruke -

    Just push on the sticks. Pops out like a charm, zero effort.

    Italian Retro Guy -

    Try to leave the controller on its front when you pop out the board, otherwise the speaker can fall out like mine did.

    James Hartman -

  24. oX26uMHyDTNDwuXP
    oX26uMHyDTNDwuXP
    nXUNbpCIvQiDBPZI
    VLOuAlQ2P3n6cQh5
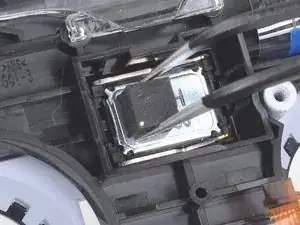
    • Entferne den Lautsprecher mit einer Pinzette oder deinen Fingern vom Controller-Mittelrahmen.

    • Achte darauf, den Lautsprecher in der richtigen Ausrichtung mit dem Schaumstoffpolster auf der linken Seite und den goldenen Kontaktpunkten auf der rechten Seite wieder einzubauen.

    Where do I buy a new speaker?

    Tristan Revure -

    Where do I buy a new speaker for my PlayStation five controller?

    Tristan Revure -

  25. cIxQeXAmdD53yC1w
    cIxQeXAmdD53yC1w
    JySpNaUyvfCM6PPx
    BhZHddTHDjZURSEb
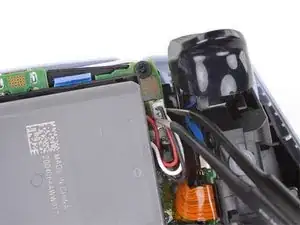
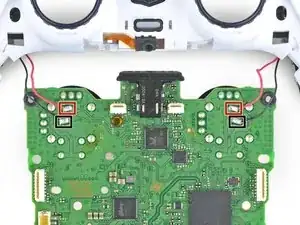
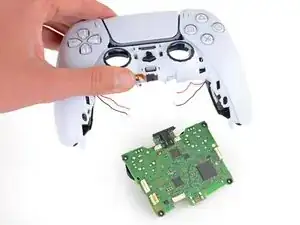
    • Drehe den Controller und die Hauptplatine um.

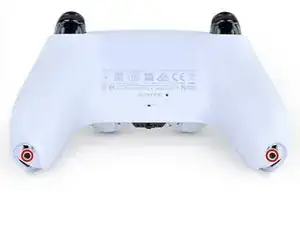
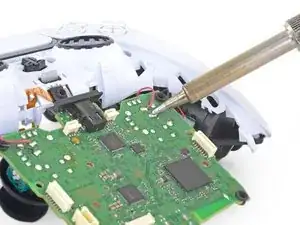
    • Entlöte die Kabel der Vibrationsmotoren mit Hilfe eines Lötkolbens von der Hauptplatine:

    • Zwei rote Kabel

    • Zwei schwarze Kabel

    • Denke beim Zusammenbau daran, die Kabel wieder an der gleichen Position zu verlöten. Die roten Kabel gehören direkt an den Rand neben den Rs auf der Hauptplatine.

    but how do I solder them back and at what temperature. I’m a kid that’s why i’m asking. Also should i wear gloves . My controllers black wire disconnected so this is why i’m asking and yes i know how to do it and i will be supervised. I watch I Tronics fix’s videos so i’ma a big fan of him and all i know about this kind of stuff is from him.

    ps_fan_1 -

    The temperature will depend on the solder and tip you are using. Start at 180°C (360°F) and increase temperature as needed.

    To solder the wire back on:

    1. Place the end of the wire on the solder pad on the motherboard. Use something to hold it in place while you work, like helping hands.

    2. Heat up your soldering iron and touch the tip to the solder pad for 15-30 seconds to get it hot.

    3. With the soldering iron and wire touching the pad, use the tip of your soldering iron to melt just enough solder to cover the wire and pad. Remove the solder and soldering iron tip as soon as enough solder melts onto the pad.

    Wearing gloves and safety glasses is a good idea if you’re new to soldering, and practice on something else first. Read our soldering guide before you start too.

    Sam Omiotek -

    What if I want to leave the vibration motors out? Is there anything special that has ti=o be done?

    Super Korean -

    In addition to the 2 red and 2 black wires, my controllers also have 2 yellows and 2 greens. So 8 wires total. I'm going to remove all of then and then install in reverse order. Wish me luck!

    Dallas Hall -

    Dieser Schritt wirt einfach unmöglich ich habe für 2 Stunden damit vergeblich gekämpft auch nur eines der Kabel zu lösen. Und das mit meinem Lötkolben auf 450°C. Wie es mit "optimierten" ent-löt tools aussieht konnte ich nicht testen, da ich es vermutlich für immer aufgeben werde Dinge die Löterfahrung benötigen zu repairieren.

    Kurz gesagt, versucht diese Reparatur garnicht erst, wenn ihr nicht SEHR viel erfahrung habt. Kauft euch lieber einen pre-gemoddeten Kontroller (was ich jetzt vermutlich machen werde).

    Luca -

  26. L6peLyuAkiXpNg6V
    • Trenne den Controller von der Hauptplatine.

Abschluss

Um dein Gerät wieder zusammenzubauen, folge den Schritten dieser Anleitung in umgekehrter Reihenfolge.

Sam Omiotek

Mitglied seit: 25/02/19

87355 Reputation

0 Kommentare