Einleitung
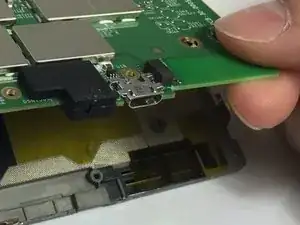
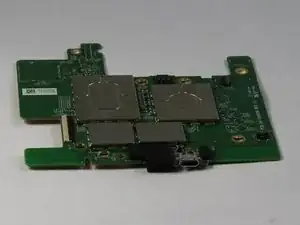
Die Ladebuchse des Paperwhite ist auf der Hauptplatine festgelötet. Wenn sie defekt ist, musst du sie auslöten und eine neue einlöten, oder die Hauptplatine austauschen.
-
-
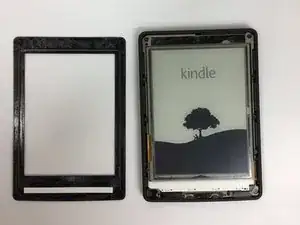
Setze das Kunststofföffnungswerkzeug in die Ecken des Paperwhite ein und schiebe es um den Rand herum, um die Displayeinfassung zu entfernen.
-
-
-
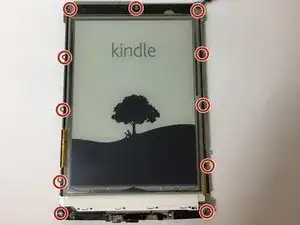
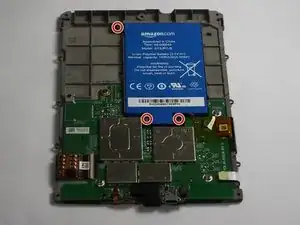
Entferne mit einem Schraubendreher die elf 3,2 mm Kreuzschlitzschrauben 000 von den Ecken des Mittelrahmens und hinter dem schwarzen Streifen wie abgebildet.
-
-
-
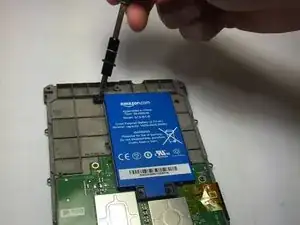
Entferne mit einem Schraubendreher die drei 3,0 mm Kreuzschlitzschrauben 000, mit denen der Akku wie abgebildet befestigt ist.
-
-
-
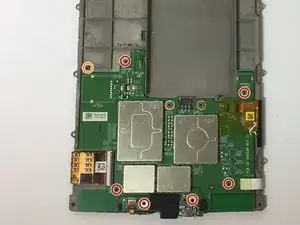
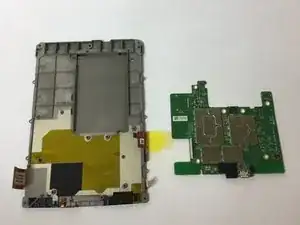
Entferne die sieben 3,0 mm langen Kreuzschlitzschrauben #000, mit denen die Hauptplatine befestigt ist.
-
-
-
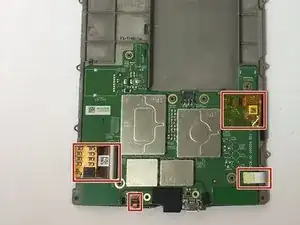
Wenn du nicht gleich die ganze Hauptplatine austauschen willst, musst du die defekte Ladebuchse entlöten und eine neue einlöten.
-


Um dein Gerät wieder zusammenzubauen, folge den Schritten in umgekehrter.
10 Kommentare
How to replace the USB port; replace the motherboard. Kind of a lame fix if you ask me. Whatever happened to soldering a new port on?
I have not done the fix yet but plan to replace the USB which appears to be a USB - micro B USB 2.0 Receptacle Connector 5 Position Surface Mount available at DigiKey. Is there any reason not to attempt this? I have microscope and soldering station. If not, where do you get the motherboard and how much is it?
Any updates? Did you run into any issues?
Démontage facile effectivement, mais les cinq microsoudures sur la carte mère sont impossibles à faire avec un simple fer à souder ! Il faut utiliser du matériel pour CMS (composant à montage en surface)…
Ceci dit mon problème vient effectivement de ces microsoudures. En appuyant simplement sur ces contacts mon Kindle s’est remis en marche ! Vive le travail mal fait à la construction…
I broke an LED light and slightly pulled up the layer protecting the screen leaving some bubbles I can’t really get rid of. This guide has no warning whatsoever about being careful with the spudger and making sure you don’t go too deep. The sticky bezel you pry off can be really sticky and difficult to come off (like mine was). If this guide had a simple warning and explanation to be careful about depth of spudger/plastic tools around LEDs and the middle of the screen I would not have ruined a perfectly good kindle and new battery!
Albert Einstein -
I noticed that the screen protector film was starting to lift with the outer bezel. Luckily I stopped at this point as it would have ruined the Kindle. It would seem some paperwhite 2s have a bonded screen film which makes battery replacement impossible. Perhaps you should mention this before owners buy a battery?
Anna Lien -
My first attempt started at a bottom corner— while reading I wouldn’t have to stare at any scratches I made. But the bottom bezel has a ton of glue, and is difficult to separate even when you do it last. What worked for me was to start from a top corner, and separate in both directions, using picks and other tools to keep the side bezels separated. Then I worked the bottom bezel free from both corners.
Matt D -
Agreed that the information in the instructions is lacking. I wish I had known that the bezel is only glued on and not locked in to the backplate in any way. I think the warning to focus on the outer edges is misleading and definitely steered me way closer to the screen separation issues than I would have otherwise. I wish I had read these comments before starting.
Dan M -
Warning: There is a Wi-Fi antenna along the top. I damaged mine (only half of the dipole, so not too bad). It is a flex PCB stuck down and adhered to the bezel.
F. Mort -