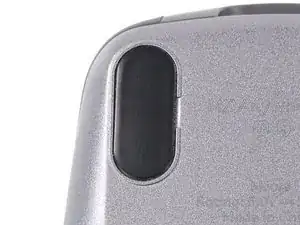
Einleitung

Diese Anleitung zeigt, wie die Logitech MX Anywhere 3 geöffnet werden kann.

Du musst die Maus öffnen, wenn du sie innen reinigen, Probleme mit der Mechanik lösen oder ein Bauteil ersetzen willst.

  1. XEBBVLOg5SsELbRX
    XEBBVLOg5SsELbRX
    RyUFDDkl3MVRCXKC
    • Schiebe die Ausschalttaste in die Off-Position, ziehe alle Kabel ab und lege die Maus mit der Unterseite nach oben auf die Arbeitsfläche.

    • Die ungewöhnliche Form der Maus verhindert möglicherweise, dass sie stabil liegt. Wenn nötig, lege die Maus auf ein weiches Tuch, damit sie nicht wackelt.

    • Wenn du die Mausfüße weiterverwenden willst, musst du sie gut erwärmen, um den Kleber rückstandsfrei zu entfernen.

    • Lege einen erwärmten iOpener etwa zwei Minuten lang auf die Mausfüße.

    • Du kannst den Kleber auch mit einem Haartrockner aufweichen.

    • Wenn du einen Haartrockner verwendest, richte den warmen Luftstrom jeweils nur wenige Sekunden lang auf eine Stelle. Sie darf nur warm werden, nicht heiß, andernfalls kann der Kunststoff schmelzen oder sich verformen.

  2. UAYxW4VMNHwsHtxo
    UAYxW4VMNHwsHtxo
    jQYU6VwSZAvxDHNI
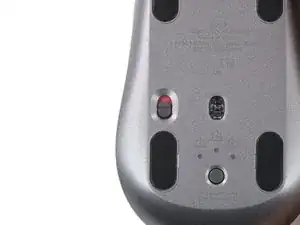
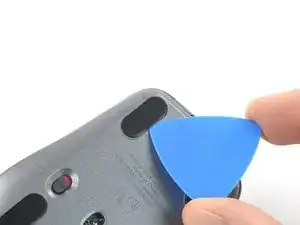
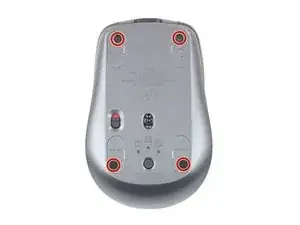
    • In den Rillen um jeden Mausfuß gibt es kleine Spalten. In diese musst du das Werkzeug im nächsten Schritt einsetzen.

  3. ScBiFTZdTAXiLrxP
    ScBiFTZdTAXiLrxP
    ERZDn6aI2XlU5aSV
    IdpNqMgXdrEAkWRP
    • Setze ein Plektrum mit der Spitze in den Spalt in der Rille unter den Kleber des Mausfußes ein.

    • Arbeite langsam und passe auf, dass das Plektrum unter den Mausfuß und den Kleber gleitet. Diese beiden Schichten lösen sich leicht voneinander ab.

    • Wenn du den Mausfuß weiter verwenden willst, dann achte darauf, dass du ihn nicht knickst oder von der Klebeschicht ablöst.

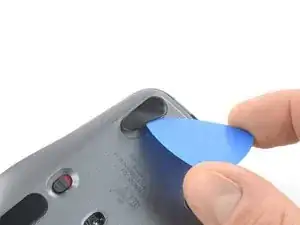
    • Schiebe das Plektrum unter den Mausfuß und löse den Kleber soweit ab, dass du den Fuß mit den Fingern fassen kannst.

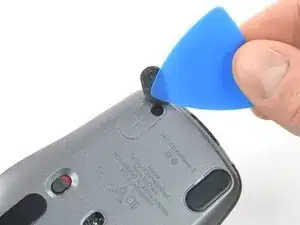
    • Wiederhole das Ganze für die anderen drei Mausfüße.

    • So werden neue oder die alten Mausfüße wieder befestigt:

    • Beseitige alle größeren Kleberreste mit einer Pinzette oder einem Spudger. Reinige die Unterseite der Maus gründlich mit Alkohol und einem fusselfreien Mikrofasertuch. Lasse die Oberfläche gut trocknen.

    • Ziehe die neuen Mausfüße von ihrer Schutzfolie ab und drücke sie an den vorgesehenen Stellen fest.

    I would also suggest Tesa 61395 Tape as a replacement for the adhesive for the feet. It is extremely strong when applied.

    I use it on the back of a metal plate adhered to my phone for a magnet mount in my car. And is on a silicone case.

    Amazing tape and extremely thin.

    Paolo Alberto -

  4. FFHEDKu5kasBCsTQ
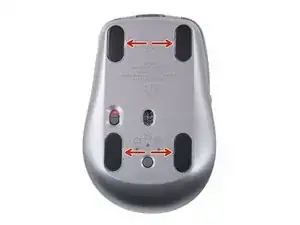
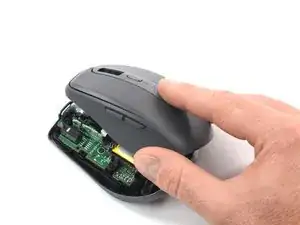
    • Entferne die vier 4,3 mm langen Kreuzschlitzschrauben, mit denen die beiden Gehäuseteile zusammengehalten werden.

  5. wO4ibQaTZKLTSDP4
    wO4ibQaTZKLTSDP4
    ZKIXYOHD1pHTcytE
    WdcNtSP4IXeVFcE3
    • Hebe das Gehäuseoberteil vorsichtig hoch und klappe es wie ein Buch nach rechts auf.

    • Entferne das Gehäuseoberteil noch nicht ganz, es ist noch durch ein Kabel mit dem Gehäuseunterteil verbunden.

  6. CYKBoIvUiL4AFxEu
    CYKBoIvUiL4AFxEu
    1KoQaOpwAPSyY4oI
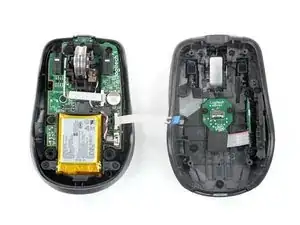
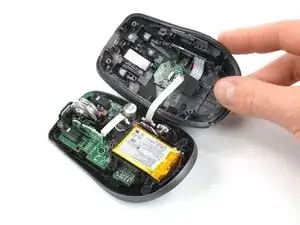
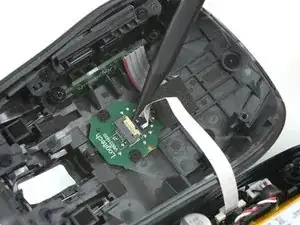
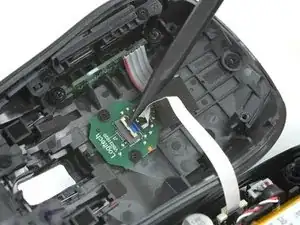
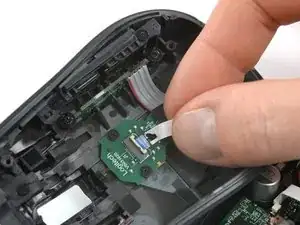
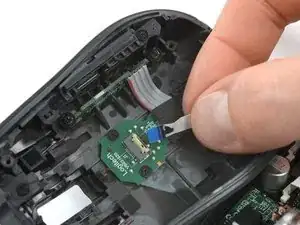
    • Klappe den kleinen scharnierartigen Sicherungsbügel am ZIF-Anschluss des Verbindungskabels mit der Spudgerspitze, einem Öffnungswerkzeug oder deinem Fingernagel hoch.

  7. CdTEJCl2igglBkNM
    CdTEJCl2igglBkNM
    1ivABlPhbgbdBdXE
    • Ziehe das Kabel gerade aus dem Anschluss heraus.

    • Setze das Kabel beim Zusammenbau mit der blauen Lasche nach oben ein und klappe dann den Sicherungsbügel herunter.

    On my MX Anywhere 3, the interconnect cable is also glued to the board on the top half of the mouse. It was much easier to pop up the white top of the connector on the bottom half of the mouse to free the interconnect cable.

    dustin -

  8. 2TWFVkSuT1a5Pm3d
    • Entferne das Gehäuseoberteil von der Maus.

    The switches in this mouse are the Omron D2FC-F-7N and they are very loud. It might also be the plastic chassis that's contributing to the overall clicky sound signature.

    Rad -

Abschluss

Um dein Gerät wieder zusammenzubauen, folge den Schritten in umgekehrter Reihenfolge.

Hat die Reparatur nicht ganz geklappt? Probiere ein paar grundständige Lösungen oder schau in unserem Forum nach Lösungen.

Tobias Isakeit

Mitglied seit: 31/03/14

125672 Reputation

12 Kommentare

My left click started to have double click issue. Do you have any suggestions how to fix it? If I want to replace it, does ifixt have the part? If not, what is the part number? Thanks

Vim -

You could replace the left switch. See step 9 for the part number. You’d need to desolder the switch.
Sometimes it is enough to open the case of the switch and clean or tweak the small metal plate. But this is a very delicate finger exercise.

Tobias Isakeit -

Mine had the left click issue. Opening the switch case and cleaning the contact points resolved it.

Meo Tras -

Steps 6 and 7 are not necessary to get access to buttons (the most common malfunction). My model had this interconnect cable glued hard to the top half of the device. You can easily remove it without disconnecting the cable, oil the buttons and assemble mouse back

Максим Шилиманов -

My interconnect cable wasn't glued hard, but was attached via adhesive which took careful effort to peel away. I had to remove the screws on the board to get to the lower level to clean up coffee, though fortunately there was very little. However when I went to reassemble, I found a free spring and no clue where it came from. Thankfully, enlarging the third picture in step 5 shows where the spring is under the wheel assembly and I was able to reassemble successfully (also the two screws holding the wheel assembly are slightly longer than all others). I even managed to reinsert and restick the interconnect cable correctly.

Carol Y -

my mouse has a red blinking light on the battery status LED after cleaning the click switches with dielectric contact cleaner, any way to solve this?

luis javier gutierrez jeronimo -

Hi luis, I bought a used MX Anywhere 3 which middle clicks turned out to be unreliable. So I opened it, removed its battery and scrollwheel unit and also tried to fix it with dielectric cleaner. After letting it dry for a moment, I carefully reassembled everything. But just like yours, it not longer works and just flashes red. It seems like a bootloop to me, but I couldn't find any documentation on how to reset its memory or reinstall its firmware without wireless connection. Does this mean, end users are not supposed to disconnect its battery? But how would I clean or replace the switches then?

pnoqable -

I have the same issue!! Does anyone knows how to solve it???
After I reassembled my MX Anywhere 3 mouse, when I turn on the switch, the LED at the back of the mouse wheel only blinks red. I have already tried charging it, but the red LED keeps blinking whether it is charging (with the power switch turned on or off) or not charging (with the power switch turned on). Additionally, the LED on the Bluetooth switch, which has 3 options to connect up to 3 devices, no longer turns on. Does anyone can help me?

Alexandre Abreu -

Bonjour, la molette se bloque, alimentée ou non. ⏎
j'ai démonté, et une rondelle métallique crantée à l'intérieur saute et se bloque.⏎

j'ai réussi à réparer, normalement :)⏎
Sans savoir si cette fameuse rondelle était collée, ce que je suppose, eh bien de la colle et ça fonctionne.

Christ Ophe -

Had similar issues as others where its hard to click and drag things as the click would randomly disconnect. Very annoying for what's supposed to be a premium mouse. How much would it be to have it repaired or is it better to buy a new one? Definitely would not get the same one again!

Andrew Shaw -

I have the same problem. I had same problem with my earlier Logitech mouse too. I bought MX Anywhere3 due to high resolution for mouse operations. But these not lasting more than 2 years.

Govind Avireddi -

On/off switch is moving more difficult every day, this happens on all 3 of my MX3's

Arjan -