Einleitung
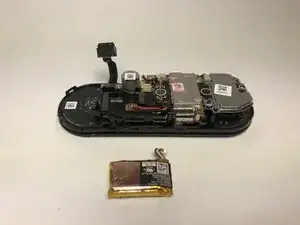
Wenn dein Nest Hello schneller als üblich seine Akkuladung verliert oder sich, trotz Fehlersuche, nicht mehr einschalten lässt, wird dir diese Anleitung helfen, Zugang zum defekten Akku zu erhalten.
Die folgenden Schritte erfordern das iFixit Werkzeugset zum Hebeln und Öffnen, einen Kreuzschlitzschraubendreher PH000 und eine Pinzette. Während des Öffnen des Gehäuse kann es leicht passieren den O-Ring der Wasserdichtung zu beschädigen, also bereite dich darauf vor auch diesen zu tauschen.
Ersatzteile
-
-
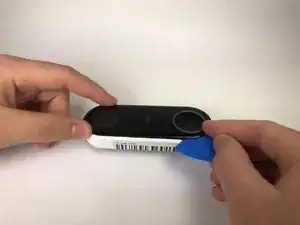
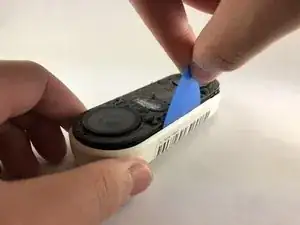
Schiebe ein Plektrum zwischen die schwarze Vorderseite und das weiße Gehäuse des Nest Hello.
-
Heble die Vorderseite mit dem Plektrum vom Gehäuse weg.
-
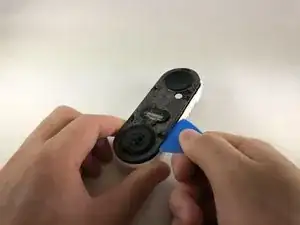
Entferne nun die Vorderseite komplett vom Gerät, zögere nicht, hier fest zu ziehen.
-
-
-
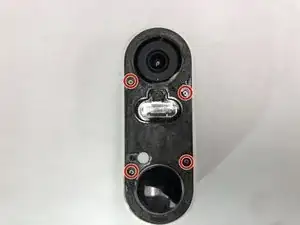
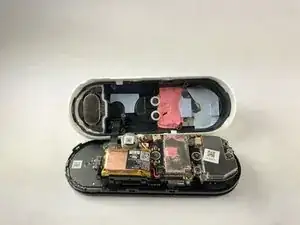
Entferne die Aufkleber und benutze einen Kreuzschlitzschraubendreher #000, um die vier Schrauben zu entfernen.
-
-
-
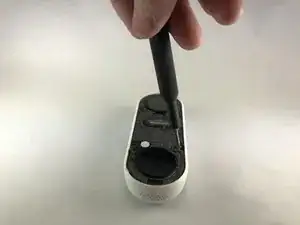
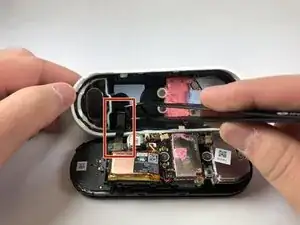
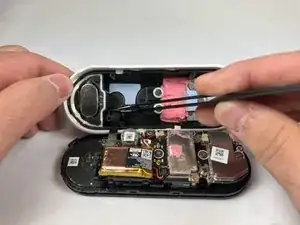
Schiebe ein Plektrum zwischen das weiße Gehäuse und die schwarze interne Platine, um diese heraus zu hebeln.
-
-
-
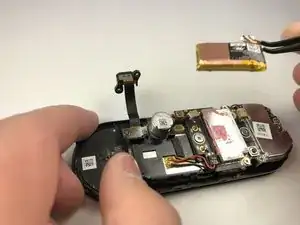
Sobald das schwarze Gehäuse entfernt ist, trenne das Kabel des Akkus und entferne den Akku aus dem Gerät.
-
Um dein Gerät wieder zusammenzubauen, folge der Anleitung in umgekehrter Reihenfolge.

47 Kommentare
Any recommendations as to where we can find a replacement battery? Model #, specs?
Flujoy 280mAh/3.7V Replacement Battery for Nest C1241290 Vido Doorbell Wired NC5100US Hello 1ICP7/17/26
About $16 from Amazon
Battery and o-ring part source?
Ryan -
What is the replacement battery?
Search Amazon for the following and you should find several choices:
Nest Hello NC5100US C1241290 Video Doorbell Wired
I had to use a metal spudger tool to start and then used guitar picks.
Joel Lundi -
Be afraid to pull hard. The faceplate will break in two.
B Bremer -
I did the JerryRigEverything method and slipped a razor under the faceplate to separate it carefully from the body. Worked perfectly and nothing was damaged
There I Fixed It -
Be careful with the wiring and the heater element. I must have shorted something together when it put it back together and now it will no longer power up. It is probably best to cut the wires to the heater and deal with the consequences in the cold temperatures.
Joe I. Fabritz -
The secret I think is slicing through the adhesive. I shoved multiple picks in and worked my way around. You want to cut the adhesive. Prying is likely to break the faceplate. The big hint is the next picture in the step, seeing where the adhesive is.
Arnold de Leon -