Einleitung

Mit Hilfe der Ladespule am unteren Ende der Zahnbürste wird der Akku drahtlos aufgeladen. Wenn sie beschädigt ist muss sie ausgetauscht werden, dies wird hier gezeigt.

Zum Ausbau musst du löten. Wenn du das noch nie gemacht hast gilt dir unsere Lötanleitung.

  1. ysgBokHpSjcXlyZP
    ysgBokHpSjcXlyZP
    fOSHPhyJKKXjSLW4
    o1Bn3A4taluh3OSw
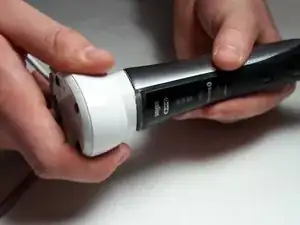
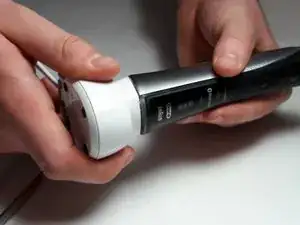
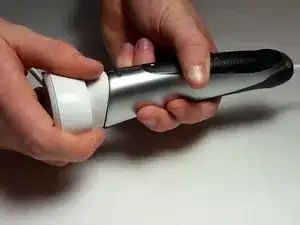
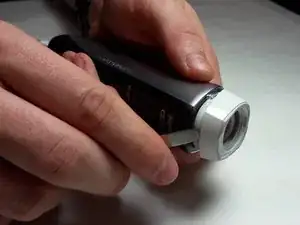
    • Löse die Bodenkappe am Ende der Zahnbürste mit Hilfe der Ladestation. Setze die Bürste in die Ladestation ein und drehe sie um 90° gegen den Uhrzeigersinn.

  2. MQqRMGwPofTcmRMp
    • Entferne die Bodenkappe mit dem Spudger.

  3. qBKNtVlJ1i2Q2SGf
    • Löse die Kappe an der Antriebsachse mit dem Spudger.

  4. OJ1TDjVUsvCOmoye
    OJ1TDjVUsvCOmoye
    SV12YGFVHI23ljCh
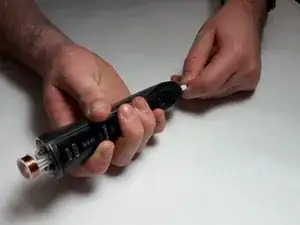
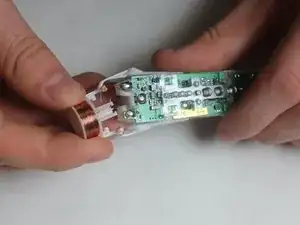
    • Die Inneneinheit ist nahe bei der Induktionsspule mit zwei Kunststofflaschen am Rahmen befestigt. Löse sie mit einem Spudger ab.

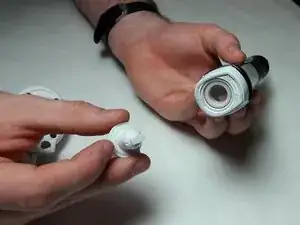
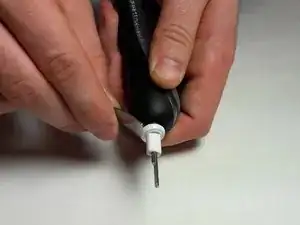
    • Drücke auf de Antriebsachse damit die Inneneinheit herauskommt.

    • Du kannst auch vorsichtig mit dem Spudger an der Spule hebeln, aber dies kann auch zu Beschädigungen führen.

    You need to release the induction coil’s plastic clips before you try to slide it out! This is a key missing step.

    Matthew Dowdeswell -

    I agree with Matthew. You must insert a spudger and release the plastic clips while pressing down on the rotating head. I held the rotating head with a pair of pliars and then released the plastic clips and it popped right out.

    Brian Davis -

    i third that, this needs to be added ASAP, you have no chance of getting it out without unclicking those two latches that lock the inner assembly to the outer casing.

    Rainer Joos -

    I'd recommend changing this to say where these tabs are. Basically, you insert the spudger between the left and right side plastic arms/tabs going to the coil assembly and the body. If you have light pressure applied to the head at the right time, you'll feel them move when you insert a spudger and put a tiny bit of leverage.

    Ryan Novosielski -

    You can see these tabs most easily in step 7. The tab shown in the second photo doesn't really have anything to do with anything (maybe that's the ill-advised leverage method).

    Ryan Novosielski -

  5. UigCxWJygXhj5412
    • Wickle die Drahtenden mit einer Pinzette von den weißen Kunststoffstiften.

    • Jeder Draht ist mit drei bis vier Windungen aufgewickelt.

    Unnecessary step for battery replacement! The electrode of the battery is solely the single solder point in the middle and the battery comes out just as well if you just leave the coil. If all you want is to replace the battery. just leave the coil, It’s fiddly and risky to break the wire and more work, only disadvantages. Good efforts!

    Rainer Joos -

    I'm not doing this right now, but thank you!

    Ryan Novosielski -

    Achtung dieser Schritt ist für den reinen Akkutausch unnötig und quasi falsch! Die Spule kann verbleiben, der Akku ist einzig die einzelne mittige Lötstelle!

    Rainer Joos -

  6. SaKRvLEqS1nCnxYo
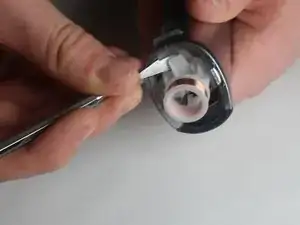
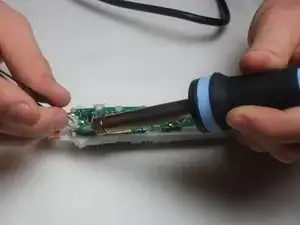
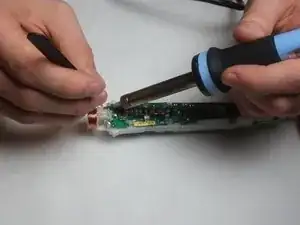
    • Entlöte die beiden Anschlüsse oben an der Platine. Entferne die Drähte mit einer Pinzette.

  7. pKSWZTRmJNVWqSyA
    • Entferne die Ladespule indem du die Plastikrasten löst.

    • Falls nötig kannst du dazu einen Spudger benutzen.

Abschluss

Zum Zusammenbau musst du die Schritte in umgekehrter Richtung befolgen.

Rachel Surridge

Mitglied seit: 06/11/17

397 Reputation

3 Kommentare

bonjour, ou puis je trouver une nouvelle bobine d’induction ou puis je remplacer simplement le fil de cuivre

Geoffrey Sacré -

juste une précision pour sortir l’intérieur de la brosse du manche il faut appuyez sur les deux pattes plastique en bas près de la boucle d’induction

on voit une des pattes a l’étape 5

Geoffrey Sacré -

Woher bekomme ich denn eine neue ladespule?

Franz Leichsenring -