Einleitung
Lässt sich deine Pebble Steel nicht mehr anschalten und alle Lösungsversuche waren ohne Ergebnis? Möglicherweise muss der Akku getauscht werden. Diese Anleitung hilft dir dabei!
Um den Akku auszuwechseln, musst du löten. Unsere Lötanleitung zeigt, wie das geht.
-
-
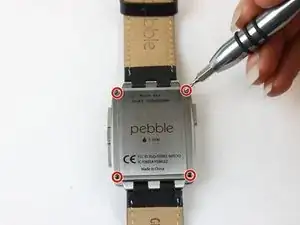
Entferne die vier 3,5 mm langen Torx T3 Schrauben, mit denen die Rückseite befestigt ist.
-
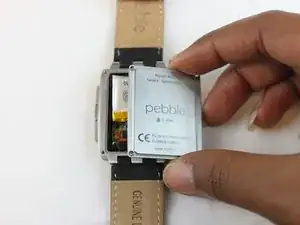
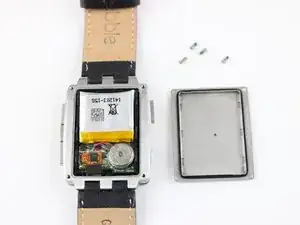
Entferne die Rückseite.
-
-
-
Der Kunststoffrahmen ist mit vier Clips am Metallgehäuse befestigt, je zwei auf der linken und rechten Seite der Uhr nahe bei den Ecken. Setze einen kleinen Schraubendreher in die Ausschnitte direkt über den Clips und heble sie nacheinander ab.
-
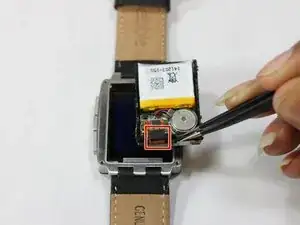
Fasse den schwarzen Kunststoffrahmen mit einer Pinzette und hole die Innenteile heraus.
-
Trenne das Flachbandkabel mit einer Pinzette oder einem Spudger von der Hauptplatine ab.
-
-
-
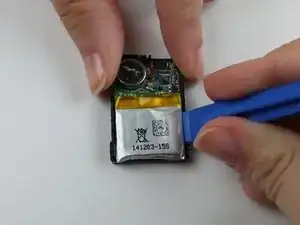
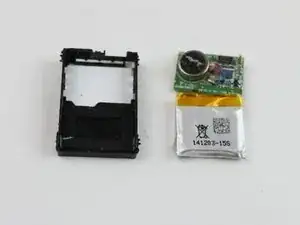
Drehe das Innenteil um und heble den Akku mit einem Kunststoffwerkzeug aus dem schwarzen Rahmen heraus.
-
-
-
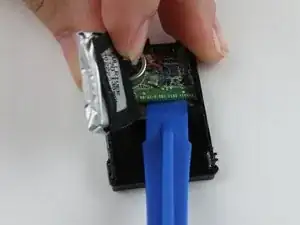
Entferne die Hauptplatine mit einem Kunststoffwerkzeug aus dem schwarzen Kunststoffrahmen.
-
Am Rahmen sind vier Rasten über den vier Ecken der Platine. Du kannst den Rahmen vorsichtig biegen, damit die Hauptplatine leichter herauskommt.
-
-
-
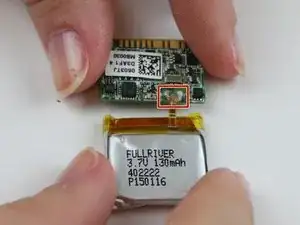
Drehe den Akku und die Platine um, damit die Anschlussstelle sichtbar wird.
-
Entlöte die beiden Lötstellen auf der Hauptplatine.
-


Um dein Gerät wieder zusammenzubauen, folge den Schritten in umgekehrter Reihenfolge.
27 Kommentare
And how do you connect the new battery to the motherboard?
What kind of connection is used between the two?
Instead of desoldering the old battery, I clip the ribbon cable that connects the battery to the motherboard. Trim the ribbon cable as short as possible to the motherboard. The replacement batteries I’ve found have braided wire instead of a ribbon cable, so they can be resoldered to the pads that the remnant of the ribbon cable is attached to. Pebble used enough solder that I’ve never had to add any - just melt the solder that’s already there and drop in the new wires. You can tin the wire ends before attaching them to make a better connection, but you get a good solder connection even with the bare wires. Make sure you get the polarity right - the positive (red) battery wire attaches to the pad closer to the center of the motherboard. If you look carefully there are tiny + and - symbols silkscreened into the motherboard just outboard of the pads.
Farely certain battery ribbon conector is soldered to the circuit board. Gently pulling on it will seperate it but results in tearing. Two other things not mentioned is when removing the rear cover note the round disc object that looks like a button cell, it is glued to the back plate. Care must be taken when removing or one can pull out the red and blue wire from the circuit board. Second thing is a ribbon connector that needs to be disconnected from the cicuit board before the board can be removed. The plastic spudger or tweezers should do he trick. Its easy to miss as a piece of foam hides the connection point.
mjstev17 -
Anyone found a source for these batteries? I've found the manufacturer but not a retailer.
Paul K -
There are some really small batteries on aliexpress, do you know the measurements of the original one? I kinda want to replace mine as battery life has been declining.
if I can find my T3 driver I'll pull my watch open and use the calipers. You just need the external dimensions of the battery?
Paul K -
The Fullriver 402222(s) is 21 x 21.5 x 3.9 mm. This is currently the closest thing I can find on the market. http://www.bsdmicrorc.com/index.php?show...
It is the same manufacturer as far as I can tell and I believe its basically the same battery. I think the measurement discrepancy is due probably to the flaps that LiPo batteries have. Either way, this is the website that I got sent to by Fullriver when I contacted them to see where I might be able to purchase their batteries in the US seeing as I couldn't immediately find them.
The obvious problem here is that it doesnt come with the ribbon soldered on it. You would have to desolder the battery assembly from the pebble, desolder the ribbon carefully from the bare cell, then reverse that with the fresh cell. And thats assuming your problem is the cell itself and not something on the assembly.
Have we made any more progress on this issue? I fear that my Pebble Steel's battery is showing its age as it is going on over two years now of constant use. Has anyone even been able to purchase a new battery and attempt an install? If so is it even possible to desolder the ribbon from the bare cell and put it on the new battery? Just curious as to what your thoughts are. I am average at soldering but I am unsure if it is even feasible to attempt such an undertaking considering the battery does not seem to be easily available and the actual install seems a little concerning as well. Just curious as if any further research or ideas have come about.
These batteries are easy to find on eBay. Search for 402020. They are slightly smaller capacity than the originals, 120mAh instead of 130. Battery life is a little shorter than the original. I’ve seen people do all kinds of alterations to fit bigger batteries, like cutting the plastic frame or removing the safety circuit from the battery, but IMO it’s better to live with slightly more frequent charging than to risk a lithium fire from an overcharged battery. I don’t wait for the low battery warning on mine and still get a comfortable 2-3 days from a charge on my OG Steels.
The vibration motor is glued to the back plate. So remove the back plate a little bit, and look, if the motor sticks to it. Then first use a plastic opening tool to remove the vibration motor from the back plate.
Gauner -
Same comment as Gauner: The vibration motor is glued to the back plate. DO NOT simply pull off the back plate as per the instructions else the two small wires that connect the motor will be damaged. I used a SIM tray pin tool to gently pry off the motor.
Steven Holbourne -
There’s no need to desolder the battery. Use wirecutters to clip the ribbon cable as close as possible to the motherboard, then use the old solder beads to attach the wires of the new battery. Cutting out the old battery reduces the amount of heat the motherboard is exposed to. Also, the polarity of the battery is indicated by two tiny symbols next to the solder pads. In case you can’t read them, the positive wire is soldered to the terminal closer to the center of the motherboard. Finally, be aware that leaving too high a bead of solder above the motherboard will cause pressure and bright dots on the backlight when the watch is reassembled. Check your solder before reassembly and either melt down, cut or file off the excess solder to save yourself a second teardown.
Rich Stillman -
After reassembly, the watch will sometimes need a little attention before the display works again. You may need to either press buttons or attach the charger to jump-start the watch. Also, even if the display fully works, the backlight may not function immediately after reassembly. This is almost always fixed by shutting down and restarting the watch. You will almost never need to disassemble the watch again to get the display working, unless you forgot to reinsert the zebra strip or reconnect the ribbon cable connector.
Rich Stillman -