Einleitung

Diese Anleitung zeigt, wie die Hauptplatine im Nintendo Switch Pro Controller ausgetauscht wird. Sei bei dieser Reparatur besonders vorsichtig, da auch der Lithium-Ionen-Akku entfernt werden muss. Wenn der Akku aufgebläht ist, musst du entsprechende Vorsichtsmaßnahmen treffen. Die Schritte acht und neun erfordern besondere Sorgfalt, das weiße Flachbandkabel darf nicht beschädigt werden. Du benötigst Lötkenntnisse, wenn du keine Erfahrung damit hast, hilft dir unsere Lötanleitung. Behandle die inneren Bauteile und die Hauptplatine vorsichtig.

  1. iaKRfcPV2HNC5yUK
    • Drehe den Controller so um, dass der Aufkleber mit der Modellnummer nach oben zeigt.

    • Entferne die beiden schwarzen 8,4 mm Flachkopf-Kreuzschlitzschrauben mit einem JIS #00-Bit, mit denen die Handgriffe am Ende verschraubt sind.

    Be carefull, these screws are super easy to strip even with the right tools.

    Lukas Eberharter -

    I tried editing these instructions after I had trouble with stripping screws, but it doesn't seem to take. The issue is that these are JIS and not Phillips screws. They are VERY similar looking but a Phillips head screwdriver will strip the screws.

    Isaac Webb -

    I tried using a Philips #00 screwdriver but it didn’t work

    vincent ingrassia -

    Don't even think about trying Phillips. There are some other guides online that say you'll be fine, but they're wrong. Even one attempt with Phillips WILL strip these, and you will never, ever get this controller open once that happens. Even with JIS they're really hard to get out and really easy to strip.

    Luke T. Allen -

  2. pFHHOlTyvlQ43DOC
    pFHHOlTyvlQ43DOC
    KCE54LsPyGnuWTkW
    UNYZtREEKVfHallZ
    • Ziehe die Abdeckungen der Griffe vorsichtig vom Controller.

  3. 3OnYDcOU1gVR2fEG
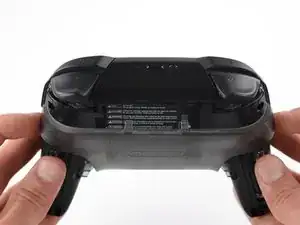
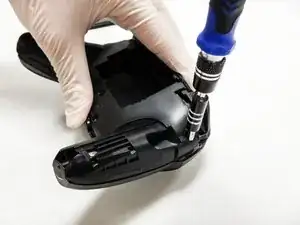
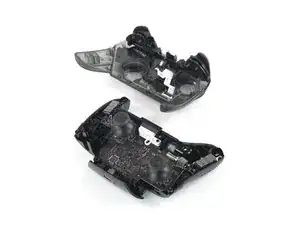
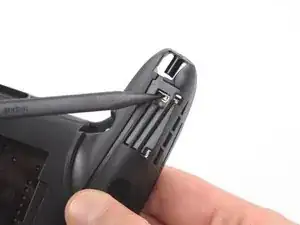
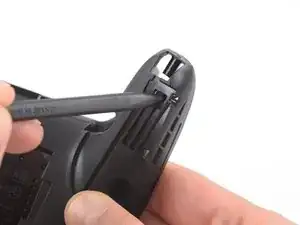
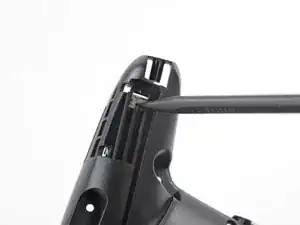
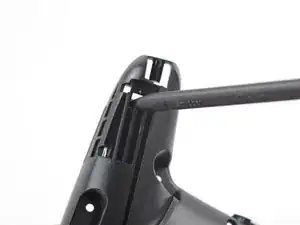
    • Entferne die vier silberfarbenen 6,8 mm langen JIS-Schrauben #00, mit denen die durchsichtige Abdeckung befestigt ist.

  4. Zb3Ool4Evh63KKVd
    Zb3Ool4Evh63KKVd
    E4qBEgOibCQbXlIJ
    jihxJQfDSqclVJnF
    • Löse die durchsichtige Abdeckung mit deinem Fingernagel ab.

  5. p4bHAkTpIvuBFIfc
    • Entferne die durchsichtige Abdeckung.

  6. yUbMYllrTC6sSOGL
    yUbMYllrTC6sSOGL
    6pxWhyQpxoXGbs22
    vEF6WXIGCHUebiZO
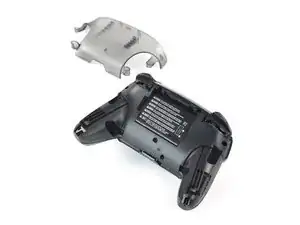
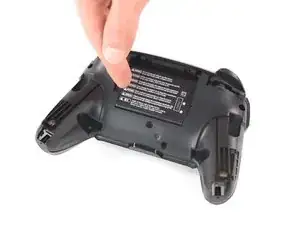
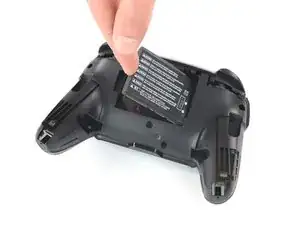
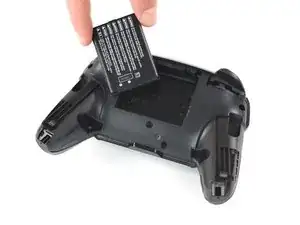
    • Entferne den Lithium-Ionen-Akku, indem du ihn mit deinem Fingernagel oder einem Öffnungswerkzeug an der linken Seite anhebst.

    • Dafür brauchst du nur wenig Kraft.

  7. V5kF4MuHympJyAFM
    V5kF4MuHympJyAFM
    WJ4LvGQlKLhlREns
    IhtOVVcrnx5IBHgJ
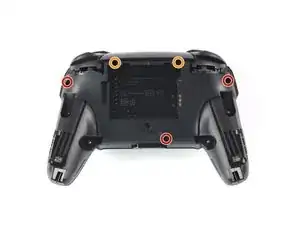
    • Entferne die fünf 6 mm Kreuzschlitzschrauben auf der Rückseite des Controllers:

    • Die beiden Gehäuseschrauben über den Handgriffen und eine Schraube unter dem Akku sitzen nicht sehr tief. Diese Schrauben können leicht entfernt werden.

    • Die beiden Schrauben neben der ZR und der ZL Schultertasten sitzen in tiefen Löchern. Um an sie heranzukommen musst du eine Bitverlängerung oder einen Schraubendreher mit langem Schaft verwenden.

    the 2 screws up at the top are unreachable with the standard fixit kit just a heads up

    drew -

    Seconded. the screws are located too deep below the plastic slot, and the bit holding bulge is too wide for the small aperture (similarly with the flexible extension). the bit length is too shallow to reach.

    An alternative driver with a much narrower & longer shaft is required, which will likely not come with interchangeable bits.

    Douglas Selby -

    I would say it is possible to reach the top left screw, just not the top right - there is a gap in the top left that allows you to slightly bend the standard driver outward to turn it while still making adequate contact.

    El_Mechacontext -

    An update: I was actually able to remove the top right one in a really hacky way - inserting the Phillips #0 bit into the #4 hex bit, and then using that in the standard driver. This added just enough length to successfully reach and make full contact with the screw!

    El_Mechacontext -

    Using the #4 hex bit as an extension was the exact "hack" I needed to get rid of the drift finally. Thank you. You're a lifesaver.

    Das #4 Hex Bit als Verlängerung für das Kreuzschlitz Bit zu nutzen ist zwar etwas eng, aber es erspart einem wirklich einen zusätzlichen Schraubendreher.

    Techn0magier -

  8. PnIrdtdY4KCyxuKK
    PnIrdtdY4KCyxuKK
    ZBKtxPXnhQuBTaDN
    OZcevYGCPPARFaRx
    • In der Mitte jedes Handgriffs gibt es ein Klebepad. Du benötigst etwas Kraft, um sie von der vorderen Abdeckung loszuhebeln, denke an die daran befestigten Flachbandkabel.

    • Nimm die Kunststoffabdeckung des Controllers behutsam ab.

    • Entferne die Abdeckung noch nicht ganz, sie ist noch mit einem weißen Flachbandkabel an der Hauptplatine angeschlossen.

    Didn't realize there is adhesive holding the front cover onto the unit. It's located inside of the handles. Just a bit of force there helped, just be careful of the cable.

    Roger Perez -

    this step is really hard

    XDchlapec -

    You can use a pry tool to pry the part of the top shell covering the handles off the adhesive in order to make this step less like pulling teeth.

    Charlie -

  9. NpVhXDsYSWmW4tBT
    NpVhXDsYSWmW4tBT
    QXe1DlCMuCXbrveX
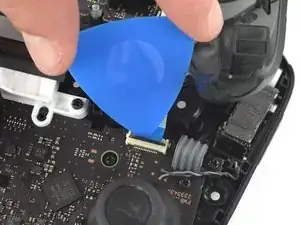
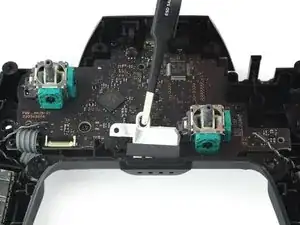
    • Drücke den schwarzen Sicherungsbügel am ZIF-Anschluss mit der Spitze eines Plektrums zum Öffnen nach oben.

    Having just completed this repair, I noted that this ribbon cable can disconnect on either side. It is easier to disconnect and reconnect from the other side than what is shown in my experience.

    acestronautical -

    @acestronautical is right! much easier to remove the ribbon cable from the button board, connect to the base board and then connect back to the button board. Thank you @acestronautical

    Joe Rickerby -

  10. 3qj6VtFJtKAHHm6I
    3qj6VtFJtKAHHm6I
    YJvaLXngDhvHF1Gr
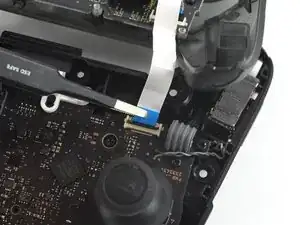
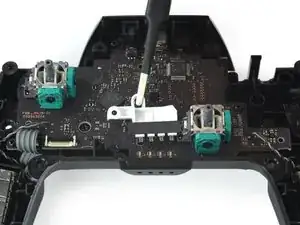
    • Löse das Verbindungskabel mit deinen Fingern oder einer stumpfen Pinzette aus seinem Anschluss.

    You don't need to disconnect this as long as you are fine with keeping it close by so as not to rip the ribbon cable.

    Caden Helm -

  11. OpC2vBHXBB35uAQ4
    • Entferne das vordere Gehäuseteil.

  12. fmhalkYPurcsCRYL
    fmhalkYPurcsCRYL
    elaYKLLtkDSyGABw
    rEIOPXEXhFo3sEO1
    • Ziehe mit leichter Kraft die beiden Joystickkappen vom Controller ab.

  13. HpPnoTw2oVU5odHN
    HpPnoTw2oVU5odHN
    pBBnnW3FYeTkDTo4
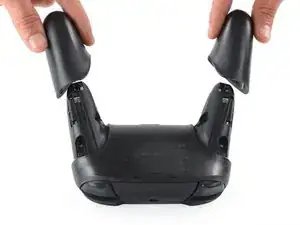
    • Setze einen Spudger mit der Spitze in die Öffnung auf der Rückseite am rechten Griff des Controllers.

    • Drücke den Spudger hinein um den Kleber zu lösen, der die Rüttelmotore festhält.

  14. ywrKJmgVYNUGlrUM
    ywrKJmgVYNUGlrUM
    BISvKHpMS1DNiXYW
    • Setze einen Spudger mit der Spitze in die Öffnung auf der Rückseite am linken Griff des Controllers.

    • Drücke den Spudger hinein um den Kleber zu lösen, der die Rüttelmotore festhält.

  15. pSXEQWgJfaVMvFBE
    pSXEQWgJfaVMvFBE
    eGaKJXVbGkns5qSd
    • Hebe die Rüttelmotore mit einer Pinzette hoch.

  16. mPwXoXbItirFTqAd
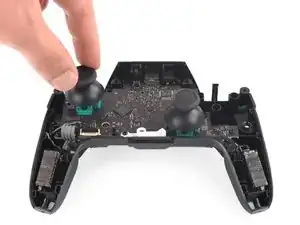
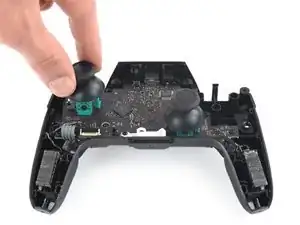
    • Entferne die vier 5 mm langen Kreuzschlitzschrauben, mit denen die Hauptplatine befestigt ist.

  17. DkHZNPYKTFgGGwQj
    DkHZNPYKTFgGGwQj
    rdqd3X5NWRvfAASb
    mjhakMjwswRNykjv
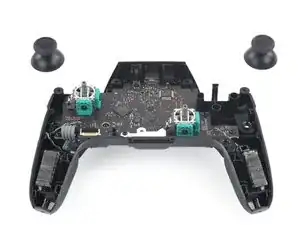
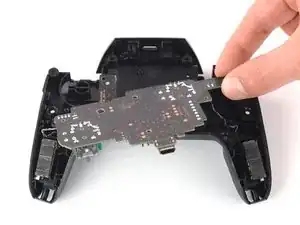
    • Entferne die weiße Einfassung für die LED-Beleuchtung mit den Fingern oder einer Pinzette.

  18. NjOknKYPoSaynVej
    NjOknKYPoSaynVej
    yk6VDfhaUbXCxAKg
    eJTHvLHbRrQqKjIC
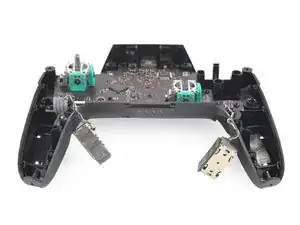
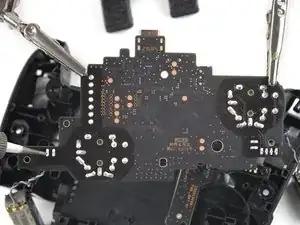
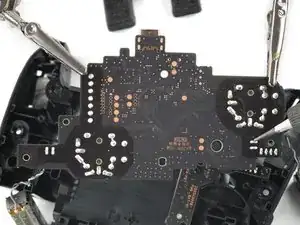
    • Hebe die Hauptplatine vorsichtig nach oben, achte dabei auf die Kabel. Drehe die Platine um, um an die Rückseite zu gelangen.

  19. jsM6bSetmHAUvnrX
    jsM6bSetmHAUvnrX
    BKEhDG2Dpey1MUgQ
    iaJsCB6DwLfg6mjT
    • Entlöte die Lötstellen der Rüttelmotore links und rechts auf der Hauptplatine

    • Entferne die Rüttelmotore.

    • Wenn du noch nie gelötet hast, schaue in unsere Lötanleitung.

    • Löte die neuen Rüttelmotore an den Lötstellen fest.

  20. w3qbCOXWMVolaIbO
    w3qbCOXWMVolaIbO
    YqWVmhIyIqbFOLLB
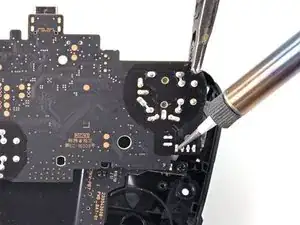
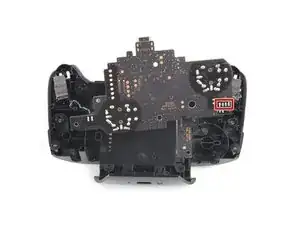
    • Entlöte das Kabel der Stromversorgung an den markierten Lötstellen.

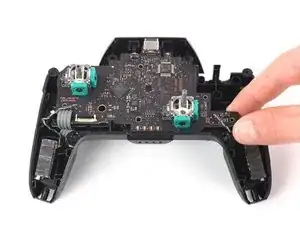
    • Entferne die Hauptplatine.

    I broke the main power cable (grey 4 pin) do you know what kind of cable it is that I would need as a replacement?

    S B -

Abschluss

Um dein Gerät wieder zusammenzubauen, folge den Schritten in umgekehrter Reihenfolge.

Jared Murphy Johnson

Mitglied seit: 16/09/20

275 Reputation

Ein Kommentar

maybe a tutorial about how you change the usb c port since there are no videos about the pro controller replacement anywhere

Del Meg -