Einleitung
Grundständige Anleitung
-
-
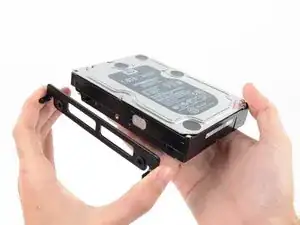
Entferne die vier 8,1 mm Torx T8 Einschraubstifte von der Festplatte und übertrage sie auf die neue Festplattenhalterung.
-

Abschluss
Um dein Gerät wieder zusammenzusetzen, folge den Schritten in umgekehrter Reihenfolge. Benutze unsere Anleitung für Klebestreifen, um das Displayglas wieder zu befestigen.
In my case these were T9 screw posts. Late 2012 iMac. They had traces of Loctite on them.
rsnadd -
Not sure if this is the right place to add this comment, but here goes: I bought a late 2015 iMac 27 which had only a 256Gb blade SSD in it, and wanted to upgrade it with additional storage. I'll not include everything here that I did, however I will mention that I discovered that it had the brackets inside for a 3.5" HDD, but no SATA cable. With a new cable and 2.5" SSD drive in an adapter, I now found that I had no screw posts to secure the SSD adapter in the mounting brackets. I searched everywhere online, but couldn't find any to buy. I procured some (brass) logic board mounting posts with the proper thread gauge to fit the SSD adapter which I then filed to an appropriate round shape that would hold the adapter in the mounding brackets. Problem solved.
By the way: I grabbed one post in my drill to spin them while filing them round. Holding one post in the drill, I could screw a second one into it for filing, lastly placing a finished post into the drill to modify the last post. Worked like a charm!
VikingShips -