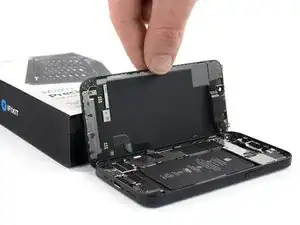
Einleitung

Akkus im iPhone sollten nach 500 Ladezyklen noch mindestens 80% ihrer ursprünglichen Kapazität haben, das genügt bei einem durchschnittlichen Benutzer für 18 bis 24 Monaten. Danach muss das iPhone wahrscheinlich öfter geladen werden und iOS gibt eine Warnung aus, dass die Leistung eingeschränkt ist (anders gesagt: das iPhone wird langsamer). Diese Anleitung zeigt, wie der Akku getauscht werden kann, um wieder die ursprüngliche Leistungsfähigkeit zu erhalten.

Wenn dein Akku aufgebläht ist, musst du geeignete Vorsichtsmaßnahmen treffen.

Hinweis: Unter iOS 17.6 und früher kann es vorkommen, dass dein iPhone nach der Reparatur eine Warnung über die "Echtheit" des Akkus ausgibt, selbst wenn Originalteile verwendet wurden. Wenn dein iPhone normal funktioniert, brauchst du diese Meldung nicht zu beachten. Unter iOS 18 und neuer musst du den Akku mit Hilfe von Apples Repair Assistant authentifizieren.

Du wirst für den Zusammenbau Ersatzklebestreifen benötigen, um die einzelnen Komponenten wieder zu befestigen.

  1. JVwauFGp15pboki4
    JVwauFGp15pboki4
    6ZrVNyXTV2DYTb13
    • Bevor du beginnst, entlade deinen Akku auf unter 25%. Ein geladener Lithium-Ionen-Akku kann sich entzünden und/oder explodieren, wenn er bei der Reparatur versehentlich beschädigt wird.

    • Schalte dein iPhone aus, bevor du mit dem Zerlegen beginnst.

    • Entferne die beiden 6,7 mm langen Pentalobe-Schrauben an der Unterkante des iPhone.

    is it oem apple battery, because at some photo shows(Ifixit) and another shows (apple) ... wait your answer?

    karim -

    BEWARE! This screen isn’t the same as older iPhone models’ screens. The iPhone mini 12-screen comes with a thin plastic frame around the screen on its back. Thus, make sure you don’t insert the pick in between the screen and its plastic frame, as you’ll seperate the screen and leave the plastic frame still sitting in the phone’s metal housing (this cost me 100 dollars…). Carefully heat the sides of the metal housing and do not heat directly on the glass, as doing so will potentially loosen the glue from the plastic frame stuck to the screen. My suggestion is that you watch a video of this repair as this step-by-step-guide is undercooked.

    Dan -

    This is an excellent comment. Following this step-by-step guide to the letter will break your screen; it's by far the worst iFixit guide I've seen to date.

    Dormouse -

    Yup, that’s what happened to me. I will be reading the comments next time

    pinballnc -

    Ive finished mine and Soooo absolutely dont do this yourself🙌🏽 unless your a mechanic because first of all they didnt send me all of the right tools🤗 and secondly the battery they gave me has an overly large component so it wont fit into my phone. And the absolute HASSEL i had to go through to even just get the package was insane it was a whole month of struggling just for the stuff to not even be right, in conclusion will NEVER order from here again..🤗

    Chanell -

  2. 6UPwoloGBO4tmVoS
    6UPwoloGBO4tmVoS
    BmSYPJmOy6dbHipF
    3EOdQPAGOmiuhoKU
    • Wenn du ein Plektrum zu tief einschiebst, kann das Gerät beschädigt werden. Dieser Schritt zeigt, wie du eine Marke am Plektrum anbringen kannst, damit das nicht passiert.

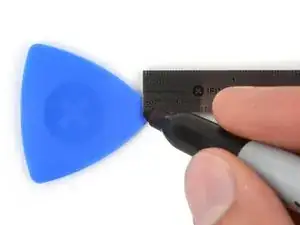
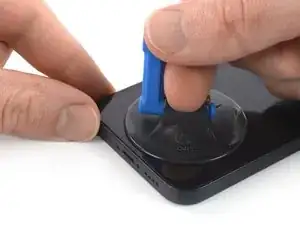
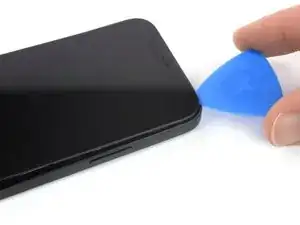
    • Zeichne mit einem Permanentmarker 3 mm von der Spitze des Plektrums entfernt einen Strich.

    • Du kannst die anderen Ecken ebenfalls mit Strichen in verschiedenen Abständen markieren.

    • Du kannst auch eine Münze so mit einem Klebeband auf das Plektrum kleben, dass sie einen Abstand von 3 mm zur Spitze hat.

    Got to step 2 and realized the fix kit doesn't include an opening pick! Looks like a guitar pick, and I have those lying around. Is that expected? Looks like the pick is used in many steps below. There's a little blue crowbar that isn't mentioned in the instructions. Perhaps that replaces the opening pick?

    Sloan Looney -

    Hi! I can't see which guide you were using when writing this comment. Can you reply here with which guide and fix kit you used?

    Clay Eickemeyer -

    I see you posted this in Meta. I hope it's resolved soon! In the meantime, a guitar pick may work well enough for your repair.

    Clay Eickemeyer -

    what fix kit?

    Meow Purr -

    My fix kit didn't include an opening pick either

    WILLIAM HARRIS -

    Make sure you check inside the black boxes after emptying them. My pick was stuck inside one of the boxes.

    AndyF -

    My AliExpress refurbished screen came with a pick that has a coin-like circle that pops out, so no modification was necessary

    Gijs Leegwater -

    the picture shows 3 cm but the description says 3 mm's. Which one is it?

    John Pena -

    That is a misunderstanding. It is a ruler with a scale for cm, it shows 0.3 cm, i.e. 3 mm.

    VauWeh -

    Oh, come ON!

    Big Ed -

    It will ALWAYS be millimeters on a phone, but this step is ridiculous, skip it!

    Leif DeWolf -

    @leifdewolf I wouldn't skip it for a first repair.

    Gabriel-Science -

    It's not an Ifixit KIT if it doesn't include everything. You'll need to order the opening pic separately. Or head to Walmart like myself and look for guitar pics. Hopefully, this will work just as well.

    Jaleeljb97@icloud.com -

    No pick in mine as well. It’s really not clear that you have to order this separately when ordering an IPhone SE 202/2022 screen repair kit. Is this the case?

    Jackson Castiglione -

    Frustrated, I ordered a compact package where everything was encapsulated. Useless suction tools could not separate the screen. If it is unable to decouple the screen, then why sucking suction tools you have provided.

    Shourob Datta -

    For my kit the triangle pick was stuck inside the box with the screen not with the other tools maybe it's also there for you

    Henry Scheibehenne -

    Y’all are getting far, FAR too detailed with some of this stuff…. Measuring and marking the pick that you won’t actually use to open the device?!? lol that’s kinda funny. Just heat it up, grab a spudger, and the back just pops right off! The iFixit tech need to stick to the KISS method more often, you know KEEP IT SIMPLE STUPID!!! Like l, for reals, I’ve been doing this stuff for YEARS and using iFixit guides regularly and this is just ridiculous at this point!

    Leif DeWolf -

    Will the phone still work if the sensor assembly on the back of the screen is damaged?

    Mutshidzi Rambau -

    I don't have a pick, but how much better are these picks than an old credit card for opening an iPhone 13 mini?

    mike eng -

    The pick in my iFixIt kit was packed with the battery, not with the rest of the toolkit.

    Tony Houlihan -

  3. 1CjogrubnNxIGvrd
    1CjogrubnNxIGvrd
    pXY5VoUJ1hFuERqR
    Q1eZoASRSIbOibcj
    • Wenn das Display deines iPhone gebrochen ist, überklebe die Risse mit Klebeband, um weitere Schäden zu vermeiden und Verletzungen vorzubeugen.

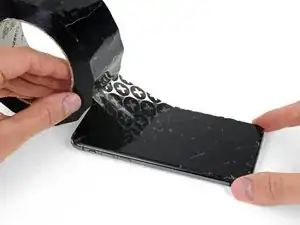
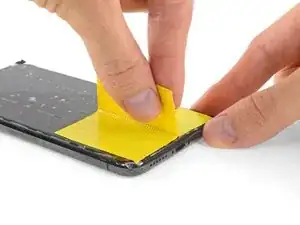
    • Klebe überlappende Klebestreifen auf das Display, bis es vollständig bedeckt ist.

    • Trage eine Schutzbrille, um deine Augen während der Reparatur vor Glassplittern zu schützen.

    • Falls der Saugheber nicht hält, kannst du ein Stück festes Klebeband (z.B. Panzertape) zu einem Griff falten und das Display damit anheben.

    • Wenn alle Versuche das Display zu lösen scheitern, kannst du den Saugheber mit Sekundenkleber am Display festkleben.

  4. 5SDAKLhJ2tKixZi2
    5SDAKLhJ2tKixZi2
    ptSQJmqMjcBBW1st
    Rb3dmudH5T5hUrmc
    • Wir haben die Anti-Clamp entwickelt, um das Öffnen von Geräten zu erleichtern. Die nächsten drei Schritte zeigen, wie sie verwendet wird. Wenn du sie nicht benutzen willst, überspringe die nächsten drei Schritte und folge einer anderen Methode.

    • Genaue Anweisungen für die Anti-Clamp findest du hier.

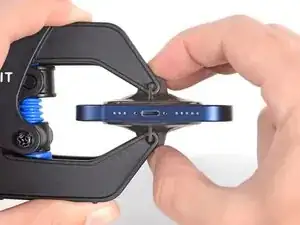
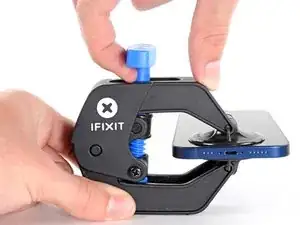
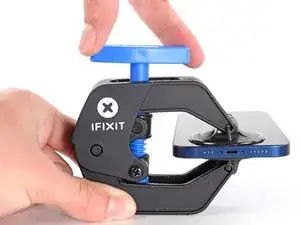
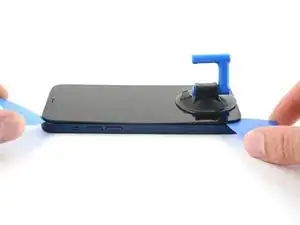
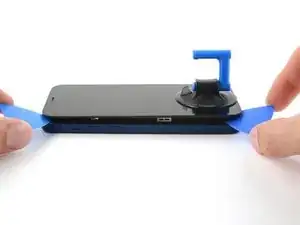
    • Drücke den blauen Griff zurück, damit die Arme der Anti-Clamp frei beweglich werden.

    • Schiebe die Arme entweder über die linke oder die rechte Kante des iPhones.

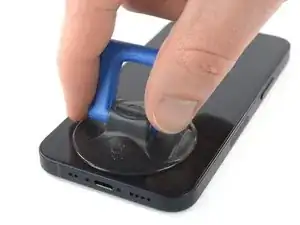
    • Bringe die Saugheber nahe an der Unterkante des Displays an, einen auf der Vorderseite, den anderen auf der Rückseite.

    • Drücke die Saugheber zusammen, so dass sie auf den Oberflächen haften.

    • Wenn die Saugheber nicht gut auf den Oberflächen des iPhones haften, dann kannst du Stücke aus Klebeband verwenden, um eine griffigere Oberfläche zu schaffen.

  5. FsT3FA5QaEWxaiEg
    FsT3FA5QaEWxaiEg
    1idtRJHPlsFJBJES
    xf6uNSGb6GPTDJQd
    • Drücke den blauen Griff vorwärts, um die Arme wieder zu verriegeln.

    • Drehe den Griff eine volle Umdrehung im Uhrzeigersinn, oder bis du merkst, dass sich die Saugheber dehnen.

    • Achte darauf, dass sich die Saugheber weiterhin gegenüber stehen. Wenn sie sich nicht mehr gegenüber stehen, dann löse die Saugheber ein wenig ab und schiebe sie in die richtige Position.

  6. DpZCL6axAepLaTCc
    DpZCL6axAepLaTCc
    atEF2NMTghnIiSsM
    ALaITu6uDhQqZvXN
    • Lege dein iPhone auf einen stabilen Gegenstand, z.B. ein Buch mit festem Einband. Es sollte frei und parallel zur Arbeitsfläche liegen, dadurch wird die Arbeit bei nachfolgenden Schritten leichter.

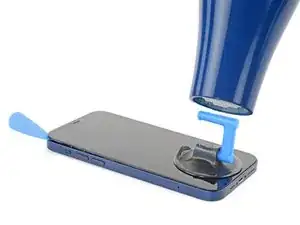
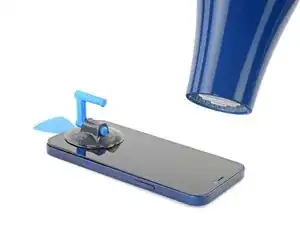
    • Erwärme die Unterkante des iPhones mit einem Haartrockner. Sie sollte so heiß sein, dass du sie gerade noch anfassen kannst.

    • Warte eine Minute, damit sich der Kleber lösen und ein Spalt entstehen kann.

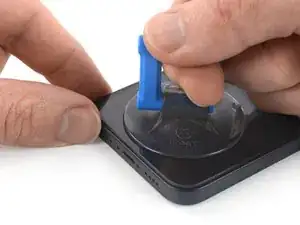
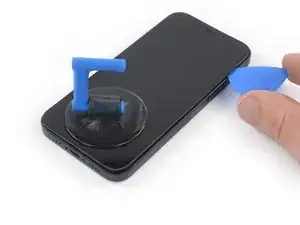
    • Wenn mithilfe der Anti-Clamp ein ausreichend großer Spalt entstanden ist, setze ein Plektrum in den Spalt unter die Kunststoffblende am Display ein.

    • Achte darauf, dass das Plektrum genau zwischen der Kunststoffblende und dem Rahmen sitzt, damit das Display nicht beschädigt wird.

    • Wenn es nicht gelingt, mit der Anti-Clamp einen ausreichend großen Spalt zu erzeugen, dann erwärme die Stelle nochmals und drehe den Griff eine viertel Umdrehung im Uhrzeigersinn weiter.

    • Drehe den Griff jeweils nicht mehr als eine viertel Umdrehung weiter und warte jedes Mal eine Minute lang. Gib der Anti-Clamp Zeit, ihre Arbeit zu erledigen.

    • Überspringe die nächsten drei Schritte.

  7. qIfcdOsDsjmJl2VY
    • Wenn das iPhone geöffnet wird, wird der Feuchtigkeitsschutz beeinträchtigt. Halte neue Klebestreifen bereit, bevor du mit diesem Schritt beginnst, oder vermeide in Zukunft alle Flüssigkeiten, wenn du die Klebestreifen nicht ausgetauscht hast.

    • Durch das Erwärmen der Unterkante des iPhone weicht der Displaykleber auf und das Display kann leichter geöffnet werden.

    • Erwärme die Unterkante des iPhones 90 Sekunden lang (bzw. so lang, bis du sie gerade noch anfassen kannst)mit einem Haartrockner oder einem Heißluftgebläse.

    • Richte den Heißluftstrom nie zu lange auf eine Stelle.

    • Wenn sich das iPhone schwer öffnen lässt, ist der Kleber wahrscheinlich zu stark abgekühlt. Erwärme ihn wieder, um ihn aufzuweichen.

    you need to clarify that you're heating the metal frame, not the glass. I gently heated the glass front with a heat gun and proceeded to pull the display apart, destroying it. :-(

    Jim Harger -

    Don't heat up the display for too long or else you could destroy the display like I did. Now I have a phone with a giant white stripe. So don't be a fool like me. 1 to 2 minutes is enough!

    K T -

  8. MKV3OGqZaxNHEhUc
    MKV3OGqZaxNHEhUc
    hHhDVWStBbPQpiZN
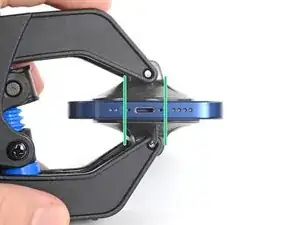
    • Wenn du einen einzelnen Saugheber benutzen willst, dann bringe ihn so nah wie möglich an der Unterkante des Smartphones an.

    • Wenn dein Display stark gesplittert ist, dann haftet der Saugheber vielleicht besser, wenn du die Scheibe mit durchsichtigem Paketband abklebst. Anstelle des Saughebers kannst du auch sehr starkes Klebeband befestigen. Wenn das alles nicht hilft, dann klebe den Saugheber mit Sekundenkleber an der zerbrochenen Scheibe fest.

    I would recommend starting with a bottom corner, not the bottom middle. If the adhesive isn't softened enough, you will pull the middle out but the sides will still be stuck on, causing extreme flex to the panel and damage to the panel down the middle (white bars down the middle in a worst case). I did this to my phone.

    Drew Kosir -

  9. nQTSoddbEVTMfZHR
    nQTSoddbEVTMfZHR
    KlrDYepF3DQrMwU5
    jdiUyLciFyBYDGOm
    • Ziehe den Saugheber fest und gleichmäßig nach oben, so dass ein kleiner Spalt zwischen dem Display und dem Rahmen entsteht.

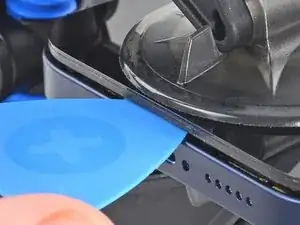
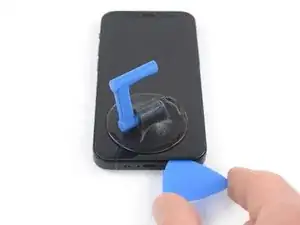
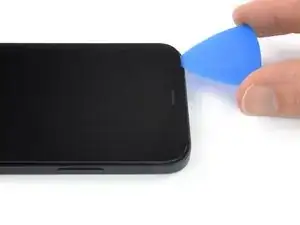
    • Setze ein Plektrum in den Spalt unter der Kunstoffblende am Display ein.

    • Achte darauf, dass das Plektrum genau zwischen der Kunststoffblende und dem Rahmen sitzt, damit das Display nicht beschädigt wird.

    • Das Display ist stark mit wasserfestem Kleber befestigt. Um den Spalt zu erzeugen, muss ziemlich viel Kraft aufgebracht werden. Wenn dies zu schwer geht, dann erwärme es nochmals und ruckle die Scheibe vorsichtig auf und ab, bis der Kleber schwächer wird und ein genügend großer Spalt für das Plektrum entsteht.

    I ended up separating my screen rather than getting under the scren casing.. BE CAREFUL TO MAKE SURE YOU ARE UNDER THE PLASTIC PART - otherwise you just ruin your screen... No mention of this precaution here and as a result, my phone is more broken than when I started

    Tyler Ludwig -

    Hi, I don’t get it. Should the plastic part stay with the display or with the phone?

    Paul -

    The plastic frame should stay with the display.

    Carsten Frauenheim -

    Be sure you see two layers: glas and plastic (Step 6, Clamp, last picture). You have to go underneath the plastic frame otherwise you are tearing your displayglas off the frame and destroy your OLED!

    Johnny RS -

    Broke the screen. Too bad. I've done maybe 5 battery replacements before. But this one is very very tight. Got a new phone. :P

    Gilles van Leeuwen -

    Same thing, I broke my screen too. I think the warning should be in all caps and show more clearly where is the right place to put the pick and where is not — without the need to click on the link.

    Judging by amount of people who reported it here (and should also account for those who didn't bother to report), I'd say that there is a problem with instructions.

    It is honestly not so hard if you know what does mistake looks like and that it is possible to separate the screen so easily from the frame. I repaired more than a dozen phones — screens and batteries — and this is the first time I made such a mistake that costs 100+euros.

    Axel Mort -

    something, broke my screen by inserting the pick in between. also wish the hair dryer has pointed to the side rather than the display. damaged my display after replacing battery, so my phone is more broken than when I started

    Ghalia Naseer -

  10. bv1agNYR2AZSRh4i
    bv1agNYR2AZSRh4i
    QKZUYPEDGXwEWFW2
    • Erwärme die rechte Kante des iPhones (die Kante mit der Einschalttaste) 90 Sekunden lang (bzw. so lange, dass du sie gerade noch anfassen kannst) mit einem Haartrockner.

    The pictures show the left side. I know that the left side is the correct one to heat, but for others it might be confusing. 😊

    Donát Viosz -

    @dviosz You mean the right edge! The picture shows the left edge but the right edge is the correct one to heat. As described in the text next to it. Opening the phone from the left will damage it!

    catchMyException -

    Yeah, sorry, you are right! (tried to make something less confusing and created more confusion by accident… 😃 )

    Donát Viosz -

    THIS ONE HERE (lolz)

    weebeast -

  11. A1oBwCyETfZ3eBwg
    A1oBwCyETfZ3eBwg
    nOJW3MH4vbghr4vJ
    kLNvCWTAVyBPWgjF
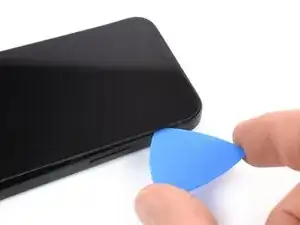
    • Schiebe das Plektrum um die untere rechte Ecke herum und an der rechten Seite des Smartphones nach oben, um den Displaykleber aufzutrennen.

    • Setze das Plektrum nicht tiefer als 3 mm ein, du könntest innere Bauteile des iPhones beschädigen.

    Be very careful your tool does NOT go in between the screen and the screen frame but rather in between the screen frame and the phone frame. If not you will damage the screen and need a new one. This has happened to MANY people. The screen is attached to the screen frame with an adhesive that can also be accidentally pried apart if not done carefully. This is probably more likely if your tool is too thin, if you dont heat enough, or dont suction and pull enough to create a big enough separation between the screen frame and the phone frame.

    Ezra Gilbert -

    Yes, this happens to me, too. It took a long time until I could remove the screen using a heat gun with a heat gun set to 120°C (after trying first with 90° and 100°). Now the right side of the display shows white stripes and the touch doesn't react. -> New display necessary...

    Bernd Löhr -

    same as @bernd lohr.

    Ghalia Naseer -

  12. jlAuMwmQ6WRMXnpn
    • Erwärme die Oberkante des iPhones 90 Sekunden lang (bzw. so lange, dass du sie gerade noch anfassen kannst) mit einem Haartrockner.

  13. luVslv2EJDPHjdFY
    luVslv2EJDPHjdFY
    bhGJkCcPB6iwKJWR
    tMyUCZXybbOw6SsY
    • Die Oberkante des Displays ist sowohl verklebt als auch mit Clips befestigt.

    • Setze das Plektrum an der rechten oberen Ecke des Glasscheibe ein.

    • Schiebe das Plektrum um die obere rechte Ecke herum. Aufgrund der Rasten spürst du wahrscheinlich etwas Widerstand.

    • Setze das Plektrum nicht tiefer als 3 mm ein, du könntest sonst die Sensorgruppe am Frontpanel beschädigen.

    • Wenn du dabei die Glasscheibe behutsam zur Unterkante es Smartphones hin ziehst, geht es etwas leichter.

    • Schiebe das Plektrum an der Oberkante entlang und trenne den restlichen Kleber auf, mit dem das Display befestigt ist.

  14. bn6svgDdnTZqo1Li
    bn6svgDdnTZqo1Li
    ZM3kLhdMRgUEI2rG
    • Erwärme die linke Kante des iPhones 90 Sekunden lang (bzw. so lange, dass du sie gerade noch anfassen kannst) mit einem Haartrockner.

  15. AcI1PTLBB3LgoSVC
    • An der linken Seitenkante des iPhones verlaufen zwei empfindliche Kabel, eines oben, das andere etwas unterhalb der Mitte. Setze hier kein Plektrum ein, du könntest sonst das Kabel beschädigen.

    There are two cables, one near the top, another lower than the middle on the left side. Further steps show where the second one is, but this picture doesn't show it...

    mesanos -

    Welches Ersatzteil benötige ich, wenn die obere Verbindung gerissen ist?

    Claudia T. -

    If the inside of your phone looks different than these photos (like me) then you may have only removed the top layer of the screen assembly. The bottom layer should pry up easily enough with tweezers.

    macro -

    I accidentally tore the cables off. What can I do?

    Alma Hernandez -

    The display flexy is in the middle of the left side, please update the picture showing the flexy connected and highlight in red, so other users don't damage it as I did :(

    Juan David Zuluaga -

    Updated -- thank you! Does this look better?

    Spencer Pennington -

  16. uNtM2YKyVD2BKNwq
    uNtM2YKyVD2BKNwq
    OyXrlHMUOR2dqtME
    • Setze ein zweites Plektrum in die untere linke Ecke des iPhones ein.

    • Verdrehe beide Plektren gleichzeitig, bis sich die Rasten an der linken Seite lösen.

    • Steigere allmählich die Kraft beim Verdrehen.

    • Wenn sich der Kleber nicht lösen lässt, erwärme die Kante nochmals.

    Don't go from just one corner (like on the right side). I've done that (forgot this step) and broke my screen.

    Donát Viosz -

  17. GKjjmXfhwhaIRErW
    GKjjmXfhwhaIRErW
    2JqHTqMrNqKn2oIC
    Bgygc1XwrnZIXYqP
    • Drehe das iPhone so, dass die rechte Kante zu dir zeigt.

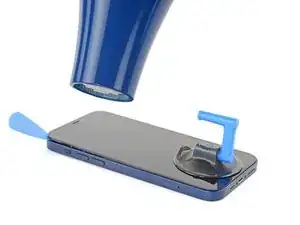
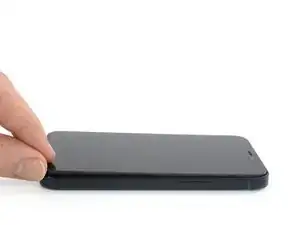
    • Öffne das iPhone so, wie man einen Buchdeckel von rechts her aufschlägt.

    • Versuche noch nicht, das Display ganz zu entfernen, es ist noch mit empfindlichen Flachbandkabeln am Logic Board des iPhones angeschlossen.

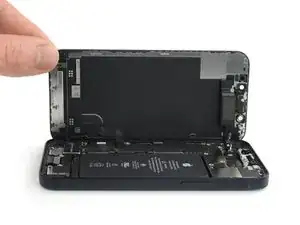
    • Lehne das Display gegen einem stabilen Gegenstand, so dass es während der Reparatur senkrecht stehen bleibt.

    • Lege das Display beim Zusammenbau in der richtigen Position hin und richte die Rasten an der Oberkante aus. Drücke dann erst die Oberkante fest und lasse das restliche Display einrasten. Wenn es nicht gut einrastet, dann überprüfe den Zustand der Rasten um den Rand des Displays, achte darauf, dass sie nicht verbogen sind.

  18. s32v5LyOyuYgWKwK
    s32v5LyOyuYgWKwK
    LZTDcUatrTtkQdMX
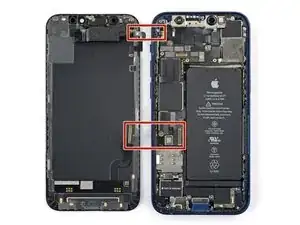
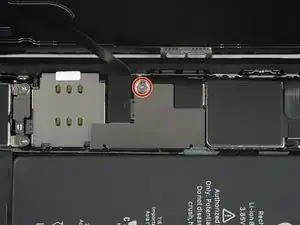
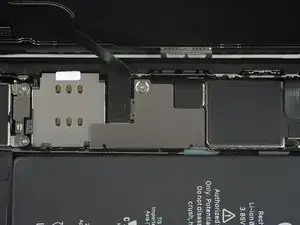
    • Entferne die beiden 1,25 mm langen Y000 Schrauben, mit denen die Halterung an der Abdeckung am Stecker des Akku- und Displaykabels befestigt ist.

    • Halte während der ganzen Reparatur alle Schrauben gut geordnet und achte darauf, dass jede Schraube an ihren alten Platz zurück kommt, sonst kann das iPhone schwer beschädigt werden.

    • Beim Zusammenbau ist jetzt eine gute Gelegenheit, um alle Funktionen zu testen, bevor du das iPhone wieder zuklebst. Vergiss nicht, es danach wieder auszuschalten.

    hallo, ich sehe in Schritt 17 nur EINE markierte Schraube... (?)

    marrei1964 -

    So i got the kit how do you expect with the tools you gave me i should get that tiny screw out?? Its requires a 3 way screw i have a 4 and 2 5 ways 🤔

    Chanell -

    This Shield is garbage and once it's taken out it's next to impossible to get back in. I'm not even going to put the shield back in I'm just going to put kapton tape over it and call it good.

    Zach Benson -

  19. sSx1WV2GJT4GTDvI
    sSx1WV2GJT4GTDvI
    XJvryN6fwJQrk14F
    • Entferne die Halterung des Display- und Akkukabelsteckers mit einer Pinzette.

    • An der rechten Kante der Halterung für den Stecker befinden sich zwei kleine Scharniere. Achte darauf, dass du sie beim Zusammenbau richtig in ihre Gegenstücke einfügst.

  20. lQtM3wSEjFBP4bUT
    lQtM3wSEjFBP4bUT
    cAGmO4Gkg5y1sdJM
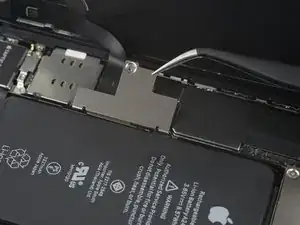
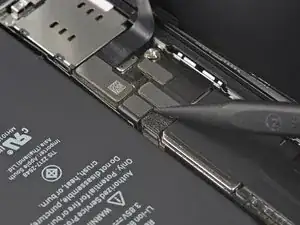
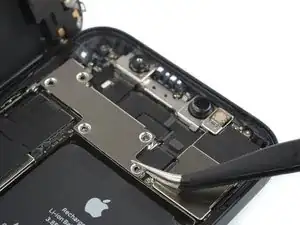
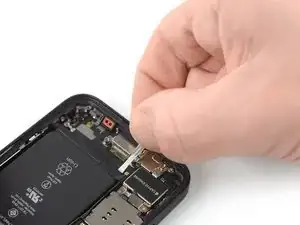
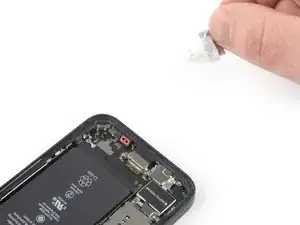
    • Heble den Akkustecker mit einem Spudger oder dem Fingernagel aus seinem Anschluss auf dem Logic Board hoch.

    • Beschädige dabei nicht die schwarze Silikondichtung am Stecker. Diese Dichtungen schützen zusätzlich gegen Staub und Feuchtigkeit.

    • Biege den Stecker ein wenig vom Logic Board weg, damit er sich nicht wieder versehentlich verbinden und während der Reparatur das Gerät mit Strom versorgen kann.

  21. Bg2WOTycx6pQSryg
    Bg2WOTycx6pQSryg
    IMpe3jXIrjPmFpZ3
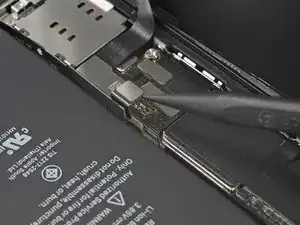
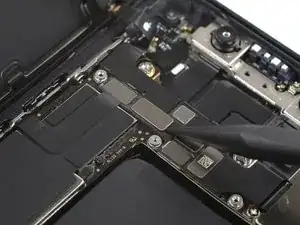
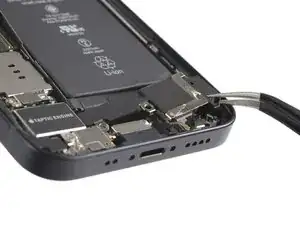
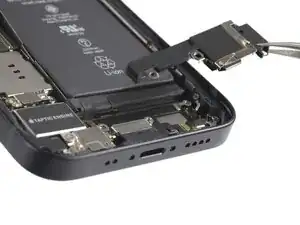
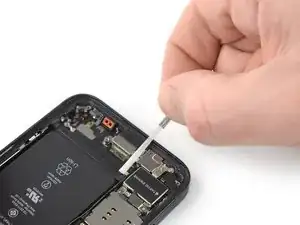
    • Heble den Stecker am OLED-Displaykabel mit einem Spudger oder dem Fingernagel aus seinem Anschluss auf dem Logic Board hoch.

    • Um Press-fit-Verbinder wie diesen hier wieder anzuschließen, musst du ihn sorgfältig ausrichten und erst an einer Seite herunterdrücken, dann an der anderen. Drücke nicht in der Mitte. Wenn der Stecker nicht richtig aufgesetzt wird, können die Kontakte verbogen und dauerhaft beschädigt werden.

  22. nPYF4uJRS6rlvqj5
    nPYF4uJRS6rlvqj5
    CvgjiiCJADpTTDXb
    • Entferne die fünf 1 mm langen Y000-Schrauben, mit denen die Abdeckung der Frontsensoreinheit befestigt ist.

    There is an error here. There are different screws. 2 large and 3 small.

    zeidin09 -

    what 3 are the small ones? I don't know anymore

    Thomas Klep -

    in case anyone else reads this, the 3 small ones screw directly onto the board. the two longer ones screw into standoffs (the two top screws, based on the picture above)

    Skyejobs -

  23. uQjgeWT2KXfFZYOA
    uQjgeWT2KXfFZYOA
    OTkQXcHJLAQwguIy
    • Entferne die Halterung der Frontsensoreinheit mit einer Pinzette.

  24. GZpFOHpLepHvKBKQ
    GZpFOHpLepHvKBKQ
    bRxWP1dlhidDyEDy
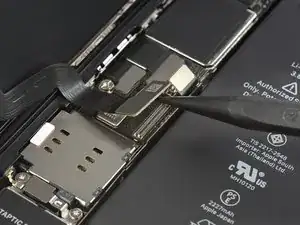
    • Trenne den Stecker am Kabel zur Frontsensoreinheit mit einem Spudger oder dem Fingernagel ab.

  25. 6WvMQVuRTVALGms5
  26. pYZMIXpWMncYTXB2
    pYZMIXpWMncYTXB2
    1Lb14GBcFCcbjEGV
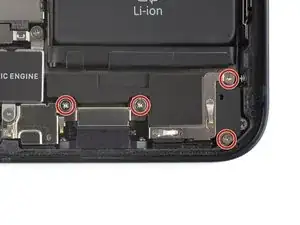
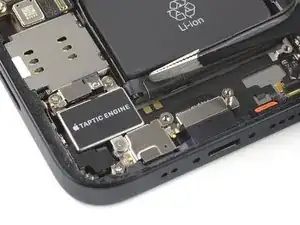
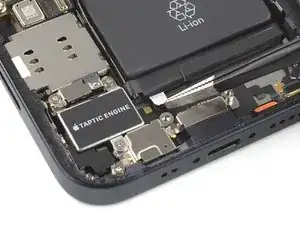
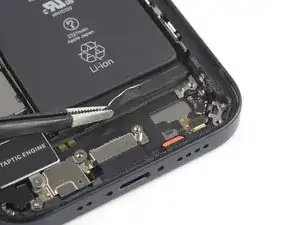
    • Entferne die vier 1,5 mm langen Kreuzschlitzschrauben #000, mit denen der Lautsprecher befestigt ist.

  27. ZY4plW2TuMj4XZbT
    ZY4plW2TuMj4XZbT
    DMnyDZUBsRcu4B16
    • Entferne den Lautsprecher mit einer Pinzette .

  28. IXFdefICht1JmsCX
    IXFdefICht1JmsCX
    aRDFj32xSi2aOrXH
    • Löse die Zuglasche am ersten Klebestreifen von der Unterkante des Akkus ab.

    • Beschädige den Akku nicht mit irgendwelchen scharfen Werkzeugen. Aus einem angestochener Akku können gefährliche Chemikalien austreten oder der Akku kann sich entzünden.

  29. RbRZYsTTrZ5YU4jR
    RbRZYsTTrZ5YU4jR
    D6sBxcLgi4odOHZU
    CGdtKBeZpeL4esnV
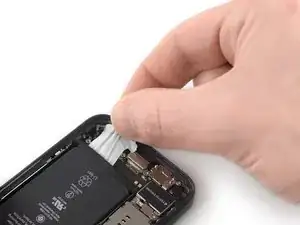
    • Fasse die Zuglasche mit den Fingern und ziehe sie langsam vom Akku weg zur Unterkante des iPhones hin.

    • Ziehe fest genug, damit der Streifen gespannt bleibt, aber auch nicht zu fest. Lasse dem Streifen Zeit, sich auszudehnen und unter dem Akku loszulassen.

    • Drücke den Akku nicht nach unten. Halte das iPhone an den Seiten fest.

    • Halte den Streifen glatt und knittere ihn nicht. Ziehe gleichmäßig am gesamten Streifen, nicht in der Mitte oder an der Seite.

    • Ziehe in einem flachen Winkel, damit der Streifen nicht an der Kante des Akkus entlang schabt.

    • Wenn der Streifen reißt, dann versuche ihn mit den Fingern oder einer stumpfen Pinzette zu greifen und weiter herauszuziehen. Versuche nicht, unter dem Akku zu hebeln.

    • Wenn einer der Streifen unter dem Akku reißt und nicht herausgeholt werden kann, dann versuche zuerst, die anderen Streifen herauszuziehen. Fahre dann mit den nachfolgenden Schritten fort.

    Top side of battery have pull tabs too*

    rbhbokka -

  30. Ov15jwZUshuZqlvD
    Ov15jwZUshuZqlvD
    Bqo3LHPAULJXOaLY
    • Fasse die breite Zuglasche mit den Fingern und ziehe sie langsam vom Akku weg zur Unterkante des iPhones.

  31. m4Dco3nTwYRFXt23
    m4Dco3nTwYRFXt23
    VU14BAv6eAFeWRwP
    iTTTpcM1EvWRFdTF
    • Fasse die Zuglasche mit den Fingern und ziehe sie langsam vom Akku weg zur Unterkante des iPhones.

    • Wiederhole das vorige Verfahren für die beiden restlichen Zuglaschen.

    • Wenn der Streifen unter dem Akku reißt und nicht wieder herausgeholt werden kann, dann gib einige Tropfen hochkenzentrierten Isopropylalkohol (mindestens 90%ig) unter die Kanten des Akkus in der Nähe der gerissenen Streifen.

    • Lasse den Alkohol ungefähr eine Minute lang einwirken.

    • Hebe den Akku behutsam mit dem flachen Ende eines Spudgers an.
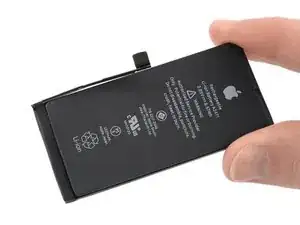
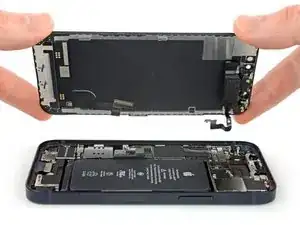
    • Heble den Akku nicht mit Gewalt heraus. Wenn es nötig ist, kannst du noch etwas mehr Alkohol dazu geben, damit der Kleber noch mehr aufgeweicht wird. Verbiege den Akku nicht mit dem Herbelwerkzeug und stich ihn nicht an.

  32. ErjPBxpvRlydekgR
    ErjPBxpvRlydekgR
    F6vE16AJCBHKNyYq
    • Entferne den Akku.

    • Wenn noch Reste vom Alkohol im Smartphone verblieben sind, dann wische sie sorgfältig weg oder lasse sie trocknen.

    • Verwende diese Anleitung, um neue Klebestreifen am Akku anzubringen.

    • Führe einen erzwungenen Neustart nach dem Zusammenbau durch. Dadurch können manche Probleme vermieden und die Fehlersuche erleichtert werden.

    I just buy this phone 5 months ago..and the battery health is 90%, why? I need to change the battery or not?

    andy terry -

    **before you install the new battery, plug the battery into the port, making it much easier to do than after you adhere the new battery into the phone. I found that the aftermarket battery terminal was longer than the factory batt, which complicated plugging it into the power terminal.

    Ryan Jung -

    Soooo absolutely dont do this yourself🙌🏽 unless your a mechanic because first of all they didnt send me all of the right tools🤗 and secondly the battery they gave me has an overly large component so it wont fit into my phone. And the absolute HASSEL i had to go through to even just get the package was insane it was a whole month of struggling just for the stuff to not even be right, in conclusion will NEVER order from here again..🤗

    Chanell -

    You can use a thin small long screwdriver to roll the adhesive tape around it once you have detached enough of it, it prevents it from ripping so that you don't have to use ethanol.

    Lucioh -

    You should specifically mention that the other two adhesive tabs are at the top of the battery

    pinballnc -

Abschluss

Schalte, falls möglich, dein Gerät ein und teste deine Reparatur, bevor du es zuklebst.

Befestige den neuen Akku mit vorgestanzten Klebestreifen oder doppelseitigem Klebeband. Damit der Akku richtig sitzt, musst du die neuen Klebestreifen an den gleichen Stellen im Gerät anbringen, wo auch die alten Streifen waren, nicht direkt am Akku. Drücke den Akku gut fest.

Um dein Gerät wieder zusammenbauen, folge den Schritten in umgekehrter Reihenfolge. Bringe neuen Kleber an, wo es nötig ist. Reinige die Klebestellen zuvor erst mit Isopropylalkohol (mindestens 90%ig).

Je nach Ersatzteil kannst du es möglicherweise mit Hilfe von Apples Repair Assistant kalibrieren, verfügbar ab iOS 18. Führe ein Update des Gerätes durch, navigiere zu Einstellungen Allgemein Über Parts & Service History, tippe auf Restart & Finish Repair, und folge den Anweisungen auf dem Display.

Für eine optimale Leistung, solltest du nach der Reparatur den neu eingebauten Akku kalibrieren.

Entsorge deinen Elektroabfall fachgerecht.

Hat die Reparatur nicht den gewünschten Erfolg gebracht? Versuche einige grundsätzliche Lösungen oder frage in unserem iPhone 12 mini Forum um Hilfe.

Dominik Schnabelrauch

Mitglied seit: 23/11/16

235812 Reputation

22 Kommentare

If you replace the battery (even with a first party one) you will need to go to Apple, unfortunately, as is for the new iPhone 13 models.

Roman -

Since iOS 17, I believe, they have a self-registering mechanism. OS will start a wizard to register replaced first-party battery without going to the store

rbhbokka -

I don't think it's stated clearly enough that the display adhesive is VERY strong and you might think you've gotton a big enough gap when sticking in a pick will actually separate the layers of the screen and break it (defintely not speaking from experience). Make sure the phone is totally, thoroughly heated and be very, very careful.

Wesley Halliwell -

+1

Tried it without the clamp for two hours and couldn‘t get it open. With clamp, it was opened within 30 minutes.

Overall battery replacement worked well, the instructions were clear enough to follow along. Would do this again… but with the clamp. ;)

schmurian -

same pried in between layer and then realized after after i separated the bottom corners that needed to go deeper

Simon Milburn -

This comment should be pinned to the top of this article / this scenario pinned in bright red... I've replaced previous iphone screens and it was nothing like this. I also ruined my screen by prying in between the screen layers and not underneath as I could not comprehend just how insanely strong the adhesive is even after many rounds of heating. Give the ~100$ cost of apple repair and the 50$ cost of this kit, i would NOT risk doing this repair, no way.

James Chase -

is it oem apple battery, because at some photo shows(Ifixit) and another shows (apple) ... wait your answer?

karim -

Hi karim,

the batteries that you can buy for iPhones in our shop are not OEM.

Dominik Schnabelrauch -

you should always ask the shop where you go if you will receive a warning message saying the battery was not changed by apple. unless the shop knows how to properly install the right batteries, you will get that message.

nicholas houllis -

I have a problem every time I soldered the cell to the new battery it no longer works could you help me with a tip!!! I've been watching the video more than 100 times I'm interested in learning, but even so the original flex burns

andy terry -

Ich habe bereits einige Akkus getauscht. Aber das Display vom 12 mini ist wirklich heftig verklebt. Ich habe kaputt gemacht.. keine Chance. Durch das erwärmen hat sich das Glas von der Platine gelöst oder ich habe es durchs hebeln getrennt.. Jedenfalls zeigt das Display nichts mehr an. Also nochmal der Hinweis. Überlegt es euch gut! evtl sind 99€ für einen Akkutausch bei Apple besser investiert.

Möhre -

Fantastic instructions, thank you very much. The phone was already partially opened due to the battery being really bloated. So I did not need to use the dedicated tools.

Nino -

Don't do this repair, just don't. The battery adhesive is very strong, but that's not the problem. When you finally get the battery replaced, you will have a permanent badge notification on your settings app that indicates that you are not using an OEM battery. But that's not even the problem. When I did this repair, I was connecting the new battery and sparks and smoke came out, and now my screen has a line across it. Obviously this is user error to an extent, but I have replaced iphone batteries around 15 times, no exageration, and I've been WAY rougher than I was in this case and nothing bad happened. I still have no idea what I did to make this happen, I can guarantee the battery connector only touched the area on the board where it was supposed to connect. I couldn't tell you if this is because it's not an OEM battery, or if Apple is making these phones more fragile on the inside (though I suspect it's a bit of both), but ultimately it's just not worth it do attempt this repair, go to an Apple store.

Zac Soldaat -

This is a solid guide. I was able to replace my battery with the fix kit and these instructions. Unfortunately, I destroyed my display in the process. Probably the same issue that Wesley pointed out here.

I'm guessing I didn't have the adhesive loosened enough along the right-hand side. I was sliding the pick up along that edge, apparently hulked out on it, and a crack shot across the screen. I applied more heat and carried on from there. Once everything was reconnected, I hit the power button and could feel the haptic feedback from the phone booting up, but there was nothing on the display.

Learn from my mistake and be absolutely sure the adhesive is softened enough that you don't have to apply much force to separate the screen from the body (and maybe pick up the Anti-Clamp, I think I would have had a better time with that thing).

Seth Blagg -

I performed this repair twice. First time, I damaged the screen slightly before realizing the thin plastic frame around the screen was not coming up. If you are not sure you are getting the pick under the plastic, then don’t proceed. Take more time to heat and suction. On the second iPhone I pulled out the infrared thermometer, turned my hairdryer to max and kept the iPhone at a nice toasty 140 degrees Fahrenheit while letting the Anti-Clamp do it's work. Still took slightly over 30 minutes to get the screen off. The extra heat also seemed to help keep the screen adhesive stay in good shape and attached to the base. I did not feel the need to replace it which saved me an hour.

Jonathan Flower -

First time success. Display damage can be caused only if you are not patient enough and apply force uneven, screen glass is as strong as the adhesive, if adhesive is warm enough, screen will come out with just constant tension.
Tricky part is to remove all leftovers of adhesive, in my case most of it left inside of the case and needed a lot of alcohol to clean it fully.

rbhbokka -

iFixit, you need to update this tutorial with better warnings. Kinda feel like you glossed over the difficulty to sell your kit.

Like others have said, this is REALLY tough. Do not recommend. Busted my screen — I believe I didn't get the pick under the plastic, so it tore some parts when I opened it. I'd recommend ONLY trying this if you're willing to break your phone.

sjthompsonjr -

I think they should include the whole process of taking apart AND PUTTING BACK TOGETHER. The cleaning of the old gasket took almost 2HOURS TO REMOVE, THIS IS THE SECOND IPHONE I HAVE WORKED ON WITH IFIXIT. PART OF THE PROCESS SHOULD BE PUTTING BACK TOGETHER AND WAY TO CLEAN OLD SCREEN GASKET, IF THIS KEEPS UP I WILL START USING YOU TUBE ONLY FROM NOW ON!!!!!

PAUL WHEELER -

So how do you put the screen back on? Maybe i overlooked it but i didnt see that section.

Chanell -

The screen frame/bezel stayed attached to the phone. This worked out fine and the replacement screen adhesive still worked. You just have to improvise with the guide. Also Clampy is awesome and is clearly far superior to the one included in the kit.

Ross -

Unfortunately, this was not successful and the phone is now broken. The reason was that it was not the adhesive between the bezel and the display that came loose, but the adhesive between the display and the circuit board with the sensors and the mounting bracket - it opened easily, but unfortunately in the wrong places. I used a processor controlled hot air system. I have no idea what the reason for that was. So please be careful and Check that Part

R Sch -

@paulwheele61622 exactly, this is half of a tutorial.

pinballnc -