Einleitung

Diese Anleitung zeigt, wie ein defektes Display im iPod Touch der 2. Generation ausgetauscht wird.

  1. prYiuYKl5yKrjMsb
    • Das Glas-Front Panel des iPod Touch der zweiten Generation besitzt einen Kunststoffrahmen, der sowohl an der Außenkante als auch unter den breiten schwarzen Streifen oben und unten am Gerät verklebt ist. Der Rahmen hat auch einen Gummistreifen, der den Rand der Glas-Panels umschließt.

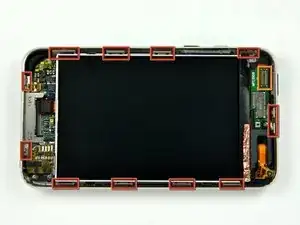
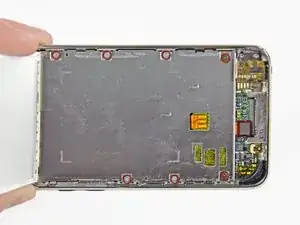
    • Das Bild links (Front Panel bereits entfernt) zeigt die Positionen der Metallklammern (rot dargestellt), die in den Kunststoffrahmen einrasten. Versuche in den nächsten Schritten, das Front Panel an den Zwischenräumen zwischen diesen Klammern anzuhebeln.

    • Achte außerdem auf das sehr dünne und empfindliche Touchscreen-Flachbandkabel (die Position des Steckverbinders ist orange markiert), das das Front Panel mit der oberen linken Ecke des iPod Touch verbindet.

    A quick note that worked great for me. Print out the picture that has the locations of the metal connector clips and scale it to actual size. Then place the iTouch on top of the printed picture and it will show you exactly where to insert the opening tool. Use it as a template.

    sean -

    Did anyone see a rubber seal? It's just a plastic frame that's slightly rubbery. It's not made of two parts as far as I can tell.

    no way -

  2. qeoZOHfxI6mmtygP
    qeoZOHfxI6mmtygP
    t5jINKbAlhrCcFTT
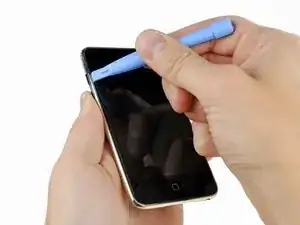
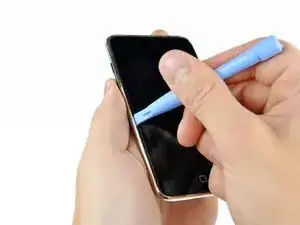
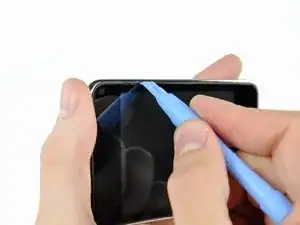
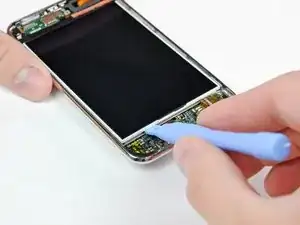
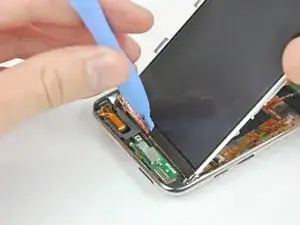
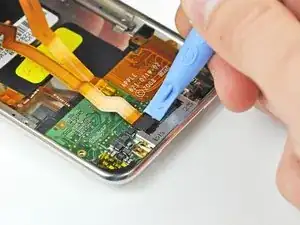
    • Führe vorsichtig ein Kunststoff-Öffnungswerkzeug in der Nähe der Lautstärketasten zwischen die Kunststoffeinfassung des Displays und das Metallgehäuse ein.

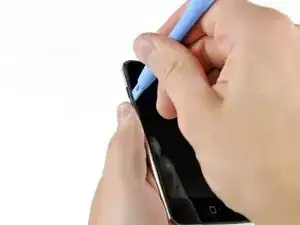
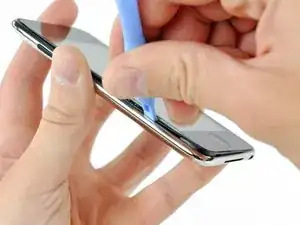
    • Heble das Glas-Panel an, indem du das Werkzeug vom iPod Touch wegdrehst.

    • Das Entscheidende ist, langsam und vorsichtig zu arbeiten, um innere Bauteile nicht zu beschädigen.

    • Falls du Schwierigkeiten bei der Verwendung des Kunststoff-Öffnungswerkzeugs hast, kannst du es auch mit einer Rasierklinge versuchen. Damit ließen sich die Klammern unserer Erfahrung nach leichter lösen. Bitte sei bei dieser Methode äußerst vorsichtig!

    If you are planning on reusing the front bezel / seal around the glass screen, be careful not to rip it up too much when loosening the screen.

    iTronics Repair -

    If you bought a new front panel there is a rubber seal around it so dont worry about ripping it up to open your iPod

    mikeseptak -

    Zitat von mikeseptak:

    If you bought a new front panel there is a rubber seal around it so dont worry about ripping it up to open your iPod

    sometimes if you buy a new front it doesn't come with the front bezel, so make sure it does before you rip the old one up. otherwise you can get a new front bezel from ebay.

    iTronics Repair -

    "Gently insert an iPod opening tool between the glass front panel and its plastic surround near the headphone jack."

    My guess is near the "Volume Control" not the "headphone jack" since the Headphone is oriented at the bottom of the picture not where the tool is being shown.

    barlowdo -

    Cracked the glass dropping on tile floor. I used a metal guitar pick to remove the glass/digitizer/bezel/"o" ring assembly, noting the clips in the first picture, I worked my way around and between the clips - starting at the volume control - first to loosen the glass/digitizer, then to go deeper and vertically lift the bezel and free the bezel from the clips. As others say - if you purchase from this site DO NOT worry about the bezel OR the "o" ring around the bezel - just get the entire thang out and the new one slips/snaps into place with ease - entire process took about 10min for removal and 3 for replacement - and I HAVE A NEW WORKING iPod TOUCH!! Jerry -Houston, TX - 281-687-2755 for questions...

    jgreengold -

    And the service and shipping are excellent - and now I'm gonna buy a new MacBook keyboard from this company and fix my daughters stuck "z" key - I love IFIXIT - would recommend to ALL - products and instructions are EXCELLENT - yes ebay *may* be cheaper but you get what you pay for... HIGHLY RECOMMEND IFIXIT...

    jgreengold -

    Zitat von jgreengold:

    Cracked the glass dropping on tile floor. I used a metal guitar pick to remove the glass/digitizer/bezel/"o" ring assembly, noting the clips in the first picture, I worked my way around and between the clips - starting at the volume control - first to loosen the glass/digitizer, then to go deeper and vertically lift the bezel and free the bezel from the clips. As others say - if you purchase from this site DO NOT worry about the bezel OR the "o" ring around the bezel - just get the entire thang out and the new one slips/snaps into place with ease - entire process took about 10min for removal and 3 for replacement - and I HAVE A NEW WORKING iPod TOUCH!! Jerry -Houston, TX - 281-687-2755 for questions...

    I am not familiar with a Metal Guitar pick, The plastic ones break very easily. (Even my Fender one) Did your metal pick damage the metal frame of your iPod? Were you able to remove the touch screen, o-ring, and plastic bezel without further damage to the parts?

    When I attempted to use a metal screwdriver I damaged the LCD.

    barlowdo -

    Zitat von barlowdo:

    I am not familiar with a Metal Guitar pick, The plastic ones break very easily. (Even my Fender one) Did your metal pick damage the metal frame of your iPod? Were you able to remove the touch screen, o-ring, and plastic bezel without further damage to the parts? When I attempted to use a metal screwdriver I damaged the LCD.

    jgreengold -

    Not too hard to find - either at music store a sometimes as a jewelry

    "charm"... Mine is the latter - very thin, very stiff. It did not damage

    the frame of the iPod at all. However - after replacing the new part I noted

    a plastic protector sheet on the *underside* of the new screen - upon

    removing the new top glass panel using the same guitar pick a second time, I

    too damaged the LCD - I also damaged the bezel and O ring. The O ring is

    very difficult to get off in a reusable condition. The bezel can come off

    clean with patience - which I apparently have little of and hence purchased

    a second glass top assembly to go along with the new LCD. I think the key

    here is patience and very slow going - I also purchased an iPod opening tool

    as another key learning is that while the guitar pick does work - it tends

    to get inserted too deep damaging the bezel (separating it from the glass or

    breaking it) or damaging internal parts. But the opening tool can sometimes

    be not firm enough. I imagine with practice one can remove the entire

    assembly in completely reusable condition - the trick it seems is to

    understand that the bezel has vertical sides that must be lifted vertically

    after being unclipped from the case - and that the glass has a tendency to

    separate from the bezel...

    jgreengold -

    I tried a flathead screwdriver and cracked the front panel.I learned that prying with a flathead screwdriver will damage it.

    Honam1021 -

    Zitat von jgreengold:

    Not too hard to find - either at music store a sometimes as a jewelry

    "charm"... Mine is the latter - very thin, very stiff. It did not damage

    the frame of the iPod at all. However - after replacing the new part I noted

    a plastic protector sheet on the *underside* of the new screen - upon

    removing the new top glass panel using the same guitar pick a second time, I

    too damaged the LCD - I also damaged the bezel and O ring. The O ring is

    very difficult to get off in a reusable condition. The bezel can come off

    clean with patience - which I apparently have little of and hence purchased

    a second glass top assembly to go along with the new LCD. I think the key

    here is patience and very slow going - I also purchased an iPod opening tool

    as another key learning is that while the guitar pick does work - it tends

    to get inserted too deep damaging the bezel (separating it from the glass or

    breaking it) or damaging internal parts. But the opening tool can sometimes

    be not firm enough. I imagine with practice one can remove the entire

    assembly in completely reusable condition - the trick it seems is to

    understand that the bezel has vertical sides that must be lifted vertically

    after being unclipped from the case - and that the glass has a tendency to

    separate from the bezel...

    Last night I recalled I use to own a metal pic it was a thumb pic for slide guitar. Anyway I decided to use my metal tools I bought from this site which are more rounded edges than the flat bladed screw driver that comes with kits. I made more progress with the metal tools and got what I think is all sides mostly up accept for the home button side which is really fighting me. I can easily tell where a clip is by sliding the tool alongside until I bump up against the side of a clip but I find it very difficult to push straight down to catch the top of the clip which it would seem would push away from the bezel. I am just not sure why this is difficult to do. I have a broken 2nd gen which I use as reference and it looks like the clip would easily push away. At any rate I am in the same predicament as you. I got the 2nd gen together only to find the home button sticks and wifi range is not what it use to be. So I am attempting to take the iPod apart a 2nd time to fix these issues without breaking the touch screen and lcd and so am taking my time. I just don't want to have to replace these brand new parts and have more money in this 8 gig 2nd gen than if I had just bought a brand new one.

    barlowdo -

    Zitat von jgreengold:

    And the service and shipping are excellent - and now I'm gonna buy a new MacBook keyboard from this company and fix my daughters stuck "z" key - I love IFIXIT - would recommend to ALL - products and instructions are EXCELLENT - yes ebay *may* be cheaper but you get what you pay for... HIGHLY RECOMMEND IFIXIT...

    Hi jgreengold, Can you help me to check if your iPod touch is like mine on this picture?: http://i44.tinypic.com/2a8ga6p.jpg

    My iPod touch bottom glass is a bit raised over the chrome bezel at the right part. Please check it and many thanks for your reply!!

    daikyouju -

    best I can see my touch glass is level with the frame - whether this picture is pre or post glass replacement, you need to gently, slowly, firmly, press down to try to seat the glass better in the frame/clip. I've see cases where after removint a glass top, the removal of the bexel is not perfect and it may leavel some of the black plastic bexel in the clip which makes it impossible to then copmpletely seat the new top glass/bezel.

    jgreengold -

    Be sure to pry between the outer case and the rubber gasket and not between the gasket and the glass

    mgardner -

    isn't this instruction misleading? :

    "Gently insert an iPod opening tool between the glass front panel and its plastic surround near the headphone jack."

    i agree with mgardner: "Be sure to pry between the outer case and the rubber gasket and not between the gasket and the glass"

    vera -

    I changed the text to reflect this. It's currently the "unverified" version.

    no way -

    I tried using the razor blade since the plastic opening tool was useless. I cracked the front panel and scratched the LCD. It had moisture damage and the touchscreen wasn't working. So be very careful when you use the razorblade...

    rockon46 -

  3. DpJBJUTKKnZOPVIU
    DpJBJUTKKnZOPVIU
    HtQN5TixiXrJM6LV
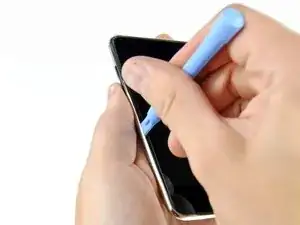
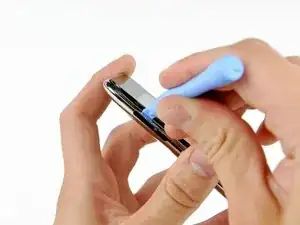
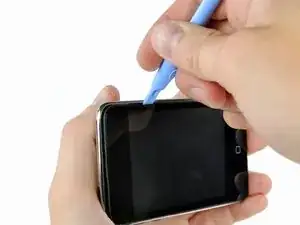
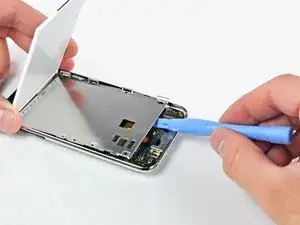
    • Führe das Kunststoff-Öffnungswerkzeug zwischen das Front Panel und dessen Kunststoffeinfassung ein und heble es an mehreren Punkten entlang der linken Kante des iPod Touch an.

    • Führe das eingesetzte Werkzeug nicht an der Kante des Front Panels entlang. Dadurch könnten das Front Panel und die Gummidichtung beschädigt werden. Am besten arbeitest du dich Punkt für Punkt vor: Heble an einer Stelle an, entferne das Werkzeug und setze es an der nächsten Stelle erneut an.

    Careful not to use a (metal) spudger too hard, or it's really easy to bust the LCD screen with the pressure.

    iTronics Repair -

    That happened to me, stabbed the LCD. Now its soild white with a green line

    Joe45110 -

    If you insert the tool between the silver case and the plastic surround, you may be able to remove the digitizer and plastic surround as a "single piece".

    Tom -

    Zitat von Tom:

    If you insert the tool between the silver case and the plastic surround, you may be able to remove the digitizer and plastic surround as a "single piece".

    That's the way I did it!

    James Bond -

    I have mine popped up about 1 mm on the top side and on both sides but so far have made no progress on bottom "home button" side. I think I have released the clips on the sides but I can't really see them and can't feel them with the small flat bladed screw driver that comes with replacement kits.

    I would love to use the small plastic tool to pry up on the o ring plastic bezel side but I know I would easily cut the o- ring.

    Has anyone got anymore suggestions?

    barlowdo -

    Zitat von barlowdo:

    I have mine popped up about 1 mm on the top side and on both sides but so far have made no progress on bottom "home button" side. I think I have released the clips on the sides but I can't really see them and can't feel them with the small flat bladed screw driver that comes with replacement kits.

    Update: I have been told that basically all I have accomplished is to raise the glass up above the surface of the metal case and really have not even got to the plastic bezel and disconnecting the clips. So maybe I have got no where so far.

    I would love to use the small plastic tool to pry up on the o ring plastic bezel side but I know I would easily cut the o- ring.

    Has anyone got anymore suggestions?

    barlowdo -

    Zitat von barlowdo:

    Update: I have been told that basically all I have accomplished is to raise the glass up above the surface of the metal case and really have not even got to the plastic bezel and disconnecting the clips. So maybe I have got no where so far.

    The metal clips from Step1 (shown in red) that snap on to the plastic frame are not right at the side of the display glas (under the black rubber) but a little more to the middle!

    I thought I opened the metal clips - but what I really did was broke the plastic frame! Now my plastic frame is only on the top and bottom but it still fixes the front panel...

    James Bond -

    agreed - or a metal quitar pick or ay other metal object. It is relatively easy to insert such an instrument and get under the bezel placing direct pressure on the LCD screed... Slow, shallow, and easy... lifting vertically

    jgreengold -

    Zitat von barlowdo:

    I finally got mine apart. The lower left metal clip was the absolute worst to get loose. Of course none of them were easy or obvious when they would let go freeing up the Bezel. It looks like I can reuse the complete touch screen and home button assembly and the rubber o ring is only slightly blemished around the lower left clip. I had to use the included repair kit flat bladed screw driver to loosen the last clip. All the other clips I was able to remove by using the metal tools sold thru this site. I did not want to use the flat bladed screw driver as it can damage the o ring but the other tools would just not catch the clip enough to lift it away from the bezel and then allowing the bezel to pop up.

    So a question, "Why was my Home Button Jamming?" it is a self contained unit. Once out of the pod and in fact even after freeing up most of the bezel it works fine.What could it have been catching on when it is completely assembled? Is there side word pressure or torsional pressure introduced by the bezel snap clips and metal outside frame ?

    Thanks to anyone with any suggestions about why the home button sticks in the unit but not when it is out of the unit.

    barlowdo -

    I had to take mine apart again due to Home Button issues. The touch screen had come loose from the plastic bezel causing the home button to work incorrectly. In the process of trying to clean up old glue I broke the ribbon cable on the brand new only been used for a coupe of months touch screen. I ended up taking the screen all the way off and was left with popping out the plastic bezel without breaking it. I thought it would be difficult but with the touch screen already out of the way I got the plastic bezel off in under 20 minutes.

    barlowdo -

    The new screen i got its home button does not click idk if its just mine but it messes with me because your used to hearing a click when it registers

    mikeseptak -

  4. 2NR1wyfNdN5dNaG4
    2NR1wyfNdN5dNaG4
    HoDAMSFkvepLhfmY
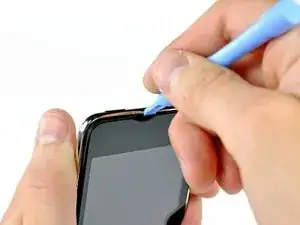
    • Heble die linke Kante weiter an, bis sich die obere und untere Kante aus dem Gehäuse des iPod Touch herausheben.

    • Sobald sich die obere und untere Kante leicht aus dem iPod Touch herausgehoben haben, stelle mit dem Öffnungswerkzeug sicher, dass die Kunststoffeinfassung von den Klammern im Inneren des iPod Touch gelöst ist.

    Step 2

    *Gently insert an iPod opening tool between the glass front panel and its plastic surround...

    First pic from Step 4 shows what is meant.

    But on all the other pics it looks like the opening tool is inserted between the plastic surrounding and the metall body!?

    James Bond -

    Zitat von James Bond:

    Step 2

    *Gently insert an iPod opening tool between the glass front panel and its plastic surround...

    First pic from Step 4 shows what is meant.

    But on all the other pics it looks like the opening tool is inserted between the plastic surrounding and the metall body!?

    I checked again and the pics from Step 4+ are correct.

    But I would advice the following way:

    Zitat von Tom:

    If you insert the tool between the silver case and the plastic surround, you may be able to remove the digitizer and plastic surround as a "single piece".

    James Bond -

    I cracked my front panel at this step while prying. First time I've ever broken anything (or given up in defeat) during a repair. Don't pry too hard! This repair is indeed VERY DIFFICULT.

    srohde -

    Cracked your front panel? Isn't that what was wrong with it in the first place?

    jonathan -

  5. ssvnHc1fkWIAfsFa
    • Setze das Aufhebeln fort und konzentriere dich nun darauf, die Kunststoffeinfassung von den inneren Metallklammern zu lösen.

    • Heble entlang der oberen Kante des iPod Touch, um das Front Panel weiter vom restlichen Gerät zu lösen.

    OK I've repaired many of these now and I think I've found the trick. The trick is to start near the volume buttons and get one or two of the clips released. Then I work my way down the unit, across the bottom, up the side. The top then pretty much comes on it's own. The trick for each clip is, once I can apply upward prying pressure on the plastic frame, I get the spudger between the clip and the frame and the frame will come out of the clip. It's almost never a dramatic pop, it just slides up. I keep a dead, open one on my desk as a reference as to exactly where the clips are.

    jonathan -

  6. wPFjehCmEUPZrc4w
    wPFjehCmEUPZrc4w
    6juGtWuXByhDAWQm
    j6dN5Q3bYCV3Ykk2
    • Heble das Front Panel entlang der rechten Kante an, wie in den vorherigen Schritten beschrieben.

    • Arbeite dich schließlich um den gesamten Rand des Front Panels herum, bis es sich leicht von der Rückabdeckung abgehoben hat.

    • Stelle außerdem sicher, dass die Kunststoffeinfassung von den Klammern in der Rückabdeckung gelöst ist.

    This image shows at best an aspirational use for this tool. I have used so many of these and they are mostly useless except for prying up the connectors. As soon as you get about 1mm into the case it shreds and loses the edge, or breaks right below the reinforcing part. Tell me I’m wrong.

    Michael Barreto -

  7. IOyDARoMAkvJS1UG
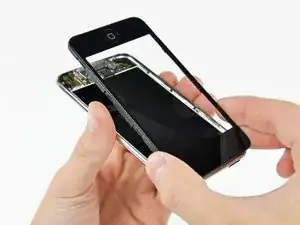
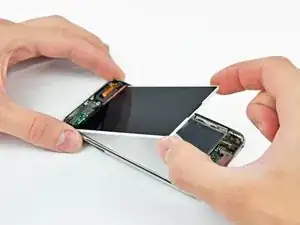
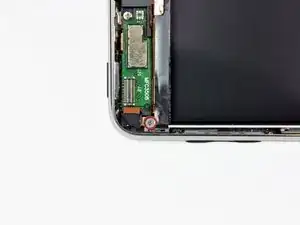
    • Hebe das Front Panel aus dem Rückgehäuse heraus, achte dabei aber auf das Kabel, das es nahe der oberen linken Ecke noch mit dem iPod Touch verbindet.

    • Achte unbedingt darauf, das Verbindungskabel des Touchscreens nicht zu zerreißen – sonst wird das Display unbrauchbar.

  8. kI1bXUMTMkBEXVEQ
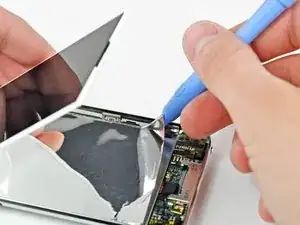
    • Verwende das flache Ende eines Spudgers (oder eines Öffnungswerkzeugs), um den Steckverbinder des Touchscreen-Kabels vom oberen Logic Board abzulösen.

    • Jetzt, da das Front Panel entfernt ist, überprüfe es auf Beschädigungen. Falls die Kunststoffeinfassung nicht bündig mit der Vorderseite des Glas-Panels abschließt, löse sie vorsichtig ab und drücke sie wieder an.

    • Achte darauf, die schwarzen Bereiche auf der Unterseite des Front Panels nicht zu verkratzen – die Kratzer wären nach dem Wiederzusammenbau sichtbar.

    • Reinige unbedingt sowohl die Display-Oberfläche als auch die Innenseite des Front Panels, da Staub oder Fingerabdrücke nach dem Zusammenbau im Inneren des iPod Touch eingeschlossen wären.

    As with the iPhone, the number one reason for removing the digitizer is if it’s smashed. Removing the broken glass from the mid-frame is a delicate procedure and can be very tedious and time consuming. The rubber gasket and home button can be easily damaged if you are overzealous with a heat gun. The mid-frame section is now readily available as an orderable spare part (about £5!) and in my opinion you’ll get a much neater, cleaner repair if you replace this part too. There is however no need to purchase a new home button and switch as this can be easily removed from the old mid-frame and applied to the new one, you will need a hot iron to melt the plastic rivets that hold it in place though.

    NoBox -

    So what is the orientation for the putting the home button back in. The button has two tabs. Do the tabs face vertical or horizontal? What keeps the button from rotating? Do the tabs fit into slots?

    barlowdo -

    I used a new frame, removed the home button and circuit and stuck it on the new frame, with metal bracket, but it isn't working.

    Ryan -

    My iPod touch has the glass screen cover a bit raised over the chrome bezel at the bottom right, as you can see in this:

    http://i44.tinypic.com/2a8ga6p.jpg

    Is this normal?

    daikyouju -

    Crazy simple! Wow! Now I pretty much have a new iPod. Thanks iFixit!

    patrickjmoe -

    I used a jeweler's screwdriver as it was the only tool I had that would fit and work. Following the instructions (Which I had my laptop right next to me) was really simple enough. I have my new digitizer installed, and it's working once again.

    Peter25 -

  9. CgVyBZZYPAdIdQar
    CgVyBZZYPAdIdQar
    sH6VGWF4VRhLS1Hk
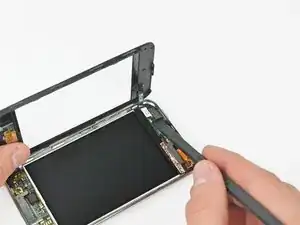
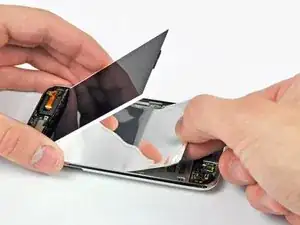
    • Setze ein kleines Öffnungswerkzeug mit der Kante schräg nach oben zur Unterseite des Displays zwischen das weiße Hintergrundlicht aus Kunststoff und der Metallabschirmung davor.

    • Heble die Unterkante des Displays soweit hoch, dass du es mit den Fingern fassen kannst.

    Be careful not to put too much pressure on the LCD screen here or it will "bleed" or crack.

    iTronics Repair -

    Zitat von iTronics Repair:

    Be careful not to put too much pressure on the LCD screen here or it will "bleed" or crack.

    I haven't had many problems with this part, I've cracked an LCD doing the initial separation of the top frame from the back though.

    jonathan -

  10. 21gC1UEOFhLvWsEn
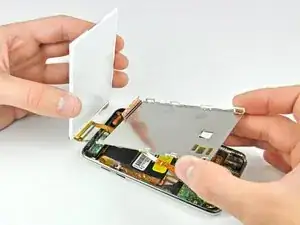
    • Hebe das Display an der Unterkante hoch und kippe es in Richtung Oberkante des Touchscreens.

    • In den nächsten Schritten müssen Bauteile entfernt werden, die ursprünglich unter dem Display waren. Halte das Display gut fest, damit das Displaykabel nicht zu stark angespannt wird.

  11. ZagFgiM2YcUKP2jK
    ZagFgiM2YcUKP2jK
    VGgf1kOtC6cFkTS6
    • Halte das Display mit einer Hand fest und lasse ein Öffnungswerkzeug an den beiden langen Kanten der unter dem Display angebrachten glänzenden Mylar-Reflexionsschicht entlanglaufen.

    • Wenn die Schicht frei ist, entferne sie vom iPod.

    Step 11. Upon dissection of my iPod touch I note that the mylar reflector is attached firmly to the back of the LCD panel and NOT to the tray as pictured. I assume that the new LCD panel that I ordered from ifixit includes this mylar reflector pre attached to the back of the LCD?

    jgreengold -

    I have a similar question about the Mylar

    1. What is it for? The LCD appears to be a closed unit so I do not think it is for lighting the LCD. Is it a reflector for the Wifi or Blue Tooth?

    2. Which way is it suppose to face. Shiny side up or shiny side down? In the pic above it is shiny side up but I see on my replacement LCD it is stuck on shiny side down.

    barlowdo -

    Zitat von barlowdo:

    I have a similar question about the Mylar

    1. What is it for? The LCD appears to be a closed unit so I do not think it is for lighting the LCD. Is it a reflector for the Wifi or Blue Tooth?

    2. Which way is it suppose to face. Shiny side up or shiny side down? In the pic above it is shiny side up but I see on my replacement LCD it is stuck on shiny side down.

    I'm fairly confident that the mylar is there for viewing the display in direct sunlight and for reflecting the backlight/incoming sunlight back out through the LCD. If you hold the display assembly (without mylar) in front of a very intense light source, you'll notice it is a bit transparent and that light transmits through both the LCD and the backlight. Now, if you check out the metal tray that the LCD sits in, you'll notice that it is not a uniform flat surface due to many voids for screw holes, etc. If you were to view the display in direct sunlight without the mylar in place, you'd probably see all the voids in the metal display tray as unwanted "shadows" in your display. I'd install the mylar with the shiny side facing toward the outer glass, as oriented in our repair guide.

    Andrew Bookholt -

  12. hqRQbAoVpkGkftFi
    • Entferne die sieben Kreuzschlitzschrauben, mit denen die Metallhalterung des Displays befestigt ist.

    • Die beiden dunkleren Schrauben gehören zu den beiden Schraubenlöchern in der Metallhalterung Nähe an der Unterkante des iPods.

  13. WcXRIHsEsYaqJGVx
    • Lege das Display wieder zurück.

    • Entferne die letzte Kreuzschlitzschraube, mit der die Displayhalterung noch an der Rückseite befestigt ist.

  14. mFAP4aP6bQTwok1F
    • Hebe das Display aus der Metallhalterung und kippe es zur Oberkante des iPods hin.

    • Hebe die Metallhalterung mit einem Öffnungswerkzeug an und kippe sie zur Oberkante des iPods hin.

  15. 4OdflVmf6Dtg5Jcs
    • Löse die Kupferfolie an der Oberkante des Displays mit einem Öffnungswerkzeug ab.

    • Lasse die Kupferfolie an der Displayhalterung angeklebt.

  16. BJOI3INQPlhNHTYa
    • Heble den Displaystecker mit einem Öffnungswerkzeug aus seinem Anschluss auf dem Logic Board heraus.

  17. lcSsEDtq2PWSmqTh
    • Hebe die metallene Displayhalterung leicht an (der Akku ist an ihrer Unterseite befestigt) und entferne das Display vom iPod. Achte darauf, dass sich das empfindliche Kabel nicht verfängt.

    • Das Display-Flachbandkabel verläuft unter der metallenen Displayhalterung.

    Works as advertised - I did it!... Replaced LCD and Glass Digitizer in about 45 min (took my time)... Steps are perfectly described - just a reminder to all - remember to take off all protective films used in shipping on both sides of the LCD and both sides of the glass digitizer during installation. You do not want to have to remove the top again (that was a $69.00) mistake on my part...

    jgreengold -

    What indication did you have that the plastic protectors were still on the new screens? Did parts fit too tightly? Was the screen Dim?

    Just curious as this may be some issues others are experiencing.

    barlowdo -

    During re-assembly, make sure the new battery is positioned low on the back of the metal tray so it does not sit on the edge of the circut board. I dident realize i had done this until I applied a little pressure while seating the LCD screen and I cracked it. Now I get to replace the LCD.

    sounnder -

    So during re-assembly I transferred the logic board into a second case to avoid the headaches that stripped screws can cause but now every LCD I plug into the unit shows only a white screen and nothing else. I don't remember damaging anything, but did make the top-left screw (next to the digitizer connector) just a wee-bit too tight without realizing that the plastic spacer behind it had broken off.

    Again, I don't see any rips in that part of the cable, but I also don't know anywhere else I could have damaged. Does anyone have an idea of why the LB doesn't want to show an image anymore?

    Schrodingers License -

Abschluss

Um dein. Gerät wieder zusammenzubauen, folge den Schritten in umgekehrter Reihenfolge.

Walter Galan

702835 Reputation

4 Kommentare

I wore a pair of nitrile gloves (the blue ones) while putting in the new LCD and glass. That way no fingerprints got on the inside portions of the screens.

Thanks for the great instructions, I'm happy to keep using my same iPod and not have to buy a whole new unit.

Mike -

Somehow it always get left out of these tutorals that the !@#$ thing has ALL parts glued together! There's a thin layer of what looks like silicon sealant/glue between the glass and the metal shell. Then the LCD is glued (also with silicon) to mylar backing and mylar backing is glued to the metal frame. The battery is also glued to that frame. The glue gives if you're persistent but it's very easy to crack the LCD while trying to pry it from the metal frame and I had to literally cut the battery off of the other side of that frame.

Elabz -

Ugh... Apple makes it almost impossible to open without breaking it.

Aiden -

Having successfully changed several iPhone batteries I decided to replace the cracked glass on my 2nd Gen Touch but it's practically impossible to do without damaging the rest of the iPod. With 2nd hand values as they are now in 2022 it's actually cheaper to buy a decent second hand 3rd. Gen one than it cost to buy the new screen, mid-frame & glue to repair the original.!! Not my ideal as I wanted to repair the old one, but at least I'm making use of another iPod that the previous owner no longer wanted. I have no doubt that these are repairable but a great deal of care & experience / practice is required & mine ended up being scrapped :-(

Peter Brown -