Einleitung

Diese Anleitung wurde von iFixit-Mitarbeiter:innen verfasst und ist keine offizielle Reparaturanleitung von Google. Hier erfährst du mehr über unsere Qualitätsstandards.

Diese Anleitung zeigt, wie die Hauptplatine im Google Pixel 5 ausgetauscht werden kann.

Entlade zur Sicherheit den Akku auf unter 25%, bevor du mit der Reparatur beginnst. Du reduzierst dadurch das Risiko, dass sich der Akku entzündet oder sogar explodiert, falls er während der Reparatur versehentlich angestochen werden sollte.

Warnung: Wenn der Akku verformt oder beschädigt war, darfst du ihn nicht wieder verwenden, das wäre ein Sicherheitsrisiko. Ersetze ihn durch einen neuen.

  1. RLELhG1QaAFQknGB
    RLELhG1QaAFQknGB
    jRnHvlkkMrVvKEF3
    2c4RTXZovpC3V36b
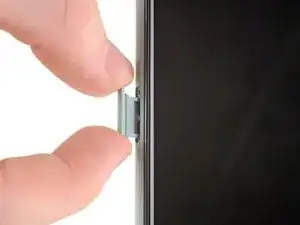
    • Setze ein SIM-Auswurfswerkzeug, - Bit oder eine aufgebogene Büroklammer in die kleine Öffnung am SIM-Einschub ein.

    • Der SIM-Karteneinschub befindet sich unten an der linken Seitenkante des Smartphones.

    • Drücke fest hinein, dann kommt der Einschub heraus.

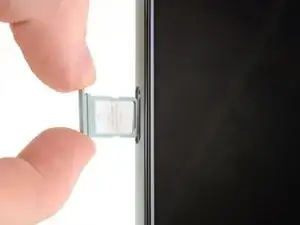
    • Entferne den SIM-Einschub.

    What if a sim tray stack in side the phone what can we do ?

    Njoka -

  2. QQGLSFPODbK54uDM
    • Erwärme den unteren Displayrand eine Minute lang mit einem erwärmten iOpener.

    • Optional kann hierfür auch ein Haartrockner, eine Heißluftpistole oder eine Heizplatte verwendet werden. Hierbei muss jedoch darauf geachtet werden, dass das Smartphone nicht überhitzt wird. Sowohl das Display als auch der interne Akku sind anfällig für Hitzeschäden.

    It would be helpful to know for how long ally the heated pad

    Yuri Deglin -

    Agreed, my friend from the past.

    Albert Einstein -

    If you click on the "iOpener" link, it tells you to heat it up for 30 seconds, and if you're using a microwave with a carousel, make sure it moves freely.

    Azurina Schalk-Smith -

    How long do you think it would take with a hair dryer?

    Gen L. -

    Don't have a microwave, so I boiled the kettle, left the iOpener in for 5 minutes and it was a good temperature to go. Doesn't need to be that hot to be effective

    Rick -

    i damaged my digitizer using a hair dryer ugh

    marco -

  3. XB15jHbG4YWAkvHj
    XB15jHbG4YWAkvHj
    idLGWGUERlrSUErg
    FsdxJwViyOclRRRc
    • Schaue dir folgende Hinweise an, während sich der Kleber löst:

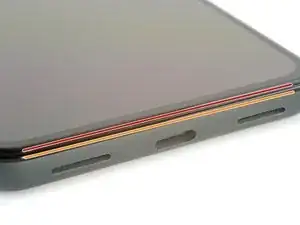
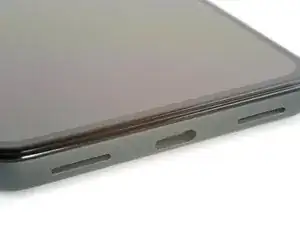
    • Displaynaht: diese Naht trennt das Display vom restlichen Smartphone. In dieser Naht darfst du nicht hebeln.

    • Blendennaht: Das ist die Naht zwischen der Blende, die als Schutz um das Display verläuft, und dem Rahmen. Die Blende ist durch Kunststoffrasten befestigt. Hier kannst du mit deinem Werkzeug hebeln.

    Please remove the image of the pick in the bottom of the phone in Step 2. This led me to place a pick there BEFORE step 5 which damaged my digitizer. Now I have to replace the entire screen as a result.

    Alternatively, add the image from step 5 with the suction cup in place, or just draw an arrow digitally to the seam you're referring to in step 2. Or call "Step 2" "Important Note" instead of a step.

    David Smith -

    Wow, I'm glad I read this first. I too assumed this step was about inserting the pick, but wasn't sure because it wasn't clearly written that way.

    Agreed with the "important note" idea, along with combining this with step 5 where the context is actually relevant.

    Marco Carag -

    Just made this same mistake and the photo is still there... there goes another $180...

    Carlos Moreno -

  4. 23sHH3BUSbtCbtOh
    23sHH3BUSbtCbtOh
    wIVYR4w6CPIbpvc1
    Pi3qHdWqZra6AUCg
    • Wir haben die Anti-Clamp entwickelt, um das Öffnen von Geräten zu erleichtern. Die nächsten beiden Schritte zeigen, wie sie verwendet wird. Wenn du sie nicht benutzen willst, überspringe die nächsten zwei Schritte und folge einer anderen Methode.

    • Genaue Anweisungen für die Anti-Clamp findest du hier.

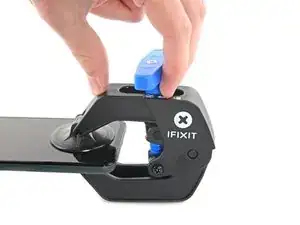
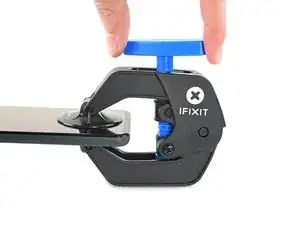
    • Drücke den blauen Griff zum Scharnier hin, um den Öffnungsmodus auszustellen.

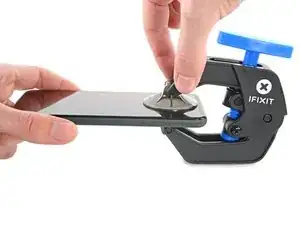
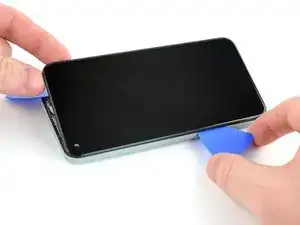
    • Bringe die Saugheber nahe an der Unterkante des Displays an, einen auf der Vorderseite, den anderen auf der Rückseite.

    • Drücke die Saugheber auf den Oberflächen fest.

    • Wenn die Saugheber nicht gut auf den Flächen haften, dann klebe Paketband darüber.

  5. LHErCKT1C5tQ23UD
    LHErCKT1C5tQ23UD
    ffUX41QYpsWEufib
    WJrFDynE3AHciwdH
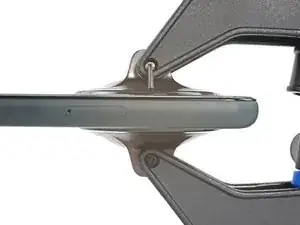
    • Drücke den blauen Griff vom Scharnier weg in die Stellung für den Öffnungsmodus.

    • Drehe den Griff im Uhrzeigersinn, bis du merkst, dass sich die Saugheber dehnen.

    • Achte darauf, dass sich die Saugheber weiterhin gegenüber stehen. Wenn sie sich nicht mehr gegenüber stehen, dann löse die Saugheber ein wenig ab und schiebe sie in die richtige Position.

    • Warte eine Minute, damit sich der Kleber allmählich ablösen kann und ein Spalt entsteht.

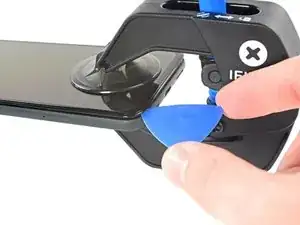
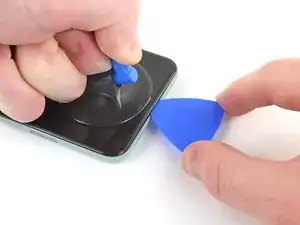
    • Wenn der Spalt groß genug ist, dann setze ein Plektrum unter das Display und seine Schutzblende ein.

    • Wenn es nicht gelingt, mit der Anti-Clamp einen ausreichend großen Spalt zu erzeugen, dann erwärme die Stelle nochmals und drehe den Griff eine halbe Umdrehung im Uhrzeigersinn weiter.

    • Drehe den Griff jeweils nicht mehr als eine halbe Umdrehung weiter und warte jedes Mal eine Minute lang. Gib der Anti-Clamp Zeit, ihre Arbeit zu erledigen.

    • Überspringe den nächsten Schritt.

  6. Z6keo3lUlisS6PiX
    Z6keo3lUlisS6PiX
    r3JOcDoYsjpYSPFJ
    TNkpv1vbVMDOwwPO
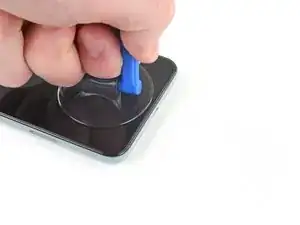
    • Bringe einen Saugheber so nahe wie möglich an der erhitzten Kante an.

    • Wenn das Display bei dir stark gesplittert ist, dann folge dieser Anleitung, um es mit Klebeband zu überkleben. Wenn alles nicht hilft, dann benutze Sekundenkleber, um den Saugheber am zerbrochenen Display zu befestigen.

    • Ziehe fest und gleichmäßig am Saugheber, bis ein Spalt entstanden ist.

    • Je nach Alter deines Gerätes kann dies ziemlich schwer sein. Erwärme es gegebenenfalls nochmal und probiere es erneut.

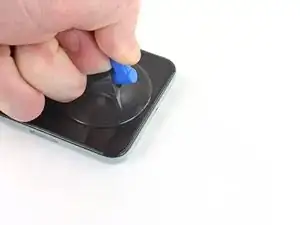
    • Setze ein Plektrum in den Spalt ein.

    "Insert the opening pick into the gap." NOT the gap under the glass, the second gap... If not you will probably break your screen, at least I did. Especially important if your pixel 5 shipped with the screen gap :(

    Alex Beaven (Nevbox) -

  7. JR3ablPZImMYsdPw
    JR3ablPZImMYsdPw
    16NeY1RIgBr4ALBD
    eHki2SVKH3c4LedP
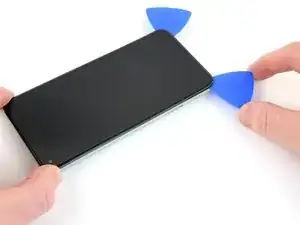
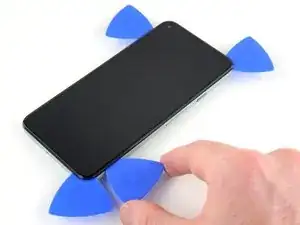
    • Schiebe das Plektrum an der Unterkante vor und zurück, um den Kleber am Display aufzutrennen.

    • Lasse das Plektrum in der unteren rechten Ecke stecken, damit sich der Kleber nicht wieder verbinden kann.

  8. YYBV6DBqqFtaUCfr
  9. PkwPMyUxTWxYtfMG
    PkwPMyUxTWxYtfMG
    t1IgSk2tcCpnLXL1
    m4ZVwT1q3UtyNBso
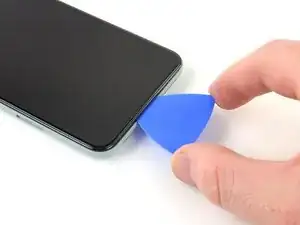
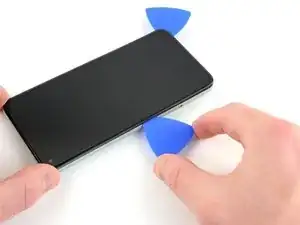
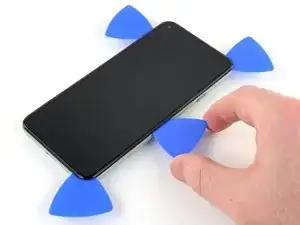
    • Setze ein weiteres Plektrum in die untere linke Ecke des Displays ein.

    • Schiebe das Plektrum um die untere linke Ecke herum.

    • Setze das Plektrum nicht tiefer als 6 mm ein, du könntest sonst das Flachbandkabel zum Display in der Mitte der linken Seitenkante beschädigen.

    • Schiebe das Plektrum weiter in Richtung Frontkamera, um den Kleber an der linken Kante aufzuschneiden.

    • Lasse das Plektrum stecken, damit sich der Kleber nicht wieder verbinden kann.

    I suggest placing an orientation sticker on the screen so you don't lose track of where that delicate ribbon cable is. I gently bent one, immediately after doing a successful one, resulting in a costly screen replacement. It's important to know that it's incredibly delicate.

    Edward McClung -

    I bent one of the picks at the end up 90 degrees with the tweezers to a depth of 3/16" and it worked beautifully. Left it on that side to remember where it was important.

    James Bennett -

  10. oEPA4kQQ5fVdHWvt
    oEPA4kQQ5fVdHWvt
    XhJQ6tagwvAhEmpG
    RKsZYcUGPiGcP3sF
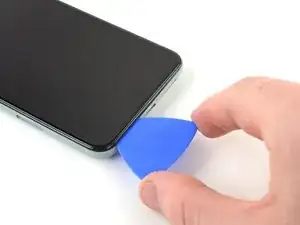
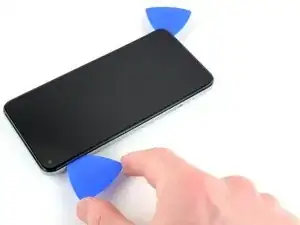
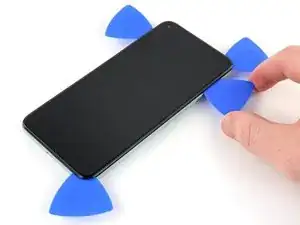
    • Setze ein weiteres Plektrum in die obere linke Ecke des Displays ein.

    • Schiebe das Plektrum um die Frontkamera herum und an der Oberkante des Smartphones entlang.

    • Wenn sich der Kleber nicht leicht auftrennen lässt, dann erwärme die betreffende Stelle eine Minute lang und versuche es erneut.

    • Schiebe das Plektrum zur oberen rechten Ecke hin und lasse es stecken.

  11. 1QnGhC4UIh3IUk1d
    1QnGhC4UIh3IUk1d
    HkkaPbXOq1RfD2hL
    eAIALPreGV2eXEBQ
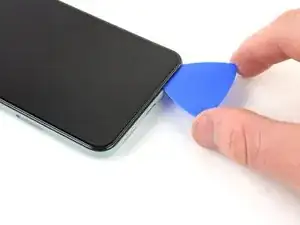
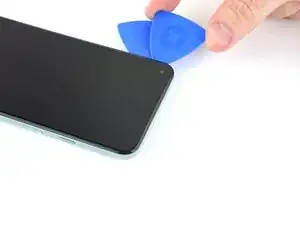
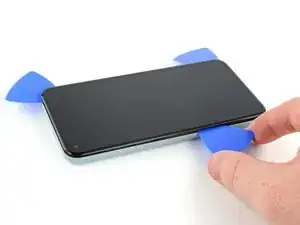
    • Setze ein Plektrum in die untere rechte Ecke des Displays ein.

    • Schiebe das Plektrum an der rechten Kante entlang nach oben, um den restlichen Kleber aufzuschneiden.

    • Eventuell musst du noch einmal mit einem Plektrum an allen Kanten entlangfahren, damit alle Klebestellen sicher aufgeschnitten sind. Der Kleber ist in den Ecken am dicksten aufgetragen.

  12. lNM4JsPdVK4M1MxG
    lNM4JsPdVK4M1MxG
    O1oOFnIGMGbAJoAG
    • Hebe das Display mit dem Plektrum in der oberen linken Ecke ein paar Millimeter hoch. Dadurch wird verhindert, dass die Rasten wieder am Gehäuse einschnappen.

    • Klappe das Display von der rechten Seite her wie ein Buch auf.

    • Klappe das Display nicht mehr als 90° auf, damit das Flachbandkabel zum Display nicht beschädigt wird.

  13. Fy2oOr21rAtW4q2W
    Fy2oOr21rAtW4q2W
    OVUGNVxv23M3tSAM
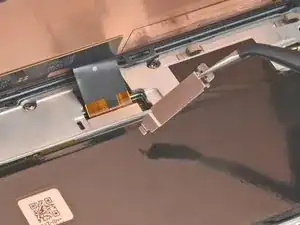
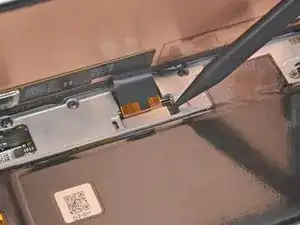
    • Die Abdeckung am Displaystecker sichert das Flachbandkabel zum Display. Fasse sie mit einer Pinzette an.

    • Schiebe die Raste zum Entsichern in Richtung des Steckers.

    I found it easier to use the spudger here rather than the tweezers (which have sharp ends that could damage something if you happen to slip).

    tristanwaddington -

    some 5a models will have a screw instead of clip , here's a photo https://imgur.com/a/9dZG5pQ


    Daniel Gonzales -

    You commented on the guide for the Pixel 5, not the 5a: Google Pixel 5a

    Pixel -

    I just fought with this part using the tweezers for several attempts, and then with the spudger it came right out when I applied force towards the center of the left edge.

    Michael Gundlach -

  14. YHjY6XJvlJjJ5tLY
    YHjY6XJvlJjJ5tLY
    bWD4NvY5CfksGydP
    • Entferne die Abdeckung des Displaysteckers.

    • Bewahre dieses Bauteil gut auf, du benötigst es beim Zusammenbau.

  15. cCDA2hvJgjXGYnJM
    cCDA2hvJgjXGYnJM
    3tLAI2OIwSxJUEYL
    • Heble das Flachbandkabel zum Display mit der Spudgerspitze nach oben und trenne es ab.

    • Um Druckstecker wie diesen hier wieder zu verbinden, richte ihn zunächst sorgfältig aus. Drücke erst eine Seite herunter, bis sie einrastet, und dann die andere. Drücke den Stecker auf keinen Fall in der Mitte herunter. Wenn er nicht richtig ausgerichtet ist, können sich die Kontakte verbiegen und dauerhaft beschädigt werden.

    The curved ends of the blue iFixit Opening Tool helped me reseat the connector when installing the new screen.

    tristanwaddington -

    Jesus no wonder the Chinese factory workers kill themselves, this thing is brutal

    Holy Moly -

    So hard to get this thing reseated to test the screen, even before putting the adheasive round the phone edge to finish the job. What made it particularly hard was that the flex cable on mine seemed very short compared to video's i've seen online.

    Jake Boddington -

    Reattaching this press connector was the worst! By the time I had done all the steps below and then in reverse, I was ready to be DONE. Be careful, patient and gentle.

    I too wanted to test my screen before the final adhesives and when I finally got the connection done and tested my screen, I HATED that I had to undo the connection to attached the adhesive.

    If using the Pixel 5 display adhesive that comes in the battery repair kit, there are actually two sets of blue protective covers. One that helps align the adhesive to the frame. Once that is removed, there is a very thin blue cover on the adhesive itself - that does split in two pieces. So, all this said, I could have attached the adhesive before testing the screen and would have been able to leave the adhesive strip with the blue protective cover in place if I needed to make any adjustments before sealing the screen to the frame.

    Kristi Hvidbjerg -

    So I was reassembling everything after changing the battery.

    Now my only step left is to reconnect the display. However by doing so and trying to turn it on the screen doesn't work... I feel the haptics, but the display is no longer responsive. Please help.

    Paolo Cunanan -

  16. RbDUQWECHGVnGIqR
    • Die Rückseite des Displays ist sehr empfindlich. Sie kann selbst durch kleinste Kratzer oder eine winzige Macke beschädigt werden.

    • Damit das Display nicht beschädigt wird:

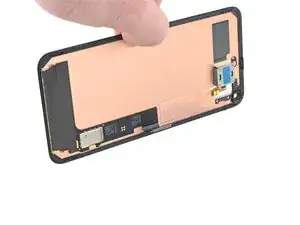
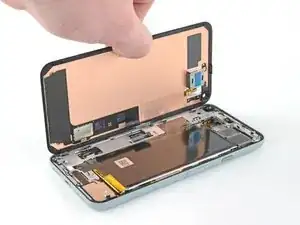
    • Fasse das Display nur an den Kanten an.

    • Wenn du das Display auf die Arbeitsfläche ablegst, achte darauf, dass kein Fremdkörper die Rückseite berührt. Am besten legst du das Display auf ein sauberes, weiches und fusselfreies Tuch.

  17. ZMAy1r2nNBMo5WNf
    ZMAy1r2nNBMo5WNf
    t5oZvVG2wXnsOAxs
    • Entferne das Display.

    • Entferne alle Kleberreste mit einer Pinzette vom Gehäuse.

    • Wenn du das Display mit Isopropylalkohol reinigst, dann achte darauf, dass keine Spritzer davon unabsichtlich auf andere Bauteile gelangen, sonst könnte sich ihre Verklebung lösen.

    • Überprüfe beim Zusammenbau die Vertiefung für die Frontkamera im Ersatzdisplay. Wenn noch Schutzfolien aufgeklebt sind, dann entferne sie.

    • Folge dieser Anleitung, wenn du das Display mit vorgestanzten Klebestreifen befestigen willst.

    • Wenn du doppelseitiges Klebeband wie Tesa verwendest, folge dieser Anleitung.

    • Beim ersten Neustart nach der Reparatur wird das Display eine Kalibriersequenz durchlaufen. Berühre das Display dabei nicht, der Touchscreen könnte nicht richtig kalibriert werden, was zu einer schlechten Funktion führen kann.

    Where from we can buy the screen. Thanks

    Ajay Sharma -

    the screen does not fit

    Joel Kelly -

    After reconnecting the screen, is it necessary to remove a screen protector (if installed) for the a proper screen calibration?

    Maxx -

    Yes. Remove the screen protector when installing the screen.

    Marcel McKenzie -

    Remaining adhesive - very little actually pulled up in strips, most had to be gently scraped up. The 90% alcohol was a must to help soften the adhesive that remained. I did not get all of it off.

    The custom cut adhesive guide was very helpful. I did use the iOpener to heat up the edges after I installed the screen to help create the best seal. I believe this also helped deal with the old adhesive I hadn't been able to remove and allowed for a secure, tight fit of my screen to the frame.

    Kristi Hvidbjerg -

    The screen is great and the instructions were mostly clear. However, I missed the part in the instructions that said "If you replaced the screen, check the screen's front-facing camera hole and remove any protective liners covering it.". I only just now noticed that.. so maybe make it bold or something?

    kevin -

  18. JjAfOqeYvPL5Q1AO
    JjAfOqeYvPL5Q1AO
    wLheS56raJwteEcq
    mjgDKNJOCZiBdShT
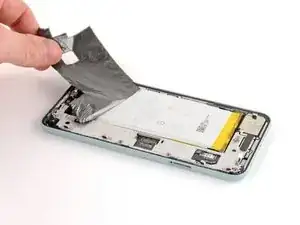
    • Hebe das Graphitband mit einer Pinzette hoch, bis es du es mit den Fingern greifen kannst.

    • Stich den Akku nicht an und verbiege ihn nicht, er könnte gefährliche Chemikalien verlieren oder in Brand geraten.

    • Löse das Graphitband ab.

    On reassembly, I missed the graphite tape installation. Will this be an issue?

    Gene Harriman -

    I believe graphite tape is used for heat dissipation to help keep the phone cool and not overheat so I would say it's an important component. If you can reinstall then do as heat will affect the operation of the device and impact the battery and internal components.

    Marcel McKenzie -

    Luckily the kit came with graphite tape replacement as I accidentally tore through mine when using the sharp tweezers. Here I recommend using the crocodile tweezers as these aren't as sharp and have a bigger surface area to grip.

    Marcel McKenzie -

    If you're dumb like me you won't find the crocodile tweezers until you look under the tools tray. I slid my tray out of its box right onto the work surface, so I never noticed the tweezers underneath.

    Michael Gundlach -

  19. tfXQmjGhSOU33UD2
    tfXQmjGhSOU33UD2
    1jrdoV3IGxUvBHwp
    • Löse die Graphitschicht von der Ladeplatte mit einer Pinzette ab.

    • Wenn es dir gelingt, die Graphitplatte unbeschadet abzulösen, kannst du sie beim Zusammenbau wieder verwenden.

    Would have been much more helpful to start off by saying to be careful removing this piece so you can reuse.

    Also would have been helpful to say that the kit comes with a new one, so don't worry about saving it.

    lupa -

    I found the sharp tweezers accidentally cut through the graphite tape and graphite pad. Use the crododile tweezers instead of the pointed ones to avoid ripping the tape.

    Marcel McKenzie -

    To clarify what lupa said: the kit does in fact come with a new graphite pad for the charging plate cover. It took me a while to find it, finally found it underneath my parts tray on the table somehow so it may slide around inside the shipping box.

    Michael Gundlach -

    I forgot to put back the graphite thermal pad when reassembling it. Now it is all glued back together and it is working like a charm. Should I worry? 🤔

    Ivan Penkov -

  20. 1eBqEykKCjSnXjba
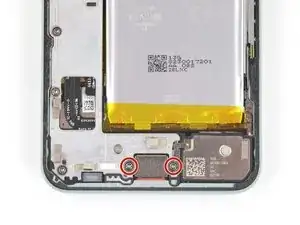
    • Entferne die beiden 4,6 mm langen Torx T3 Schrauben, mit denen die Abdeckung der Ladeplatte am Mittelrahmen befestigt ist.

    • Halte während der gesamten Reparatur die Schrauben gut geordnet und achte darauf, dass jede an ihren ursprünglichen Platz zurück kommt.

  21. MRXQwTZ2RrfesIYE
    MRXQwTZ2RrfesIYE
    vxTHHVZE22vHJCO2
    • Entferne die Abdeckung der Ladeplatte mit einer Pinzette.

    • Bewahre dieses Bauteil gut auf, du benötigst es beim Zusammenbau.

    Using the repair part tray to hold stuff that's needed later worked well for me

    Rick -

  22. oR3xLWXumQOWvDOi
    • Entferne die acht 4,6 mm langen Torx T3 Schrauben, mit denen der Mittelrahmen befestigt ist.

  23. JPgBZLYKgs1THrXW
    JPgBZLYKgs1THrXW
    EPgFFlgRcP264jrI
    nFXAFwvFhDLKAJcn
    • Hebe die rechte Seite des Mittelrahmens mit der Pinzette hoch.

    • Entferne den Mittelrahmen.

    • Der Abstandshalter oben im Smartphone fällt beim Ausbau des Mittelrahmens meistens heraus. Bewahre diesen Abstandshalter gut bis zum Wiederzusammenbau auf. Die Bilder dazu findest du in der Anleitung zum Austausch der Hauptplatine.

    Removing the midframe may cause a metal-foam spacer above the light sensor to pop out. After placing in the midframe on re-assembly, you can use the tweezers to squeeze the spacer back in between the midframe and the metal divider near the top of the phone.

    Dumpy Sheep -

    There is a picture of this spacer at https://www.ifixit.com/Guide/Google+Pixe.... To replace it, first replace the midframe. Then, before screwing the midframe back down, use the tweezers to pinch the space together, compressing the foam in the middle, and slide it into place.

    soren -

    In step 21 (and step 23) the photo showing the spacer shows the cover over the rear camera and apparently the camera itself removed. But this is not required and nor is it instructed in this guide. Confusing for photo to not match what I'm looking at.

    Gregg Lee -

    FYI My model Pixel 5 SKU: GA01316-UK does not have a spacer.

    Marcel McKenzie -

    I was very careful and looking specifically for this when removing the screen however it is just an empty cavity with nothing there. I guess it differs based on different PIxel 5 models?

    Marcel McKenzie -

  24. wYIZd3UBYiJOIH6B
    wYIZd3UBYiJOIH6B
    mTkFMKoNFSJlHdsA
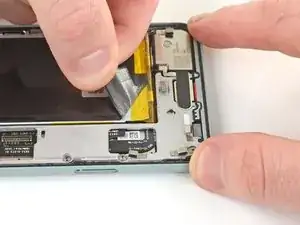
    • Heble den Akkustecker mit der Spudgerspitze gerade nach oben und löse ihn von der Hauptplatine ab.

  25. BJS2eXrS6AgkYlSL
    • Entferne die 4,1 mm Torx T3 Schulterschraube.

  26. XMnj3q4eoFTDhQsX
    XMnj3q4eoFTDhQsX
    PNABcxNFYLvSewL2
    LYw3kKDWB1HSc1Q6
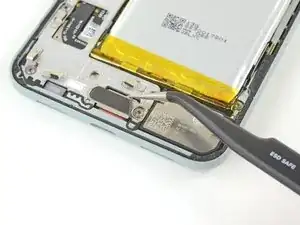
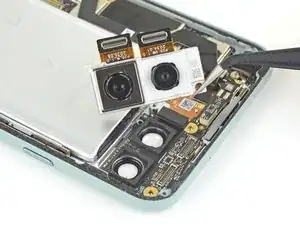
    • Trenne die beiden Druckstecker der Rückkameras mit einem Spudger von der Hauptplatine ab.

    • Drücke die Rückkameraeinheit mit den Fingern nach unten und vermeide es, die Hauptplatine zu verbiegen.

  27. PdfnvdTSWAKsF2VW
    PdfnvdTSWAKsF2VW
    wVoTBu1C1b1JS5jY
    q6AgCUwim5LsVyvy
    • Hebe die Rückkameraeinheit mit der Pinzette hoch und entferne sie aus ihrer Fassung.

    • Wenn an deiner Ersatzkamera ein Abstandshalter aus Kunststoff angebracht ist, musst du ihn vor dem Einbau entfernen.

    • Kontrolliere nochmals, ob die Linsenoberfläche gut von Staub und Schmutz gereinigt ist, bevor du die Kameraeinheit einbaust.

  28. KR4lNjRZkgFkZdZh
    KR4lNjRZkgFkZdZh
    VQALn1g6aEC4IOhf
    qWmxLyJrbZFB6Vjw
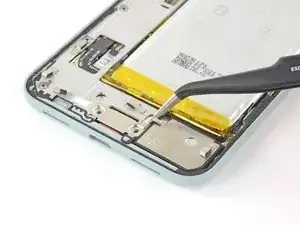
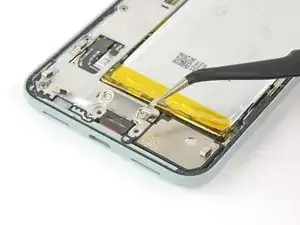
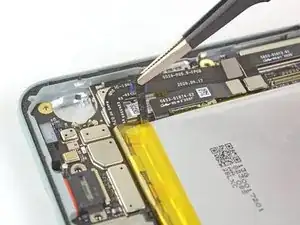
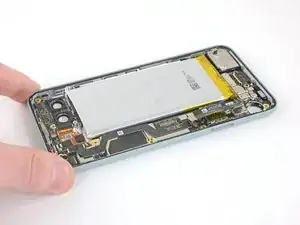
    • Fasse die schwarze Zuglasche an der oberen rechten Kante des Akkus mit einer stumpfen Pinzette. Hebe die Lasche so weit mit einer Pinzette hoch, dass du sie mit den Fingern greifen kannst.

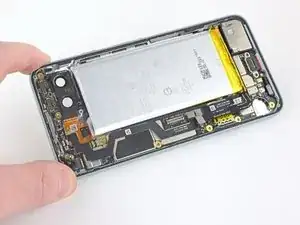
    • Ziehe die Zuglasche langsam und gleichmäßig und in einem flachen Winkel, um zu verhindern, dass sie in der Mitte reißt.

    • Halte die elastischen Klebestreifen flach und unzerknittert. Verdrehte oder zerknitterte Streifen können zusammenkleben und reißen. Sie sollten aber sauber herauskommen.

    • Wenn es schwer geht, die Streifen herauszuziehen, dann wickle sie um einen Spudger und setze die Arbeit fort.

    • Wenn der Streifen reißt, dann greife das Reststück mit den Fingern oder einer stumpfen Pinzette und ziehe ihn weiter heraus.

    • Wenn sich der gerissene Streifen nicht herausholen lässt, dann mache mit dem nächsten Schritt weiter.

    I found what helped the best, was after grabbing the tab wrapping it around the tip of the spudger, and rolling slowly away, holding it as close as possible to where the tab was. Before I did that since you're pulling so much at once it easily snapped in half. Luckily I could grab a tiny bit of the strip. After wrapping it around the spudger, it no longer broke. The whole strip came off in one piece. Both pieces are complete horizontal pieces and are along the entire width of the battery, from the side you're pulling to the other side of the battery. There's quite a bit there especially since it stretches during this process. You'll feel it suddenly basically give away. ******

    It is very much like the adhesive strips you use to hang items on the wall. When you're removing the hook, you pull at a low angle on that tab and it stretches until it comes off clean. Pull too high and you peel paint. A similar process here, keep it low and roll it slowly on the spudger. It will come away cleanly.

    Jesse -

    Pull very slowly. Once there is enough out to grip with fingers use your fingers . The tweezers concentrated the load in a small contact area with hard edges. more likely to start a tear. Easier to control pull as well. As the tab comes out keep regripping closer to the battery. That takes the load off the part of tab that has already been stretched thin and weakened.

    Gregg Lee -

    "Shallow" is not a very helpful descriptor for the angle, nor do any of the pictures demonstrate what they meant.

    Instead of pulling straight up, try pulling as parallel to your work surface as possible. It's like removing Command hooks.

    lupa -

    As expected the pull tabs snapped.

    Marcel McKenzie -

    This tab also snapped on me. I was pulling up not out. I agree that pulling almost parallel to the work surface is best. Slow and steady.

    Kristi Hvidbjerg -

    Snapped on me too. Worth saying that

    1. It's not worth going all out for a "Shallow" angle if the tape will get caught on any other fixings on the phone. Keep it shallow within reason
    2. Take your time! Pull slowly - when you've pulled a little bit, hold and regrab the tape closer to the battery with your other hand and pull slowly again. Keep doing this rather than doing one long continuous pull

    Rick -

    It is worth getting this right, using the slow-wrap-around-the-spudger approach, because if you get the whole strip out in this step and step 24, the battery lifts right out in step 27. Go veeery slowly, roll around the spudger tip so that the adhesive rolls under the spudger instead of over (to keep the shallow angle), and keep as parallel to the work surface as possible without rubbing hard on the edge of the phone. You'll hear squeaking sounds and that's OK. If you see the tape getting narrow it may be about to snap -- roll the spudger up close and pull gently to keep going.

    Michael Gundlach -

    Do the roll it on the spudger thing. My strip was coming very slowly, so I put the hairdryer to it while pulling and the strip immediately snapped, so for this step heat does not help So I took some drugstore 91% isopropyl and used one of my kids little paint brushes, dipped the bush in so it was about to drip then pushed that under the battery, quite a few times. I eventually go the battery out, although it's probably ruined (but I was putting in a new one anyway).

    donpb -

  29. PNnhcXiI3Fjrt5DW
    PNnhcXiI3Fjrt5DW
    LNvauDhS6lXaVhvY
    FuVYIte1ITLyvmvO
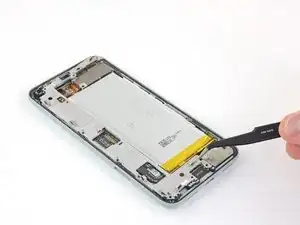
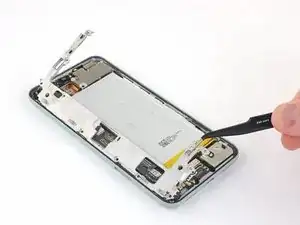
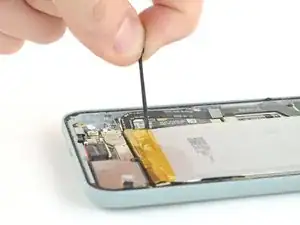
    • Wiederhole den vorigen Schritt für den anderen elastischen Klebestreifen an der unteren linken Kante des Akkus.

    • Wenn der Streifen vorzeitig reißt und sich nicht herausholen lässt, dann mache mit dem nächsten Schritt weiter.

    I had to fish around for this tab. It was not as easy to find as the last.

    lupa -

    Same. At first I thought it was a different compenent alltogether however that didn't help as it snapped when pulling anyway!

    Marcel McKenzie -

    Both tabs are hard to find. The first one snapped, this one I made sure to grip as close to the battery after I successfully pulled a small piece and by not pulling up but pulling away from the battery toward the edge of the frame. Because the tape stretches so much, I probably stretched and then grabbed the tape close to the battery 5 or 6 times. It eventually came off without breaking.

    Kristi Hvidbjerg -

    Same comment as on step 23: if you get this right, step 27 is free.

    Michael Gundlach -

  30. gChMTRLxNnsAymdF
    gChMTRLxNnsAymdF
    PfeiY5VKlLvcsxCN
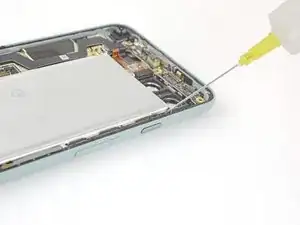
    • Wenn einer der Streifen unter dem Akku reißt und nicht herausgeholt werden kann, dann gib einige Tropfen Isopropylalkohol (mindestens 90%ig) in den Spalt des entsprechenden Klebestreifens.

    This is a frustrating step since I bought the kit thinking I had everything I needed. I don't keep 90% isopropyl alcohol on hand (71% is effective as a disinfectant, where as 90% is not).

    For those who also do not have 90% on hand, I was able to just gently lift the battery out without the alcohol and the graphite under the battery remained in perfect condition and did not tear at all.

    lupa -

    Agree. The fix kit supplies only 70% IPA so I had to buy some on Amazon. The pulltabs snapped in the previous step and the dropper provided in the kit is rather "imprecise". Kept prying at the edges got it off for me but so far this is the hardest step as it's hard to know how much force to remove the battery and risk damaging another component.

    Marcel McKenzie -

  31. LajAYQFplGJcMSbs
    LajAYQFplGJcMSbs
    bTTWR2UoNMAkYcPs
    • Kippe das Handy, so dass der Alkohol zum verbliebenen Reststück des Streifens hin läuft.

    • Warte eine Minute, bis der Kleber weich ist, und gehe zum nächsten Schritt über.

    If you're like me, I ended up having a random piece fall out of the phone that I had no idea where it went. After searching I gave up and left it out. However, after looking at the second photo in this step, the one with it tilted fully towards the camera, I found it. Between the index and thumb in the photo, directly in the center of the phone is a thick gray bar. Just to the right of it is a loose piece that might fall out for you. It looks like two thin pieces of metal that sandwich some insulation. You will also notice two tiny tabs bent at an angle on each end only on one side. If that piece does fall out, that's where it goes. Just match the tab angles with this photo and location. I, unfortunately, don't have that piece anymore and am not willing to break through that display adhesive to put it back anyways.

    Jesse -

    FYI My model Pixel 5 SKU: GA01316-UK does not have this spacer at all.

    Marcel McKenzie -

  32. DrliTJneKm2bIUSP
    DrliTJneKm2bIUSP
    2B64XTFTwiVjwueS
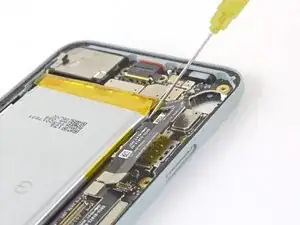
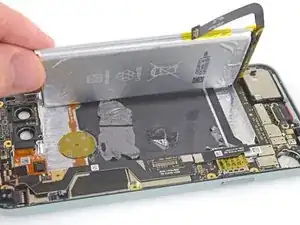
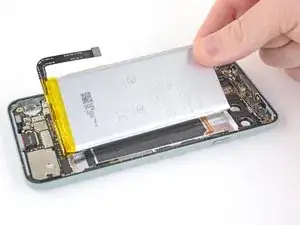
    • Setze ein Plektrum in den Spalt an der linken Seite des Akkus ein.

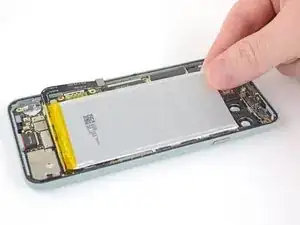
    • Trenne mit dem Plektrum den restlichen Kleber unten und oben am Akku auf.

    • Vermeide es, mit dem Plektrum an den beiden Flachbandkabeln unter dem Akku zu schaben.

    • Das kann vielleicht schwierig sein, da der Kleber strategisch zwischen den Kabeln und dem Akku angebracht ist. Eine mögliche Lösung ist, eine Plastikkarte so zuzuschneiden, dass sie zwischen die Flachbandkabel und der Kante an der Akkuvertiefung passt.

    • Verforme den Akku nicht.

    • Vermeide beim Hebeln mit dem Plektrum die Kontaktstifte des Ohrhörer-Lautsprechers nahe an der linken oberen Ecke des Akkus.

    • Wenn sich der Akku nicht hochhebeln lässt, dann tröpfle etwas mehr Isopropylalkohol an die Klebestreifen. Eine Kunststoffkarte kann bei diesem Verfahren auch sehr nützlich sein.

    This was, by far, the hardest step for me. Pay very much attention to that link "strategically located". It tells you exactly where the toughest adhesive is. I had to use a lot of isopropyl alcohol, a lot of waiting for the adhesive to dissolve, and the thin spudger on only the top and bottom of the battery to pry it out. I did not use the pick.

    I don't think it's worth applying adhesive when putting the battery back in.

    Dumpy Sheep -

    Absolutely agree. More isopropyl alcohol, a lot of waiting is the key.

    Artem Chepurnyi -

    I would recommend applying a little adhesive to the new battery. I didn't apply any and my battery rattles a bit. I wish I had put a small amount of tape in just to keep it in place.

    Elliot -

    Watch how far you push in. The thin cable for the finger print sensor is at the back I snapped it pushing into the glue.

    Kevin McDonagh -

    Try to not use alcohol. Or at least use just a tiny bit without tilting the phone too much. While it worked for me, it leaked into my primary camera lens. Wide camera is okay fortunately, so I can still take photos for important things, and I hope in the next few days alcohol will evaporate. I also tried to put the iOpener on the camera to increase the pressure and move the alcohol to the edges. It kinda worked but photos are still a no go, too blurred

    Emanuele Luciani -

    Just to update who may read this, alcohol fully evaporated after 1 day. I've been very lucky 😅!

    Emanuele Luciani -

    Be aware that if the battery has already been replaced, the aftermarket battery may be adhered over the fingerprint reader cable. I forgot that I already replaced the battery so I was expecting all the adhesive to be to be above the cable, so I pried on the battery too hard and the adhesive ripped the cable. Using more alcohol seems to have been the right move.

    Stephen Smith -

    For me, trying to pull on the adhesive pull tabs went nowhere - they broke off immediately, so essentially the full adhesive strips where still in place behind the battery. Here's what did work:

    I used lots of isopropyl alcohol, dropping in where both of the pull tabs are, and tilting the phone in the appropriate direction to allow the alcohol to flow down the length of the each strip. I did this several times -- several drops of alcohol, tilt, wait, repeat.

    Next, I stuck the blue pick in where the diagram shows to, and got a little bit of leverage. The battery was still not budging at this point, but I left the pick wedged in there and walked away for an hour. When I came back, the battery had lifted up thanks to the weakened adhesive and pressure from the pick. All I had to do was lift the battery out the rest of the way, it came without a struggle.

    Dane B -

  33. Z6ay1oul4bGqB32N
    Z6ay1oul4bGqB32N
    Nst3AuDPQCO3C3Hd
    • Verwende einen beschädigten oder verformten Akku nicht mehr, das ist ein Sicherheitsrisiko. Ersetze ihn durch einen neuen.

    • Entferne den alten Akku.

    Step 28 battery replacement guide. This is the battery replacement guide - for bad batteries. So why does it say "Do not reuse the battery if it has been deformed or damaged, as doing so is a potential safety hazard. Replace it with a new battery." This must have been copied from a different guide, that does not involve battery replacement.

    Gregg Lee -

    Great! You did it and removed the battery... now what? Doing the steps in reverse is easier said than done.

    To put it back together I recommend watching Google Pixel 5 Battery Replacement from 5:46 onwards. This video as an accompaniment in general to this guide I found super helpful as it's an actual video of this repair.

    Seeing someone actually perform this exact repair in realtime is very helpful as well as some techniques not mentioned in this guide.

    I performed a screen and battery replacement with the help of this video so I really recommend watching it.

    Marcel McKenzie -

    Could be because these steps are used in other repairs where the battery is still fine?

    Bubba Mustafa -

    The youtube link is helpful - thank you! Frustrating that the guide doesn't go through the reverse steps more explicitly, especially considering the adhesives need to be relaid.

    With these adhesives that come as part of the kit, make sure to keep the blue coverings face-up, then press all over before attempting to pull the blue coverings. This is especially fiddly when laying the final adhesive for the screen. Whilst pulling off the blue covering here, I went especially slowly and followed with the spudger to keep the adhesive down if it was coming up with the blue covering. Note: it's worth placing the adhesive before cliping in the screen connector unless you want to test the screen first (as per the youtube vid)

    Rick -

    There are also two small adhesive plastic "spacer strips" at the top and bottom of the battery that should be peeled off and installed on the replacement battery, they help hold the battery in the center of the compartment. the bottom one has a "D" cross-section to it while the top is flat and more like a rub strip. They did not come on the replacement battery and aren't mentioned anywhere.

    John Tremper -

    PSA: When reconnection the screen (the little lego bracket) be freaking careful. I've connected brackets like these multiple times on other devices but here these pins are so f fragile. I bend the left top pins (3 of them) without noticing and was freaking out if I bricked my phone.

    Fortunately, I could bend them back but I was in a lot of pain till I reassembled it.

    Luke -

  34. QNTyYUUBx3NbBdo6
    QNTyYUUBx3NbBdo6
    nuywJI5OEtPJWcNC
    IFdS1yVTedNUA24M
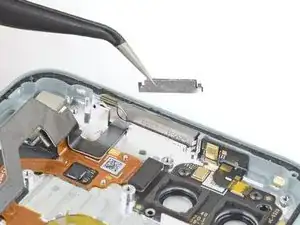
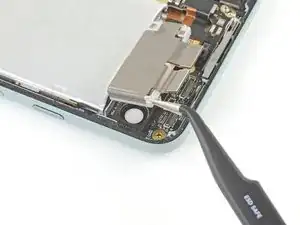
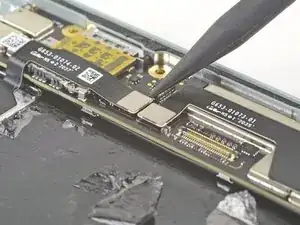
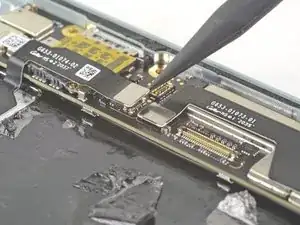
    • Hebe die beiden Druckverbinder mit der Spudgerspitze gerade nach oben und trenne sie von der Hauptplatine ab.

  35. 6CrTdLxRSeVv35HK
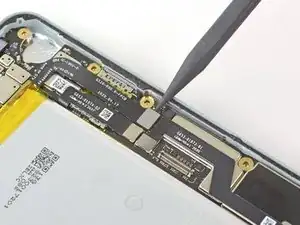
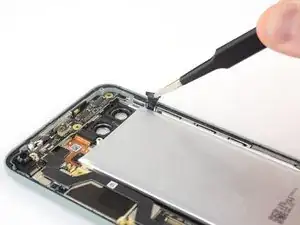
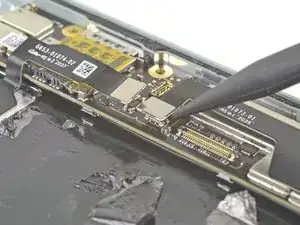
    • Entferne die beiden 2,9 mm Torx T3 Schrauben, mit denen die Hauptplatine am Rückgehäuse festgeschraubt ist.

  36. QsHDZEWBSFdIpWJM
    QsHDZEWBSFdIpWJM
    kuYhKJwENFUKe1TN
    X6N4MTMJwHAKyiHL
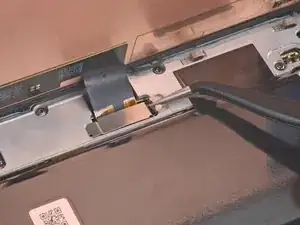
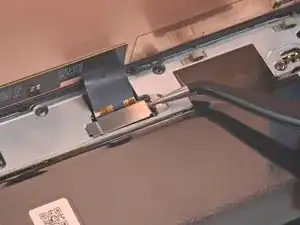
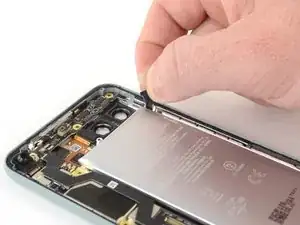
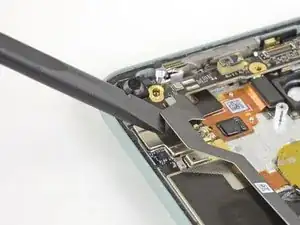
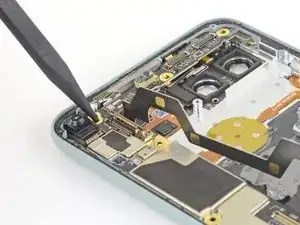
    • Biege das Flachbandkabel, das den Druckverbinder im Rückgehäuse verdeckt, behutsam mit einem Spudger aus dem Weg.

  37. FSeOPYRFtJnUDg3G
    FSeOPYRFtJnUDg3G
    Gbn4rlOBceNGKtSv
    • Löse den Druckverbinder des Rückgehäuses mit der Spudgerspitze ab.

  38. rOkQMkoM3LINFS3K
    rOkQMkoM3LINFS3K
    BJ1jcuQBOKTVjXP1
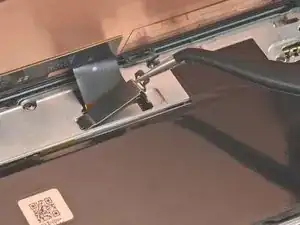
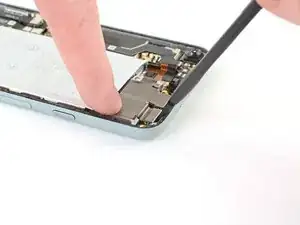
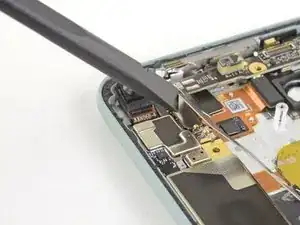
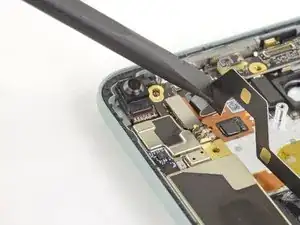
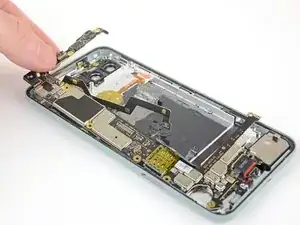
    • Setze die Spudgerspitze in die Schraubenlöcher nahe der Frontkamera ein.

    • Drücke die Hauptplatine zur Unterkante des Smartphones hin, hebe sie dann hoch, so dass sich die Oberkante der Hauptplatine vom Rückgehäuse löst.

  39. kX34xxeK3upBp4rx
    kX34xxeK3upBp4rx
    jmqKMcdYB6vw2oyX
    YQClP3S6BvCAGwIG
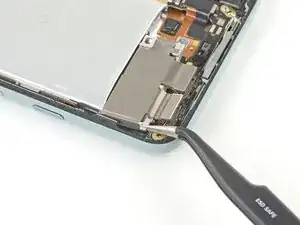
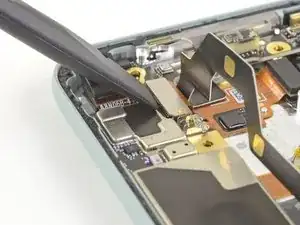
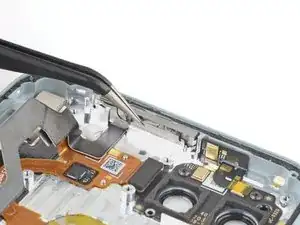
    • Ziehe die Hauptplatine mt den Fingern zum oberen Ende des Rückgehäuses hin, so dass die Ladebuchse herauskommt.

    • Verdrehe oder verbiege die Hauptplatine nicht.

    • Wenn sich die Hauptplatine irgendwo am Gehäuse verhakt, dann gehe mit dem Spudger an ihren Kanten entlang, um sie abzulösen.

    • Entferne die Hauptplatine.

  40. JKO2MONLaYeVLUns
    JKO2MONLaYeVLUns
    W2DQCqXpJdCYXBnR
    • Der obere Abstandshalter fällt meistens heraus. Um ihn wieder einzusetzen, richte den Mittelrahmen aus, ohne ihn festzuschrauben. Fasse den Abstandshalter mit einer Pinzette an und drücke den Schaumstoff im Inneren zusammen, so dass du ihn an seine alte Position drücken kannst. Schraube erst dann den Mittelrahmen wieder fest.

    • Fasse den Abstandshalter am Mittelteil an, nicht bei den empfindlichen Laschen an den Enden.

Abschluss

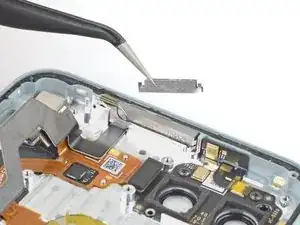
Vergleiche dein Ersatzteil mit dem Originalteil — Möglicherweise musst du fehlende Teile übertragen oder Schutzfolien vom Neuteil abziehen, bevor du es einbauen kannst.

Um dein Gerät wieder zusammen zu setzen, befolge die Anleitung in umgekehrter Reihenfolge.

Entsorge deinen Elektromüll fachgerecht.

Die Reparatur verlief nicht wie geplant? Versuche es mit einigen grundsätzlichen Problemlösungen oder frage in unserem Forum um Hilfe.

Robert Boyd

Mitglied seit: 01/02/21

30168 Reputation

4 Kommentare

Good day. Please tell me, what is the size of the vibration motor for the pixel 5? I can't find the type of vibro motor anywhere.

Андрей Тарасенко -

Mr. Boyd, where exactly is the proximity sensor inside the Pixel 5 phone?

J. Goodenough -

Any idea on model number for power IC in pixel 5? The technician is saying its Qualcomm PM8996 or PMI 8996 001 Power Management IC. Can somebody please help with my dead pixel 5 please!

Avichal Verma -

Is the pixel 5 motherboard available for purchase?
What about the front camera and or camera module/board.

My cameras are not working and I already replaced the rear cameras to no avail.

Reginald Poyau -