
Einleitung
Diese Anleitung wurde von iFixit-Mitarbeiter:innen verfasst und ist keine offizielle Reparaturanleitung von Google. Hier erfährst du mehr über unsere Qualitätsstandards.
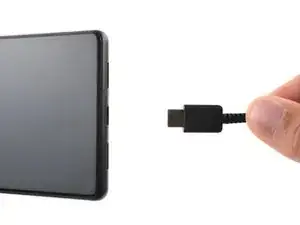
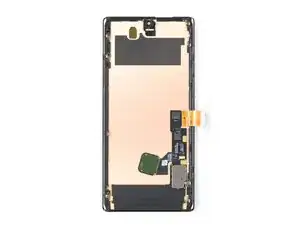
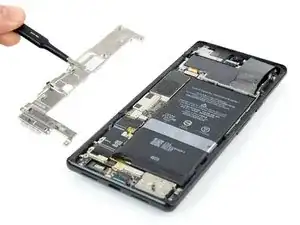
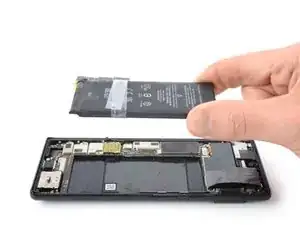
Die Anleitung zeigt, wie du einen abgenutzten oder kaputten Akku in deinem Google Pixel 6 Pro ersetzen kannst.
Ist der Akku angeschwollen, ergreife entsprechende Vorsichtsmaßnahmen .
Entlade zu deiner Sicherheit den Akku auf unter 25 %, bevor du dein Gerät zerlegst . Dadurch wird das Risiko eines gefährlichen Brands verringert, falls der Akku während der Reparatur versehentlich beschädigt wird.
Achtung: Das Pixel 6 enthält Laser der Klasse 1. Wenn du es auseinandernimmst, könntest du unsichtbarer Infrarotstrahlung ausgesetzt sein.
Ob dein Gerät nach der Reparatur noch wasserdicht ist, hängt davon ab, wie gut du es beim Zusammenbau versiegelst. Die IP-Zertifizierung wirst du jedoch verlieren.
Du benötigst Ersatzkleber, um die Komponenten beim Zusammenbau des Geräts wieder zu befestigen.
Werkzeuge
-
-
Wenn das Display zerbrochen ist, dann klebe eine Lage von durchsichtigem Paketband darüber, damit die Saugheber besser haften können.
-
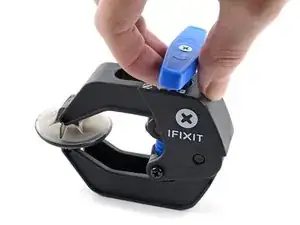
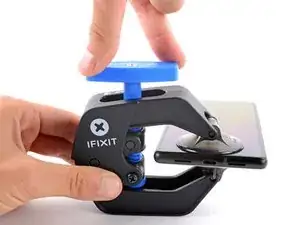
Drücke den blauen Griff zurück, damit die Arme der Anti-Clamp frei beweglich werden.
-
Schiebe die Arme über die linke oder rechte Kante des Smartphones.
-
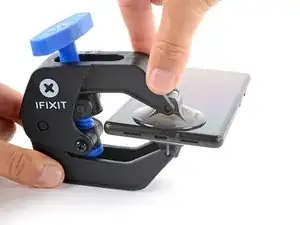
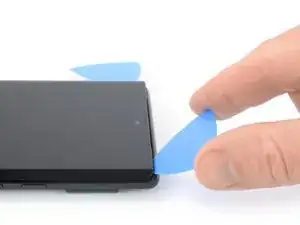
Bringe die Saugheber direkt an der Unterkante des Smartphones an, einen auf der Vorderseite, den anderen auf der Rückseite.
-
Drücke die Saugheber zusammen, damit sie sich auf den Oberflächen festsaugen.
-
-
-
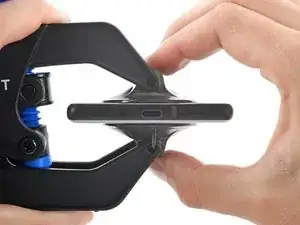
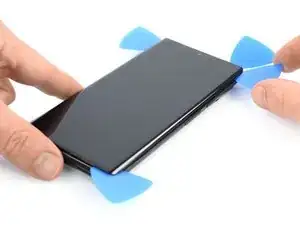
Drücke den blauen Griff nach vorne, um die Arme zuverriegeln.
-
Drehe den Griff eine volle Umdrehung im Uhrzeigersinn oder bis die Saugheber beginnen sich zu dehnen.
-
Achte darauf, dass sich die Saugheber weiterhin gegenüber stehen. Wenn sie sich nicht mehr gegenüber stehen, dann löse die Saugheber ein wenig ab und schiebe sie in die richtige Position.
-
-
-
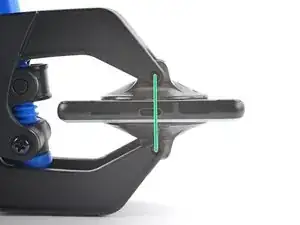
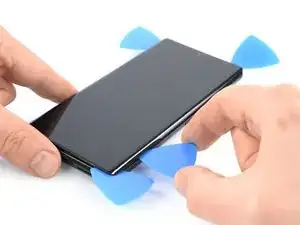
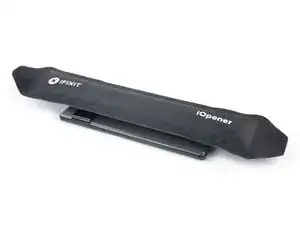
Erwärme einen iOpener und führe ihn durch die Arme der Anti-Clamp.
-
Forme den iOpener so um, dass er über der Unterkante des Smartphones liegt.
-
Warte eine Minute, damit sich der Kleber allmählich ablösen und ein Spalt entstehen kann.
-
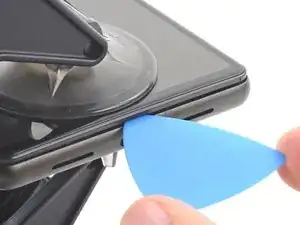
Wenn der Spalt groß genug ist, dann setze ein Plektrum unter den Displayrahmen ein.
-
Überspringe die nächsten zwei Schritte .
-
-
-
Erwärme das Display mit einem erwärmten iOpener mindestens 3 Minuten lang, um den Klebstoff darunter zu aufzuweichen.
-
-
-
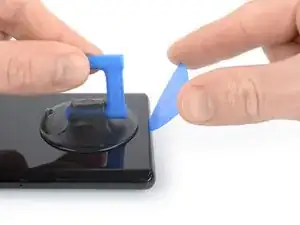
Sobald sich das Display warm anfühlt, setze den Saugheber an der Unterkante des Displays an.
-
Hebe das Display inklusive seines Sicherheitsrahmens mit dem Saugheber an, um einen kleinen Spalt zwischen dem Display und dem restlichen Gerät zu schaffen.
-
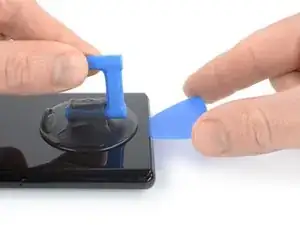
Nimm ein Plektrum und setze es in den Spalt ein.
-
Ziehe das Plektrum in die untere linke Ecke des Displays, um den Klebstoff durchzuschneiden.
-
Lasse das Plektrum stecken, um zu verhindern, dass sich der Kleber wieder verbinden kann.
-
-
-
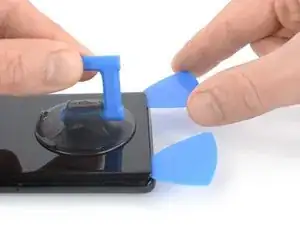
Setze ein zweites Plektrum an der unteren Kante ein und schiebe es zur rechten unteren Ecke der Displays, um den Klebstoff durchzutrennen.
-
Lasse das Plektrum stecken, um zu verhindern, dass sich der Klebstoff wieder verbindet.
-
-
-
Schiebe ein drittes Plektrum unter die untere linke Ecke des Displays ein.
-
Ziehe nun das Plektrum entlang der linken Kante des Displays, um den Klebstoff zu durchtrennen.
-
Lass das Plektrum in der oberen linken Ecke stecken, um zu verhindern, dass sich der Klebstoff wieder verbindet.
-
-
-
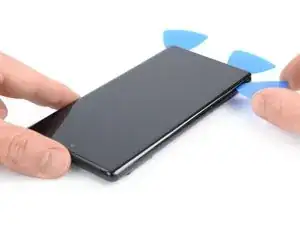
Setze ein viertes Plektrum an der oberen linken Ecke des Displays ein.
-
Ziehe das Plektrum entlang der oberen Kante des Displays, um den Klebstoff zu durchtrennen.
-
Lasse das Plektrum in der oberen rechten Ecke des Bildschirms, um zu verhindern, dass sich der Klebstoff wieder verbindet.
-
-
-
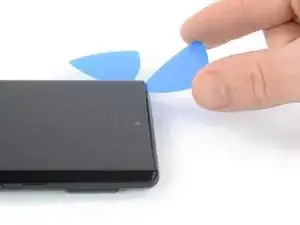
Setze ein fünftes Plektrum ein und schiebe es an der rechten Seite entlang, um den restlichen Klebstoff zu durchtrennen.
-
-
-
Klappe das Display vorsichtig zur linken Seite des Smartphones, so wie du ein Buch öffnen würdest.
-
-
-
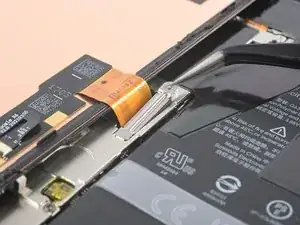
Benutze einen Torx T3 Schraubendreher, um die 2 mm lange 3IP Torx Plus Schraube zu entfernen, mit der die Metallhalterung des Displaykabels befestigt ist.
-
-
-
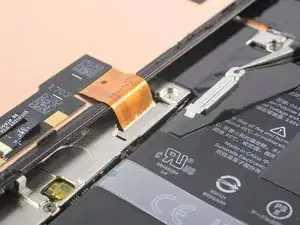
Benutze eine Pinzette, um die Metallhalterung zu entfernen, die sich über dem Displaykabelstecker befindet.
-
-
-
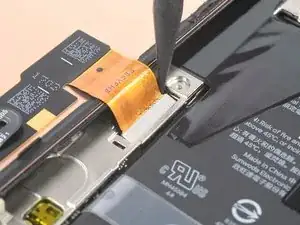
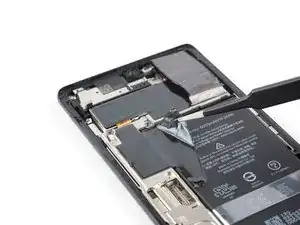
Benutze einen Spudger, um das Flexkabel des Displays abzutrennen, indem du den Stecker gerade nach oben aus seinem Anschluss hebelst.
-
-
-
Damit das Display nicht beschädigt wird:
-
Wenn du das Display auf die Arbeitsfläche ablegst, achte darauf, dass kein Fremdkörper die Rückseite berührt. Am besten legst du das Display auf ein sauberes, weiches und fusselfreies Tuch.
-
-
-
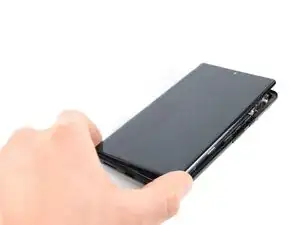
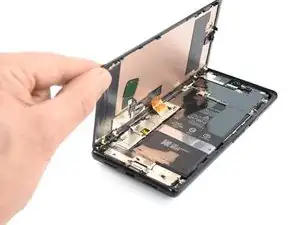
Entferne das Display.
-
Wenn du das Display ausgetauscht hast, dann kontrolliere die Öffnung für die Frontkamera und den Ausschnitt für den Sensor. Entferne alle noch vorhandenen Schutzfolien.
-
Jetzt ist eine gute Gelegenheit, um das Smartphone ausgiebig zu testen, bevor du es wieder zuklebst. Schließe das Display zeitweise an, schalte das Gerät ein und überprüfe, ob alles funktioniert. Bevor du weiterarbeitest, musst du das Smartphone wieder ausschalten und das Display abtrennen.
-
Wenn du beim Zusammenbau eine vorgestanzte Klebefolie benutzt, folge dieser Anleitung.
-
Wenn du beim Zusammenbau fertig zugeschnittene Klebestreifen benutzt, folge dieser Anleitung.
-
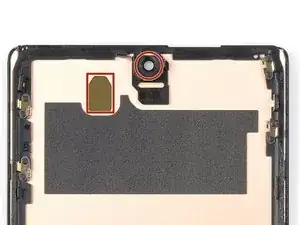
Wenn du ein neues Display eingebaut hast, führe eine Kalibrierung deines Fingerabdrucksensors durch.
-
-
-
Lege einen erwärmten iOpener mindestens zwei Minuten lang auf das Rückseitenglas, um den Kleber der Graphitschicht auf dem Akku aufzuweichen. Du kannst auch ein Heißluftgebläse benutzen.
-
-
-
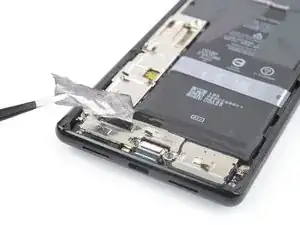
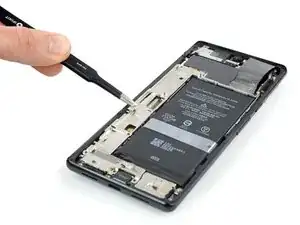
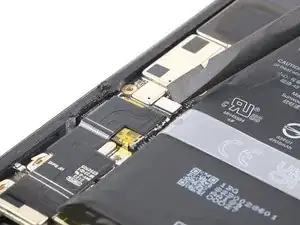
Löse die schwarze Graphitschicht vorsichtig mit einer stumpfen Pinzette oder dem Fingernagel von der Unterkante des Akkus und der Abschirmung der Hauptplatine ab.
-
Entferne die Graphitschicht.
-
-
-
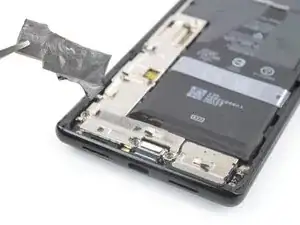
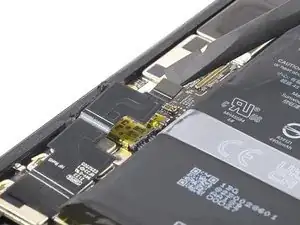
Löse die schwarze Graphitschicht vorsichtig mit einer stumpfen Pinzette oder dem Fingernagel von der rechten oberen Ecke des Akkus ab.
-
Klappe die Graphitschicht in Richtung der Selfie-Kamera, um Zugang zum Akku zu erhalten.
-
-
-
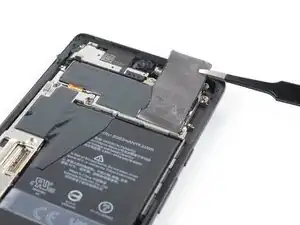
Löse die schwarze Graphitschicht vorsichtig mit einer stumpfen Pinzette oder dem Fingernagel von der linken Kante des Akkus und der Abschirmung der Hauptplatine ab.
-
-
-
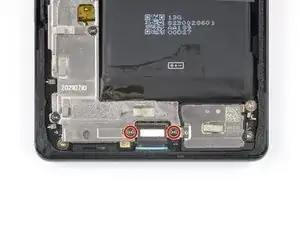
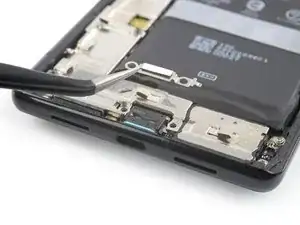
Entferne die beiden 5,1 mm langen 3IP Torx Plus Schrauben, mit denen die Metallhalterung der Ladebuchse befestigt ist.
-
-
-
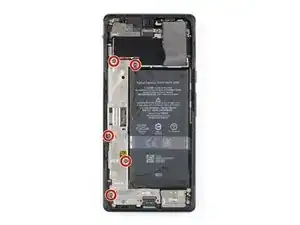
Entferne die fünf 5,1 mm langen 3IP Torx Plus Schrauben, mit denen die Halterung der Hauptplatine befestigt ist.
-
-
-
Entferne die Abdeckung der Hauptplatine vorsichtig mit einer Pinzette oder deinen Fingern.
-
-
-
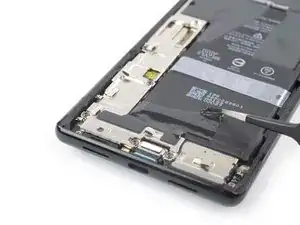
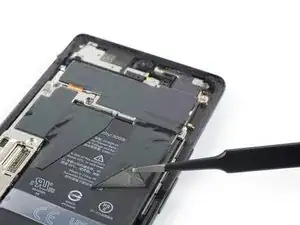
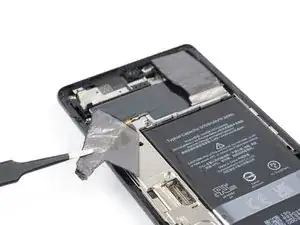
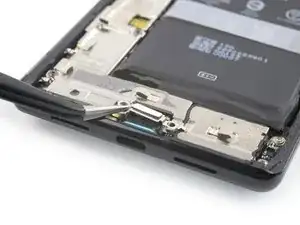
Heble den Akkustecker senkrecht mit dem Spudger aus seinem Anschluss nach oben und trenne das Akkukabel ab.
-
-
-
Kippe das Smartphone etwa in einem Winkel von 45°.
-
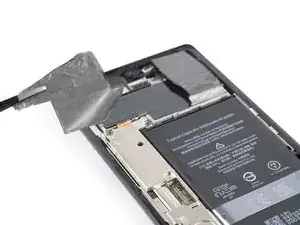
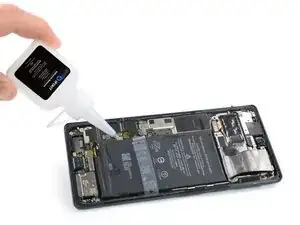
Tröpfle etwas hochkonzentrierten Isopropylalkohol (mindestens 90%ig) in den Spalt zwischen Hauptplatine und der oberen und der linken Ecke des Akkus.
-
-
-
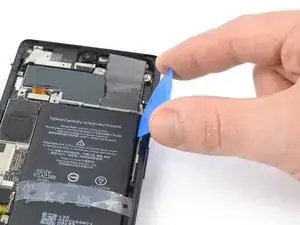
Setze ein Plektrum in den Spalt zwischen der oberen rechten Ecke des Akkus und der Mittelrahmen ein.
-
Kippe das Plektrum zum Abhebeln des Akkus nach unten. Vergrößere den Spalt zwischen Akku und Mittelrahmen so weit , dass du eine Plastikkarte einsetzen kannst.
-
-
-
Arbeite dich mit dem Plektrum an der rechten Kante des Akkus nach unten und vergrößerte den Spalt so weit, dass du eine Plastikkarte einsetzen kannst.
-
-
-
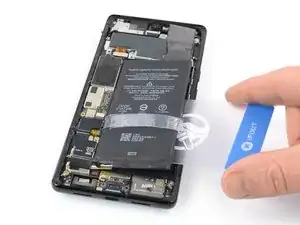
Setze eine Kunststoffkarte unter die rechten Kante des Akkus ein.
-
Schiebe die Karte unter der rechten Kante des Akkus entlang und löse ihn vom Mittelrahmen ab.
-
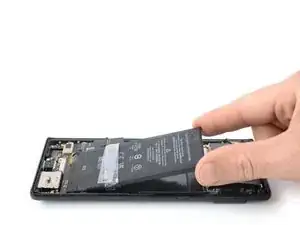
Heble den Akku mit der Kunststoffkarte hoch.
-


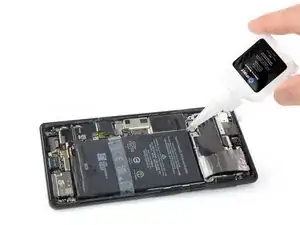


Wenn möglich, schalte dein Gerät ein und teste die Reparatur, bevor du neuen Klebstoff aufträgst und das Gerät wieder verschließt.
Vergleiche dein neues Ersatzteil mit dem Originalteil. Möglicherweise musst du vor dem Einbau die verbleibenden Komponenten übertragen oder die Klebestreifen vom neuen Teil entfernen.
Befolge diese Anweisungen in umgekehrter Reihenfolge, um dein Gerät wieder zusammenzubauen.
Um eine optimale Leistung zu erzielen, solltest du den neu installierten Akku kalibrieren, nachdem du diese Reparatur beendet hast.
Das Gerät ist mit einem eingebauten Diagnosetest ausgestattet. Hier siehst du, wie du das Pixel Diagnostic Tool starten kannst.
Bring deinen Elektroschrott bitte zu einer fachgerechten Entsorgungsstelle.
Die Reparatur hat nicht wie geplant geklappt? Versuche es mit grundsätzlichen Lösungen oder frage in unserem Forum um Hilfe.

13 Kommentare
White flickering screen after battery replacement. I checked all the connections and it seemed that they were all right.
Same AF, got to take it back apart and try to reconnect my screen
I found an important and critical piece missing in this guide. In steps 6 through 10 your goal is to get the screen separate from the phone chassis. While they do mention to be sensitive around the front camera the guide doesn't mention that you also need to be sensitive around the left-side center of the phone as well. This is where the screen cable connects to the motherboard. I wouldn't even put a pick or tool anywhere near that area. I didn't put too much pressure or anything but it looks like I somehow hit that cable while removing the screen. I don't see any damage to the cable or the screen but when I turn the phone on my screen now outputs several always on bright pink and green lines running through it indicating something went wrong here. So I went from replacing the battery to having to replace the screen too. Between the cost of the new battery and a new screen it probably would've been cheaper to just buy another used Pixel 6 Pro.
Dan -
Sorry, I have a question, did you change the screen?
RICCC -
I went through this process successfully; Several notes;
1. As Dan Mentions, careful of the screen cable, but also be careful of the alignment pins top left and bottom right of the screen - they block the insertion of the pry picks.
2. A hair dryer (750W) on low speed, high heat, works a charm and is much faster and easier than the iOpener.
3. There's an additional wiring ribbon cutting across the battery from top middle to left-middle. It can be easily disconnected, but it isn't shown on the pictures, nor mentioned in the instructions.
4. When you've reconnected the screen wiring ribbon, it says "Don't touch the screen as it needs to calibrate." Mine did nothing. It just turned on and presented the login screen. I used my fingerprint and the device worked. So I powered off and proceeded to affix the screen to the adhesives.
5. Once everything was assembled, I powered on and the finger print reader stopped working (was undetectable). There is a solution to this, but it really should be in this Guide.
@5. And what is the solution to the finger print reader not working? Could you please just link to it?
Update, it's mentioned in the respective comment: https://de.ifixit.com/Anleitung/Google+P...
quak -
Please, how can I turn it off when screen is broken?
Thubbe -